Kinetis KW40Z/30Z/20Z MCU向けFRDM開発プラットフォームのスタート・ガイド
このドキュメントの内容
-
接続
-
ソフトウェアの入手
-
ビルドと実行
-
作成
サインイン 進行状況を保存するには アカウントをお持ちでない方 アカウントを作成する。
お客様の FRDM-KW40Z | KW40Z/30Z/20Z | Wireless
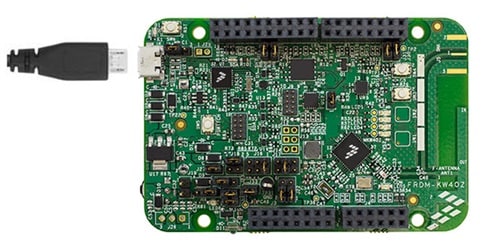
1. 接続
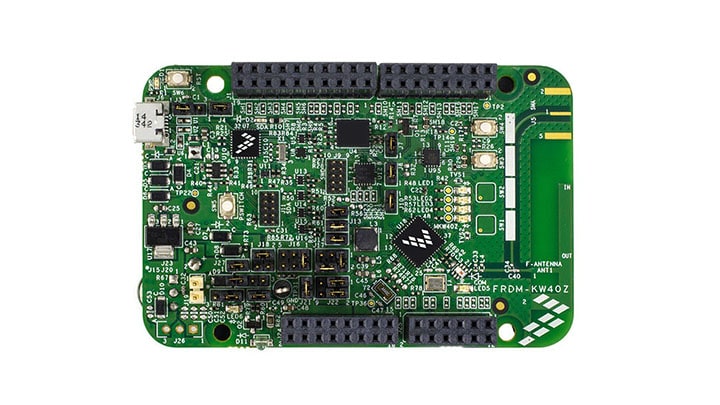
実際にFRDM-KW40Zを使ってみましょう。
1.1 FRDM-KW40Z開発ボードのスタート・ガイド
2. ソフトウェアの入手
このステップでは、コネクティビティ・ソリューションのビルドと実行に必要なソフトウェアとツールのダウンロードについて説明します。
2.1 FRDM-KW40Z用ソフトウェアをインストールする
2.2 KW40Zコネクティビティ・ソフトウェアをダウンロードする
KW40Zコネクティビティ・ソフトウェア・パッケージは、Kinetisソフトウェア開発キット (SDK) v1.3と、IEEE 802.15.4/Bluetooth Low Energy対応ソリューションの開発に必要なすべてのワイヤレス・コネクティビティ・スタックを統合しています。
下のボタンをクリックして、KW40Zコネクティビティ・ソフトウェアをダウンロードしてください。
KW40Zコネクティビティ・ソフトウェアをダウンロード2.3 ツールチェーンをインストールする
IAR Embedded Workbench for Arm (EWARM) Ver. 7.40.2以降は、NXP®コネクティビティ・スタックを利用してソフトウェア・アプリケーションを導入するための開発ツール・チェーンです。NXPでは、スムーズに開発を開始できるよう、EWARMワークスペース・プロジェクトのサンプルを用意しています。

IAR Embedded Workbench for Armをダウンロード
別のツールチェーンを使用したい場合は?
現時点でサポートされているツールチェーンはIAR Embedded Workbench for Armに限られますが、コネクティビティ・スタック向けのNXP KDSの開発を進めています。
2.4 PCを設定する
サンプル・アプリケーションの多くは、マイクロコントローラのUARTを介してデータを出力します。ボードの仮想COMポート用ドライバがインストールされているか必ず確認してください。ドライバのインストーラを実行する前に、ボードをPCに接続しておく必要があります。
ドライバのダウンロード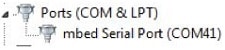
シリアル・ポート・ドライバをインストールした状態で、お好きなターミナル・アプリケーションを実行し、マイクロコントローラのUARTからのシリアル出力を確認します。ターミナルをボーレート115,200、8データ・ビット、パリティなし、1ストップ・ビットに設定します。FRDM-KW40Zの仮想COMポートのポート番号を決定するには、デバイス・マネージャを開き、「Ports(ポート)」グループを確認します。
ターミナル・アプリケーションの使用方法について不明な点がある場合は、Tera TermチュートリアルまたはPuTTYチュートリアルのいずれかのチュートリアルをお試しください。
3. ビルドと実行
3.1 コネクティビティ・スタックを選択する
NXPの各ワイヤレス・コネクティビティ・スタックには、すぐにコンパイルして実行できるデモ・アプリケーションやドライバ・サンプルが付属しています。
デモを実行するコネクティビティ・スタックを選択する
SMAC
FRDM-KW40Z用ワイヤレス・コネクティビティ・サンプル・デモのビルドと実行
コネクティビティ・サンプル・コードを確認する
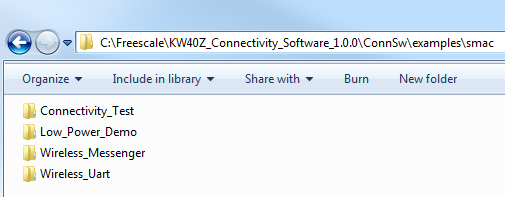
examples\smacフォルダに移動して、アプリケーション・デモを確認します。
ボードに付属するプログラム済みのコネクティビティ・テスト・アプリケーションを実行したい場合は、次のセクションに進んでください。
コネクティビティ・テスト・アプリケーション
コネクティビティ・テスト・アプリケーションは、SMACベースのデモ・アプリケーションで、基本的な送受信機能のテストのほか、ASP/SMAC APIをベースとするいくつかの高度なテストを実行できます。
設定
ランタイム設定は、ショートカット・キーを使用して実行します。このショートカット・キーは、ほとんどのアプリケーションのメニューで利用できます。適用した設定に応じてメニューやテストの内容が変化します。
コネクティビティ・テストのショートカット・メニュー: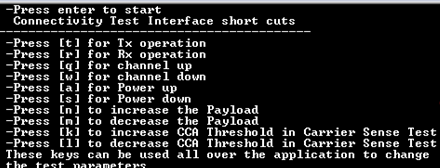
- 「t」 - PERテストおよび範囲テストでのトランスミッタの設定メニューを表示します
- 「r」 - PERテストおよび範囲テストでのレシーバの設定メニューを表示します
- 「q」 - チャネル番号をインクリメントします(11~26)
- 「w」 - チャネル番号をデクリメントします(11~26)
- 「a」 - 出力値をインクリメントします
- 「s」 - 出力値をデクリメントします
- 「n」 - PER TXと伝送制御で使用されるペイロード長をインクリメントします
- 「m」 - PER TXと伝送制御で使用されるペイロード長をデクリメントします
- 「k」 - キャリア・センス・テストのCCAしきい値をインクリメントします
- 「l」 - キャリア・センス・テストのCCAしきい値をデクリメントします
アプリケーションの使用
コネクティビティ・テスト・アプリケーションは、次の4つの主要機能を備えています。
- 連続テスト:トランシーバのRF性能について、トランスミッタとレシーバの基本機能をテストします。テスト・モード・アプリケーションは、以下に示すさまざまなテスト・モードを備えています。
- パケット・エラー・レート:メニュー内容はショートカット・キーが「r」の場合と「t」の場合で異なります。このテストを実行するには2つのボードが必要です。1つはRXに、もう1つはTXに設定される必要があります
- 範囲テスト:メニュー内容はショートカット・キーが「r」の場合と「t」の場合で異なります。このテストを実行するには2つのボードが必要です。テストが開始すると、ユーザーによって停止されるまで継続し、実行中は受信した各パケットのリンク品質が表示されます
- キャリア・センスおよび伝送制御: このメニューでは、以下の2つのテストを選択することができます。
- キャリア・センス・テスト:ED値がCCAしきい値を上回るまでEDを連続的に実行し、上回ると、「n」や「m」のショートカットで設定したペイロード長の擬似ランダム・データを格納したパケットを送信します
- 伝送制御テスト:PER TXテストと同じように、パケット数を選択するメニューが表示され、パケット間遅延時間を入力するように求められます。続いて、指定したパケット間遅延に従って、選択した数のパケットが送信されます。その際、「n」や「m」のショートカットで設定したペイロード長の擬似ランダム・データが使用されます
コネクティビティ・テスト・アプリケーションの実行方法の詳細については、SMACデモ・アプリケーション・ユーザー・ガイドを参照してください。
ワイヤレス・コネクティビティ・サンプルのビルド、実行、デバッグ
NXPのワイヤレス・コネクティビティ・スタックを使用してサンプル・アプリケーションのビルド、実行、デバッグを行う方法については、下記のガイドをご覧ください。
SMACクイック・スタート・ガイド
ここでは以下の手順について説明します。
-
アプリケーション・デモに必要なプラットフォーム・ライブラリのビルド
-
デモ・アプリケーションのビルド
-
デモ・アプリケーションのダウンロードと実行
ここではSMACコネクティビティ・テスト・デモ・サンプルを使用していますが、いずれのワイヤレス・コネクティビティ・デモ・アプリケーションにも同様の手順が当てはまります。
プラットフォーム・ライブラリをビルドする
-
Connectivity_Test.ewwIARワークスペースを開きます\KW40Z_Connectivity_Software_ \ConnSw\examples\smac\connectivity_Test\frdmkw40z\FreeRTOS\build\iar\Connectivity_Test.eww 
-
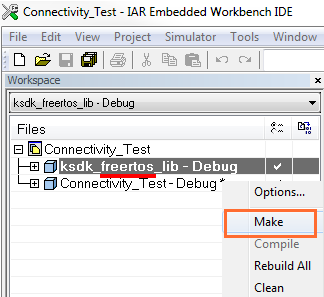
ワークスペースには、KSDKプラットフォーム・ライブラリ用のプロジェクトとデモ・アプリケーション用のプロジェクトが表示されます。SDKプロジェクトを右クリックして、[Make(作成)]をクリックすると、必要なKSDKライブラリをすべてビルドできます
デモ・アプリケーションをビルドする
-
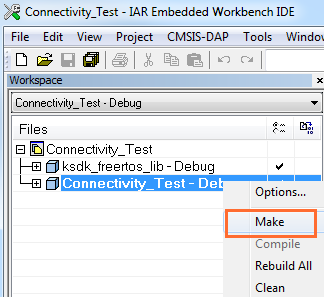
「Connectivity_Test - Debug」プロジェクトを選択してビルドします
アプリケーション・デモをダウンロードして実行する
-
PCにFRDM-KW40Zボードを接続します
-
「Connectivity_Test - Debug」プロジェクトを右クリックして[Set as Active(アクティブとして設定)]を選択します
-
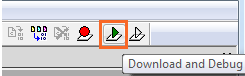
[Download and Debug(ダウンロードとデバッグ)]アイコンをクリックしてボードに書き込みます

-
ターミナル・エミュレータ・プログラムを開き、FRDM-KW40Z COMポートのセッションを開きます。次の設定値を用いてターミナルを設定します。
- ボーレート115,200
- パリティなし
- 8データ・ビット
- 1ストップ・ビット
-
[Go(実行)]ボタンをクリックします

-
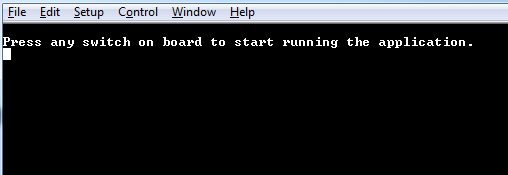
シリアル・ターミナルに以下の出力が表示されます
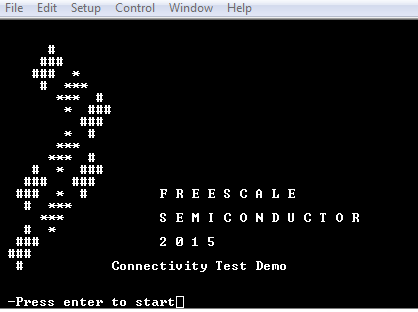
表示されない場合は、ターミナルの設定と接続を確認してください
-
次に、最初のボードを取り外し、もう1つのFRDM-KW40Zを接続します
-
上記と同じ手順を使用して、同じコネクティビティ・テスト・ファームウェアで2つ目のFRDM-KW40Zをプログラムします
-
開いているターミナル・ウィンドウをすべて閉じてから、両方のボードの電源を入れ直し、両方のボードをコンピュータに接続して、各ボードのターミナル・ウィンドウを開きます
-
各ボードのリセット・ボタンを押すと、[Connectivity Test(コネクティビティ・テスト)]オプションが表示されます
-
デモ・アプリケーションの実行方法については、
\KW40Z_Connectivity_Software_ \ConnSw\doc\MKW40ZSMACDAUG.pdf
IEEE 802.15.4
FRDM-KW40Z用ワイヤレス・コネクティビティ・サンプル・デモのビルドと実行
コネクティビティ・サンプル・コードを確認する
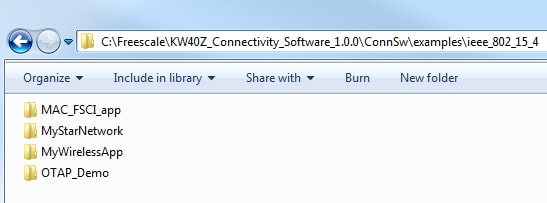
examples\ieee_802_15_4フォルダに移動して、アプリケーション・デモを確認します。
ボードに付属するプログラム済みのコネクティビティ・テスト・アプリケーションを実行したい場合は、次のセクションに進んでください。
コネクティビティ・テスト・アプリケーション
コネクティビティ・テスト・アプリケーションは、SMACベースのデモ・アプリケーションで、基本的な送受信機能のテストのほか、ASP/SMAC APIをベースとするいくつかの高度なテストを実行できます。
設定
ランタイム設定は、ショートカット・キーを使用して実行します。このショートカット・キーは、ほとんどのアプリケーションのメニューで利用できます。適用した設定に応じてメニューやテストの内容が変化します。
コネクティビティ・テストのショートカット・メニュー:
- 「t」 - PERテストおよび範囲テストでのトランスミッタの設定メニューを表示します
- 「r」 - PERテストおよび範囲テストでのレシーバの設定メニューを表示します
- 「q」 - チャネル番号をインクリメントします(11~26)
- 「w」 - チャネル番号をデクリメントします(11~26)
- 「a」 - 出力値をインクリメントします
- 「s」 - 出力値をデクリメントします
- 「n」 - PER TXと伝送制御で使用されるペイロード長をインクリメントします
- 「m」 - PER TXと伝送制御で使用されるペイロード長をデクリメントします
- 「k」 - キャリア・センス・テストのCCAしきい値をインクリメントします
- 「l」 - キャリア・センス・テストのCCAしきい値をデクリメントします
アプリケーションの使用
コネクティビティ・テスト・アプリケーションは、次の4つの主要機能を備えています。
- 連続テスト:トランシーバのRF性能について、トランスミッタとレシーバの基本機能をテストします。テスト・モード・アプリケーションは、以下に示すさまざまなテスト・モードを備えています。
- パケット・エラー・レート:メニュー内容はショートカット・キーが「r」の場合と「t」の場合で異なります。このテストを実行するには2つのボードが必要です。1つはRXに、もう1つはTXに設定される必要があります
- 範囲テスト:メニュー内容はショートカット・キーが「r」の場合と「t」の場合で異なります。このテストを実行するには2つのボードが必要です。テストが開始すると、ユーザーによって停止されるまで継続し、実行中は受信した各パケットのリンク品質が表示されます
- キャリア・センスおよび伝送制御: このメニューでは、以下の2つのテストを選択することができます。
- キャリア・センス・テスト:ED値がCCAしきい値を上回るまでEDを連続的に実行し、上回ると、「n」や「m」のショートカットで設定したペイロード長の擬似ランダム・データを格納したパケットを送信します
- 伝送制御テスト:PER TXテストと同じように、パケット数を選択するメニューが表示され、パケット間遅延時間を入力するように求められます。続いて、指定したパケット間遅延に従って、選択した数のパケットが送信されます。その際、「n」や「m」のショートカットで設定したペイロード長の擬似ランダム・データが使用されます
コネクティビティ・テスト・アプリケーションの実行方法の詳細については、SMACデモ・アプリケーション・ユーザー・ガイドを参照してください。
ワイヤレス・コネクティビティ・サンプルのビルド、実行、デバッグ
NXPのワイヤレス・コネクティビティ・スタックを使用してサンプル・アプリケーションのビルド、実行、デバッグを行う方法については、下記のガイドをご覧ください。
IEEE 802.15.4
ここでは以下の手順について説明します。
-
アプリケーション・デモに必要なプラットフォーム・ライブラリのビルド
-
デモ・アプリケーションのビルド
-
デモ・アプリケーションのダウンロードと実行
ここでは 「MyWirelessApp」アプリケーション・デモ・サンプル (Coordinator) を使用していますが、いずれのワイヤレス・コネクティビティ・デモ・アプリケーションにも同様の手順が当てはまります。
プラットフォーム・ライブラリのビルド
-
MyWirelessAppCoordinator.ewwIARワークスペースを開きます\KW40Z_Connectivity_Software_ \ConnSw\examples\ieee_802_15_4\MyWirelessApp\Coordinator\frdmkw40z\FreeRTOS\build\iar\MyWirelessAppCoordinator.eww 
-
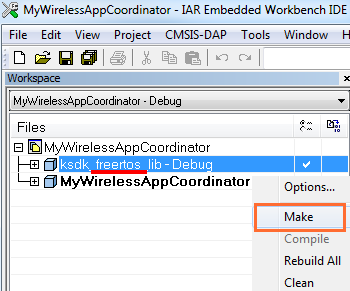
ワークスペースには、KSDKプラットフォーム・ライブラリ用のプロジェクトとデモ・アプリケーション用のプロジェクトが表示されます。SDKプロジェクトを右クリックして、[Make(作成)]をクリックすると、必要なKSDKライブラリをすべてビルドできます
デモ・アプリケーションをビルドする
-
「MyWirelessAppCoordinator - Debug」プロジェクトを選択してビルドします

アプリケーション・デモのダウンロードと実行
-
PCにFRDM-KW40Zボードを接続します
-
「MyWirelessAppCoordinator - Debug」プロジェクトを右クリックして[Set as Active(アクティブとして設定)]を選択します
-
[Download and Debug(ダウンロードとデバッグ)]アイコンをクリックしてボードに書き込みます

-
ターミナル・エミュレータ・プログラムを開き、FRDM-KW40Z COMポートのセッションを開きます。次の設定値を用いてターミナルを設定します。
- ボーレート115,200
- パリティなし
- 8データ・ビット
- 1ストップ・ビット
-
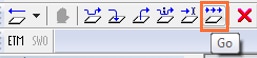
[Go(実行)]ボタンをクリックします
-
シリアル・ターミナルに以下の出力が表示されます
表示されない場合は、ターミナルの設定と接続を確認してください
-
次に、最初のボードを取り外し、もう1つのFRDM-KW40Zを接続します
-
上記と同じ手順を使用して、
にある「MyWirelessApp」エンド・デバイス・デモ・アプリケーションで2つ目のFRDM-KW40Zをプログラムします\KW40Z_Connectivity_Software_ \ConnSw\examples\ieee_802_15_4\MyWirelessApp\EndDevice\frdmkw40z\FreeRTOS\build\iar\MyWirelessAppEndDevice.eww -
開いているターミナル・ウィンドウをすべて閉じてから、両方のボードの電源を入れ直し、両方のボードをコンピュータに接続して、各ボードのターミナル・ウィンドウを開きます
-
コーディネータ・ボードの
SW3またはSW4を押してから、エンド・デバイス・アプリケーションでプログラムしたボードのSW3またはSW4を押し、接続されるのを待ちます -
接続されたら、いずれかのボードのターミナルにテキストを入力すると、もう一方のボードに出力されます
-
デモ・アプリケーションの実行方法については、
\KW40Z_Connectivity_Software_ \ConnSw\doc\802154MPDAUG.pdf
Bluetooth Low Energy
FRDM-KW40Z用ワイヤレス・コネクティビティ・サンプル・デモのビルドと実行
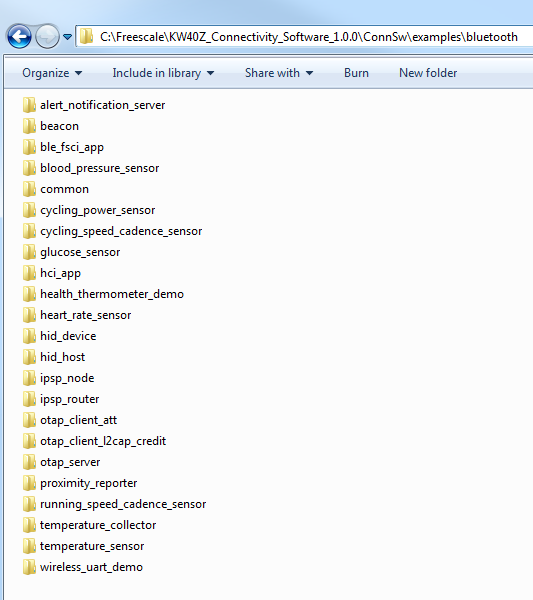
コネクティビティ・サンプル・コードを確認する
examples\bluetoothフォルダに移動して、アプリケーション・デモを確認します。
ボードに付属するプログラム済みのコネクティビティ・テスト・アプリケーションを実行したい場合は、次のセクションに進んでください。
コネクティビティ・テスト・アプリケーション
コネクティビティ・テスト・アプリケーションは、SMACベースのデモ・アプリケーションで、基本的な送受信機能のテストのほか、ASP/SMAC APIをベースとするいくつかの高度なテストを実行できます。
設定
ランタイム設定は、ショートカット・キーを使用して実行します。このショートカット・キーは、ほとんどのアプリケーションのメニューで利用できます。適用した設定に応じてメニューやテストの内容が変化します。
コネクティビティ・テストのショートカット・メニュー:
- 「t」 - PERテストおよび範囲テストでのトランスミッタの設定メニューを表示します
- 「r」 - PERテストおよび範囲テストでのレシーバの設定メニューを表示します
- 「q」 - チャネル番号をインクリメントします(11~26)
- 「w」 - チャネル番号をデクリメントします(11~26)
- 「a」 - 出力値をインクリメントします
- 「s」 - 出力値をデクリメントします
- 「n」 - PER TXと伝送制御で使用されるペイロード長をインクリメントします
- 「m」 - PER TXと伝送制御で使用されるペイロード長をデクリメントします
- 「k」 - キャリア・センス・テストのCCAしきい値をインクリメントします
- 「l」 - キャリア・センス・テストのCCAしきい値をデクリメントします
アプリケーションの使用
コネクティビティ・テスト・アプリケーションは、次の4つの主要機能を備えています。
- 連続テスト:トランシーバのRF性能について、トランスミッタとレシーバの基本機能をテストします。テスト・モード・アプリケーションは、以下に示すさまざまなテスト・モードを備えています。
- パケット・エラー・レート:メニュー内容はショートカット・キーが「r」の場合と「t」の場合で異なります。このテストを実行するには2つのボードが必要です。1つはRXに、もう1つはTXに設定される必要があります
- 範囲テスト:メニュー内容はショートカット・キーが「r」の場合と「t」の場合で異なります。このテストを実行するには2つのボードが必要です。テストが開始すると、ユーザーによって停止されるまで継続し、実行中は受信した各パケットのリンク品質が表示されます
- キャリア・センスおよび伝送制御: このメニューでは、以下の2つのテストを選択することができます。
- キャリア・センス・テスト:ED値がCCAしきい値を上回るまでEDを連続的に実行し、上回ると、「n」や「m」のショートカットで設定したペイロード長の擬似ランダム・データを格納したパケットを送信します
- 伝送制御テスト:PER TXテストと同じように、パケット数を選択するメニューが表示され、パケット間遅延時間を入力するように求められます。続いて、指定したパケット間遅延に従って、選択した数のパケットが送信されます。その際、「n」や「m」のショートカットで設定したペイロード長の擬似ランダム・データが使用されます
コネクティビティ・テスト・アプリケーションの実行方法の詳細については、SMACデモ・アプリケーション・ユーザー・ガイドを参照してください。
ワイヤレス・コネクティビティ・サンプルのビルド、実行、デバッグ
NXPのワイヤレス・コネクティビティ・スタックを使用してサンプル・アプリケーションのビルド、実行、デバッグを行う方法については、下記のガイドをご覧ください。
Bluetooth Low Energy (BLE)
ここでは以下の手順について説明します。
-
アプリケーション・デモに必要なプラットフォーム・ライブラリのビルド
-
デモ・アプリケーションのビルド
-
デモ・アプリケーションのダウンロードと実行
ここでは、心拍センサ・デモ・サンプルを使用していますが、いずれのワイヤレス・コネクティビティ・デモ・アプリケーションにも同様の手順が当てはまります。
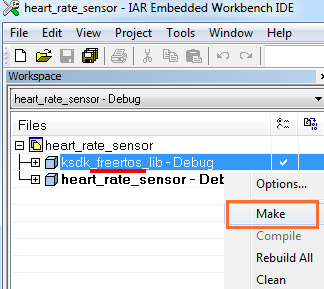
プラットフォーム・ライブラリのビルド
-
heart_rate_sensor.ewwIARワークスペースを開きます\KW40Z_Connectivity_Software_ \bluetooth\heart_rate_sensor\frdmkw40z\FreeRTOS\build\iar\heart_rate_sensor.eww 
-
ワークスペースには、KSDKプラットフォーム・ライブラリ用のプロジェクトとデモ・アプリケーション用のプロジェクトが表示されます。SDKプロジェクトを右クリックして、[Make(作成)]をクリックすると、必要なKSDKライブラリをすべてビルドできます
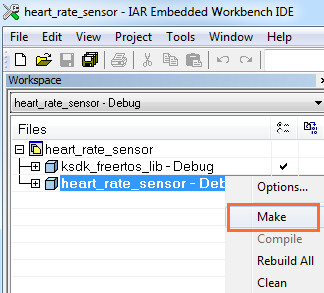
デモ・アプリケーションをビルドする
-
「heart_rate_sensor - Debug」プロジェクトを選択してビルドします
アプリケーション・デモのダウンロードと実行
-
PCにFRDM-KW40Zボードを接続します
-
「heart_rate_sensor - Debug」プロジェクトを右クリックして[Set as Active(アクティブとして設定)]を選択します
-
[Download and Debug(ダウンロードとデバッグ)]アイコンをクリックしてボードに書き込みます
-
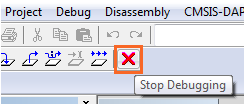
[Stop Debugging(デバッグを停止)]ボタンをクリックします
-
USBケーブルをPCから取り外し、再度接続します
-
FRDM-KW40Zにファームウェアがプログラムされている状態で、手順に従ってKinetis BLEツールボックスのスマートフォン・アプリをインストールし、デモを実行します。また、デモ・アプリケーションの実行方法については、
\KW40Z_Connectivity_Software_ \ConnSw\doc\BLEDAUG.pdf
Bluetooth Low Energyコネクティビティ・デモを実行する
Kinetis BLEツールボックスには、BLEセントラル・デバイスとして機能するモバイル・アプリが付属しています。Kinetis BLEツールボックスを使用すると、KW40Zコネクティビティ・ソフトウェアが提供するさまざまなセンサ・アプリケーションのデモを実行することができます。
Kinetis BLEツールボックスをインストールしたら、次の手順に従い、Kinetis BLEツールボックス・アプリとワイヤレス・コネクティビティ・ファームウェアの設定/実行方法を確認します。
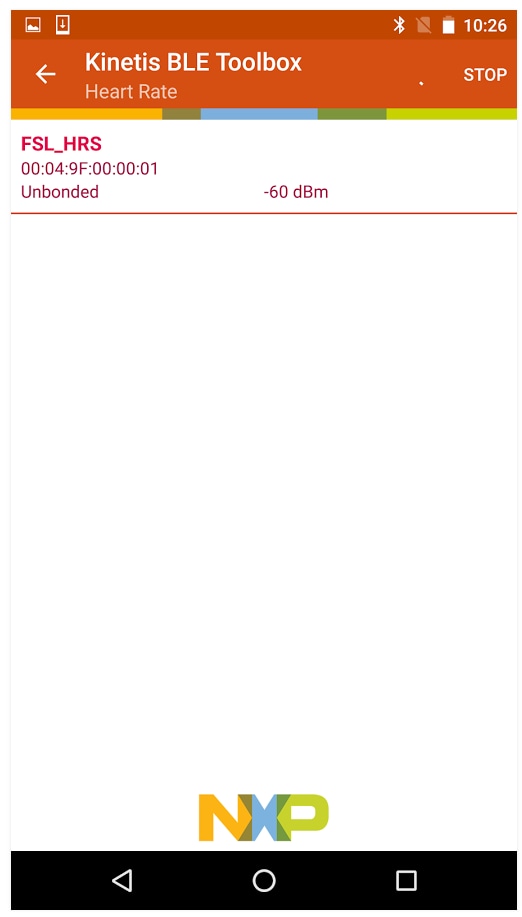
- スマートフォンのBluetooth無線がオンになっていることを確認し、スマートフォンでKinetis BLEツールボックス・アプリを開きます
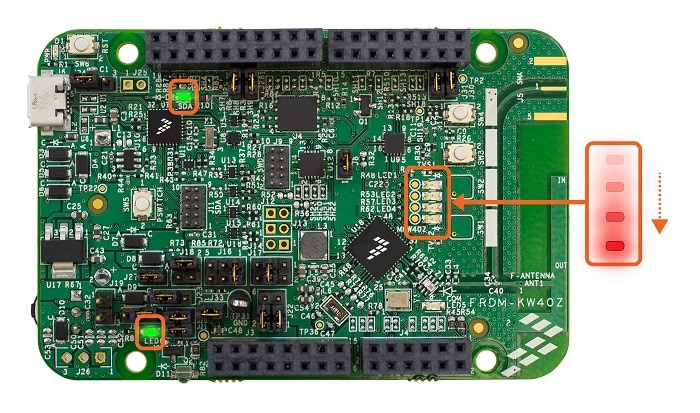
- FRDM-KW40Zの
SW4ボタンを押します。これにより、ボードはAdvertising/Discoverableモードになり、この状態を表すためにLED1が点灯します - スマートフォンのKinetis BLEツールボックス・アプリ内で、FRDM-KW40Zが「FSL_BLE_HRS」として検出されます
- Kinetis BLEツールボックス・アプリ内で、[NXP Heart Rate Sensor(NXP心拍センサ)]ボタンを選択して、FRDM-K40Zに接続します
- Kinetis BLEツールボックス心拍アプリが、FRDM-KW40Zで実行されている心拍センサ・ファームウェアから受信したデータを表示します


ハイブリッド (IEEE 802.15.4 + BLE)
FRDM-KW40Z用ワイヤレス・コネクティビティ・サンプル・デモのビルドと実行
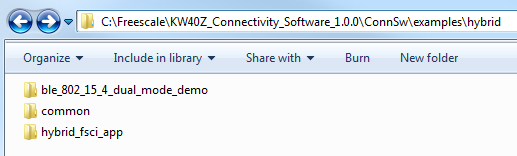
コネクティビティ・サンプル・コードを確認する
examples\hybridフォルダに移動して、アプリケーション・デモを確認します。
ボードに付属するプログラム済みのコネクティビティ・テスト・アプリケーションを実行したい場合は、次のセクションに進んでください。
コネクティビティ・テスト・アプリケーション
コネクティビティ・テスト・アプリケーションは、SMACベースのデモ・アプリケーションで、基本的な送受信機能のテストのほか、ASP/SMAC APIをベースとするいくつかの高度なテストを実行できます。
設定
ランタイム設定は、ショートカット・キーを使用して実行します。このショートカット・キーは、ほとんどのアプリケーションのメニューで利用できます。適用した設定に応じてメニューやテストの内容が変化します
コネクティビティ・テストのショートカット・メニュー:
- 「t」 - PERテストおよび範囲テストでのトランスミッタの設定メニューを表示します
- 「r」 - PERテストおよび範囲テストでのレシーバの設定メニューを表示します
- 「q」 - チャネル番号をインクリメントします(11~26)
- 「w」 - チャネル番号をデクリメントします(11~26)
- 「a」 - 出力値をインクリメントします
- 「s」 - 出力値をデクリメントします
- 「n」 - PER TXと伝送制御で使用されるペイロード長をインクリメントします
- 「m」 - PER TXと伝送制御で使用されるペイロード長をデクリメントします
- 「k」 - キャリア・センス・テストのCCAしきい値をインクリメントします
- 「l」 - キャリア・センス・テストのCCAしきい値をデクリメントします
アプリケーションの使用
コネクティビティ・テスト・アプリケーションは、次の4つの主要機能を備えています。
- 連続テスト:トランシーバのRF性能について、トランスミッタとレシーバの基本機能をテストします。テスト・モード・アプリケーションは、以下に示すさまざまなテスト・モードを備えています。
- パケット・エラー・レート:メニュー内容はショートカット・キーが「r」の場合と「t」の場合で異なります。このテストを実行するには2つのボードが必要です。1つはRXに、もう1つはTXに設定される必要があります
- 範囲テスト:メニュー内容はショートカット・キーが「r」の場合と「t」の場合で異なります。このテストを実行するには2つのボードが必要です。テストが開始すると、ユーザーによって停止されるまで継続し、実行中は受信した各パケットのリンク品質が表示されます
- キャリア・センスおよび伝送制御: このメニューでは、以下の2つのテストを選択することができます。
- キャリア・センス・テスト:ED値がCCAしきい値を上回るまでEDを連続的に実行し、上回ると、「n」や「m」のショートカットで設定したペイロード長の擬似ランダム・データを格納したパケットを送信します
- 伝送制御テスト:PER TXテストと同じように、パケット数を選択するメニューが表示され、パケット間遅延時間を入力するように求められます。続いて、指定したパケット間遅延に従って、選択した数のパケットが送信されます。その際、「n」や「m」のショートカットで設定したペイロード長の擬似ランダム・データが使用されます
コネクティビティ・テスト・アプリケーションの実行方法の詳細については、SMACデモ・アプリケーション・ユーザー・ガイドを参照してください。
ワイヤレス・コネクティビティ・サンプルのビルド、実行、デバッグ
NXPのワイヤレス・コネクティビティ・スタックを使用してサンプル・アプリケーションのビルド、実行、デバッグを行う方法については、下記のガイドをご覧ください。
ハイブリッド (IEEE 802.15.4 + BLE)
ここでは以下の手順について説明します。
-
アプリケーション・デモに必要なプラットフォーム・ライブラリのビルド
-
デモ・アプリケーションのビルド
-
デモ・アプリケーションのダウンロードと実行
ここでは、「dual_mode_demo」サンプルを使用していますが、いずれのワイヤレス・コネクティビティ・デモ・アプリケーションにも同様の手順が当てはまります。
プラットフォーム・ライブラリのビルド
-
dual_mode_demo.ewwIARワークスペースを開きます\KW40Z_Connectivity_Software_ \ConnSw\examples\hybrid\ble_802_15_4_dual_mode_demo\frdmkw40z\bare_metal\build\iar\dual_mode_demo.eww 
-
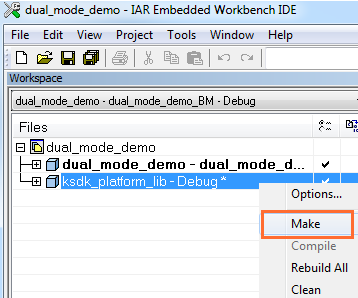
ワークスペースには、KSDKプラットフォーム・ライブラリ用のプロジェクトとデモ・アプリケーション用のプロジェクトが表示されます。SDKプロジェクトを右クリックして、[Make(作成)]をクリックすると、必要なKSDKライブラリをすべてビルドできます
デモ・アプリケーションをビルドする
-
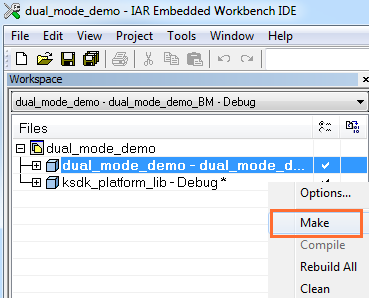
「dual_mode_demo - dual_mode_debug_BM - Debug」プロジェクトを選択してビルドします
アプリケーション・デモのダウンロードと実行
-
PCにFRDM-KW40Zボードを接続します
-
「dual_mode_demo - dual_mode_debug_BM - Debug」プロジェクトを右クリックして[Set as Active(アクティブとして設定)]を選択します
-
[Download and Debug(ダウンロードとデバッグ)]アイコンをクリックしてボードに書き込みます

-
ターミナル・エミュレータ・プログラムを開き、FRDM-KW40Z COMポートのセッションを開きます。次の設定値を用いてターミナルを設定します。
- ボーレート115,200
- パリティなし
- 8データ・ビット
- 1ストップ・ビット
-
[Go(実行)]ボタンをクリックします

-
シリアル・ターミナルに以下の出力が表示されます
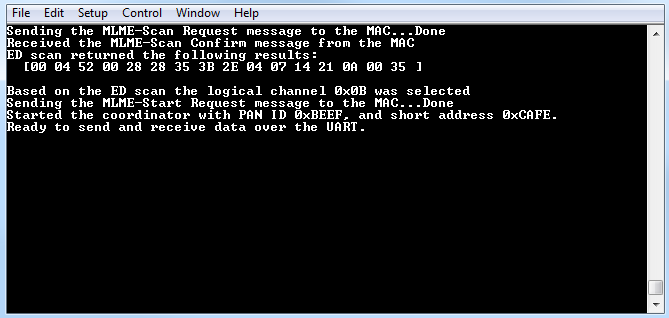
表示されない場合は、ターミナルの設定と接続を確認してください
-
次に、最初のボードを取り外し、もう1つのFRDM-KW40Zを接続します
-
上記と同じ手順を使用して、
にある「MyWirelessApp」エンド・デバイス・デモ・アプリケーションで2つ目のFRDM-KW40Zをプログラムします\KW40Z_Connectivity_Software_ \ConnSw\examples\ieee_802_15_4\MyWirelessApp\EndDevice\frdmkw40z\FreeRTOS\build\iar\MyWirelessAppEndDevice.eww -
開いているターミナル・ウィンドウをすべて閉じてから、両方のボードの電源を入れ直し、両方のボードをコンピュータに接続して、各ボードのターミナル・ウィンドウを開きます
-
ハイブリッド・ボードの
SW3またはSW4を押してから、エンド・デバイス・アプリケーションでプログラムしたボードのSW3またはSW4を押し、接続されるのを待ちます -
接続されたら、いずれかのボードのターミナルにテキストを入力すると、もう一方のボードに出力されます
-
FRDM-KW40Zにファームウェアがプログラムされている状態で、手順に従ってKinetis BLEツールボックスのスマートフォン・アプリをインストールし、BLEデモを実行します。また、デモ・アプリケーションの実行方法については、
\KW40Z_Connectivity_Software_ \ConnSw\doc\BLEDAUG.pdf
Bluetooth Low Energyコネクティビティ・デモを実行する
Kinetis BLEツールボックスには、BLEセントラル・デバイスとして機能するモバイル・アプリが付属しています。Kinetis BLEツールボックスを使用すると、KW40Zコネクティビティ・ソフトウェアが提供するさまざまなセンサ・アプリケーションのデモを実行することができます。
Kinetis BLEツールボックスをインストールしたら、次の手順に従い、Kinetis BLEツールボックス・アプリとワイヤレス・コネクティビティ・ファームウェアの設定/実行方法を確認します。
- スマートフォンのBluetooth無線がオンになっていることを確認し、スマートフォンでKinetis BLEツールボックス・アプリを開きます
- FRDM-KW40Zの
SW4ボタンを押します。これにより、ボードはAdvertising/Discoverableモードになり、この状態を表すためにLED1が点灯します - スマートフォンのKinetis BLEツールボックス・アプリ内で、FRDM-KW40Zが「FSL_HYBRID_HRS」として検出されます
- Kinetis BLEツールボックス・アプリ内で、[NXP Heart Rate Sensor(NXP心拍センサ)]ボタンを選択して、FRDM-K40Zに接続します
- Kinetis BLEツールボックス心拍アプリが、FRDM-KW40Zで実行されている心拍センサ・ファームウェアから受信したデータを表示します
4. 作成
NXPでは、Project Clonerと呼ばれるツールを提供しています。このツールでは、既存のデモをコピーして開発の基盤として利用することができると同時に、既存のデモ・アプリケーションのソース・コードをリファレンスとして維持することができます。
4.1 FRDM-KW40Z用アプリケーションを作成する
4.2 サンプル・デモをベースに独自のプロジェクトを作成する
サンプル・アプリケーション・プロジェクトのクローンを作成すると、コアのインストール・ソース・ファイルまたはデフォルトのプロジェクト設定を変更せずに、アプリケーション・ファームウェアをロードして開発することができます。
4.3 Project Clonerを実行する
サンプル・プロジェクトのクローンの作成:
- 次の場所にある実行形式のProject Clonerを起動します。
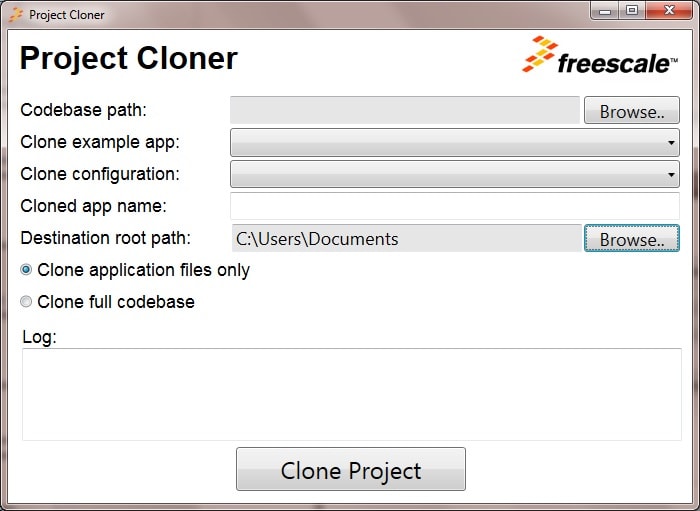
\tools\project_cloner\project_cloner.exe - Project Cloner GUIが表示されていることを確認します
- Codebase path(コードベース・パス):コネクティビティ・スタック・パス・フォルダ
- Clone example app(クローン・サンプル・アプリケーション):選択したスタックで利用可能なデモ・アプリケーション
- Clone configuration(クローン設定):利用可能な開発ボード、RTOS、ツールチェーンから選択
- Cloned app name(クローン・アプリケーション名):クローンしたプロジェクトに付ける名前
- Destination root path(クローン先ルート・パス):クローンしたプロジェクトを作成するフォルダ
- 選択:
- Clone application files only(アプリケーション・ファイルのみをクローンする):スタックのインストール時にアプリケーション、ボード、およびプラットフォームのファイルをクローンします。それ以外のファイルは、環境変数を利用してスタック・インストール・フォルダからリンクされます
- Clone full codebase(コードベースを完全にクローンする):すべてのファイル、フォルダ、ライブラリをクローンします
- クローンするサンプル・デモを選択し、オプションを入力します。
- [Clone Project(プロジェクトをクローン)]をクリックすると、クローンしたアプリケーションが作成されます。ファイルのコピー中は、ログ・ボックスにメッセージが表示されます(クローン・ファイルがすでに存在する場合は上書きされます)。
4.4 プロジェクトを開く
IAR Embedded Workbench for Armでプロジェクトを開き、3で示した手順に従います。
4.5 独自のアプリケーションの作成を開始する
クローンしたアプリケーションを修正して独自の設計を開始します。
利用可能なアプリケーションとAPIの詳細については、 ディレクトリにあるアプリケーション開発ガイドをご覧ください。802154MPADG.pdfは802.15.4開発、BLEADG.pdfはBluetooth Low Energy開発について、それぞれ解説しています。
4.6 Kinetis SDKプラットフォーム
コネクティビティ・スタックのプラットフォームには、Kinetis SDKロー・レベル・ドライバが利用されています。コネクティビティ・デモ・アプリケーションで現在使用されていないドライバを追加する場合は、Kinetis SDKリファレンス・マニュアル をご覧ください。ドライバの使用方法を紹介するサンプル・アプリケーションについては、Kinetis SDK 1.3をインストールし、Kinetis SDKデモ・アプリケーション・ユーザー・ガイド をご覧ください。
Tera Termチュートリアル
Tera Termチュートリアル
Tera Termは、広く利用されているオープンソースのターミナル・エミュレーション・アプリケーションです。このプログラムを使用して、NXP開発プラットフォームの仮想シリアル・ポートから送信された情報を表示できます。
- SourceForgeからTera Termをダウンロードします。ダウンロードしたら、インストーラを実行し、このウェブページに戻って手順を続行します
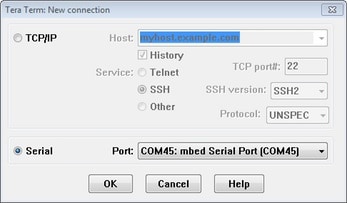
- Tera Termを起動します。初めて起動する際には、次のダイアログが表示されます。[Serial(シリアル)]オプションを選択します。ボードが接続されている場合は、COMポートが自動的にリスト内に表示されます
- 事前に確認したCOMポート番号を使用して、シリアル・ポートをボーレート115,200、8データ・ビット、パリティなし、1ストップ・ビットに設定します。この設定は[Setup(セットアップ)]>[Serial Port(シリアル・ポート)]から行うことができます
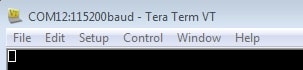
- 接続が確立されているか検証します。確立されている場合、Tera Termのタイトル・バーに次のように表示されます
- 以上で設定は完了です
PuTTYチュートリアル
PuTTYチュートリアル
PuTTYは、広く利用されているターミナル・エミュレーション・アプリケーションです。このプログラムを使用して、NXP開発プラットフォームの仮想シリアル・ポートから送信された情報を表示できます。
- 下のボタンをクリックしてPuTTYをダウンロードします。ダウンロードしたら、インストーラを実行し、このウェブページに戻って手順を続行します
- 選択したダウンロードのタイプに応じて、ダウンロードした*.exeファイルをダブルクリックするか、[Start(スタート)]メニューから選択して、PuTTYを起動します
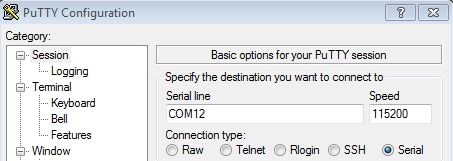
- 表示されたウィンドウで設定を行い、[Serial(シリアル)]ラジオ・ボタンを選択して、事前に確認したCOMポート番号を入力します。ボーレートもあわせて指定します。今回は115,200を入力します
- [Open(開く)]をクリックして、シリアル接続を確立します。ボードが接続されていて、正しいCOMポートが入力されていれば、ターミナル・ウィンドウが開きます。設定が正しくない場合は、アラートが表示されます
- 以上で設定は完了です
設計・リソース
チップに関するドキュメント
ソフトウェア
サポート
フォーラム
NXPのいずれかのコミュニティ・サイトで、他のエンジニアとつながり、FRDM-KW40Zを使用した設計に関する専門的なアドバイスを受けることができます。