Getting Started with i.MXRT7xx-EVK
このドキュメントの内容
-
Out of the Box
-
Get Software
-
Build, Run
-
Create
-
Developer Experience
サインイン 進行状況を保存するには アカウントをお持ちでない方 アカウントを作成する。
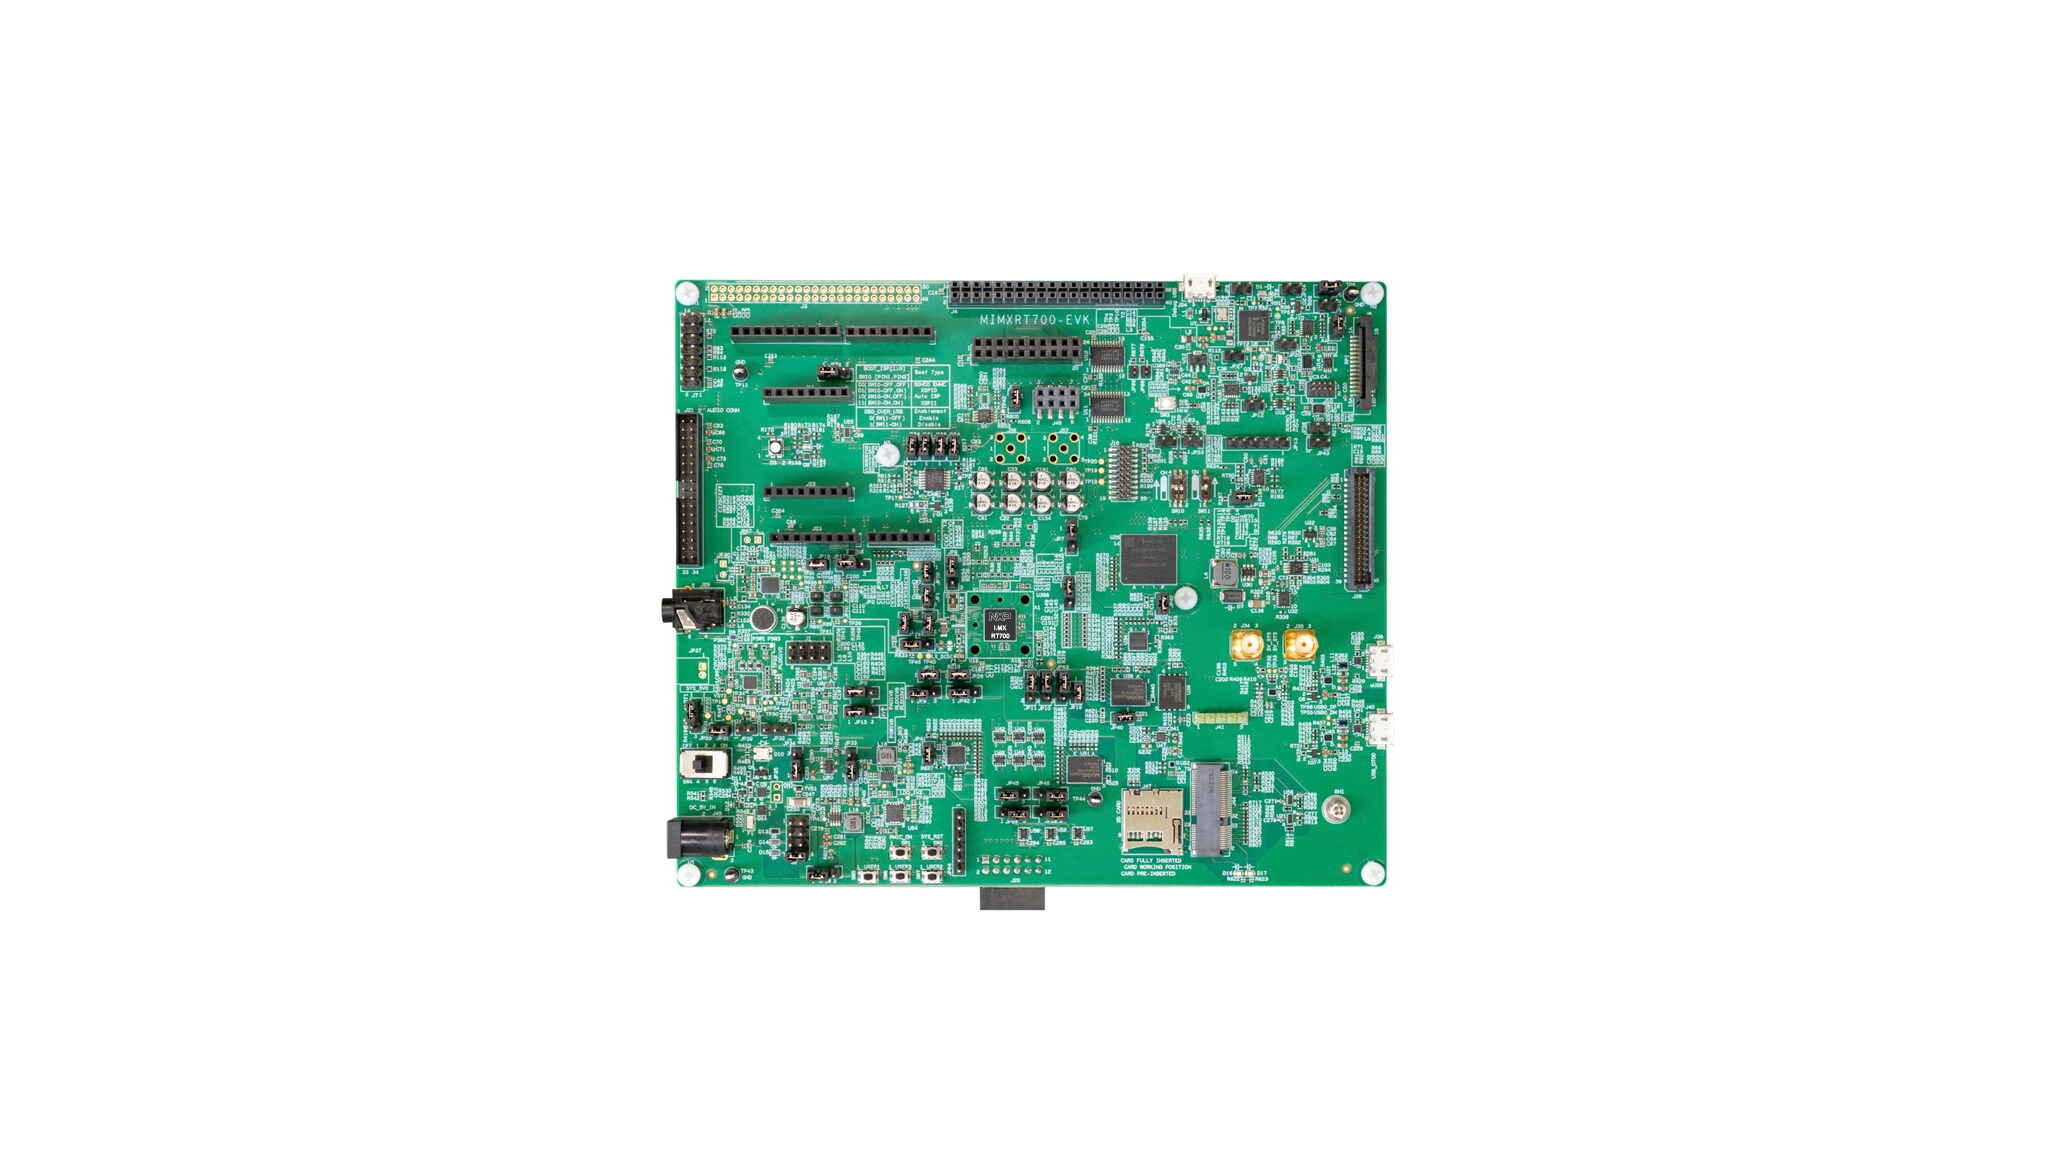
お客様の MIMXRT700-EVK
1. Out of the Box
Let's take your i.MXRT700 board for a test drive! You have the choice of watching the sequence in a short video or following the detailed actions listed below.
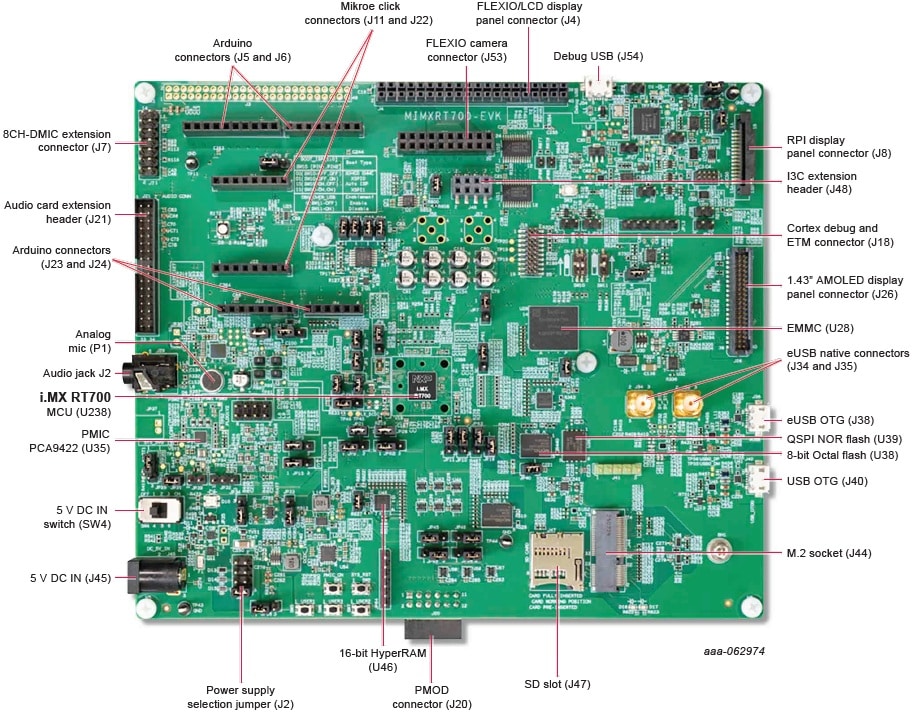
1.1 Get Familiar with the Board
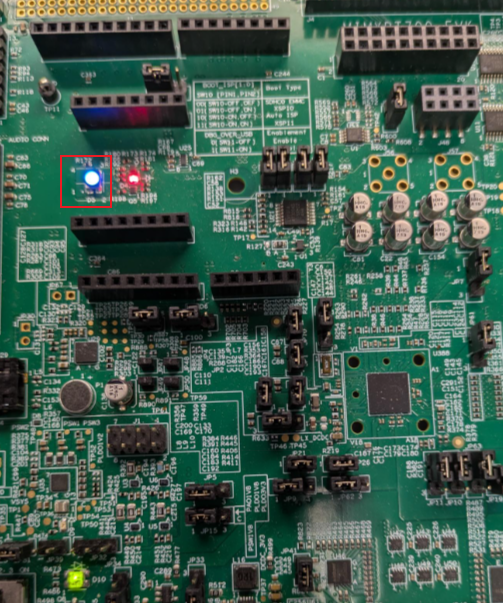
The i.MXRT700 board is pre-programmed with a LED blinky demo. This serves as a sanity check to verify that the device is working as expected out of the box.
1.2 Plug in the board
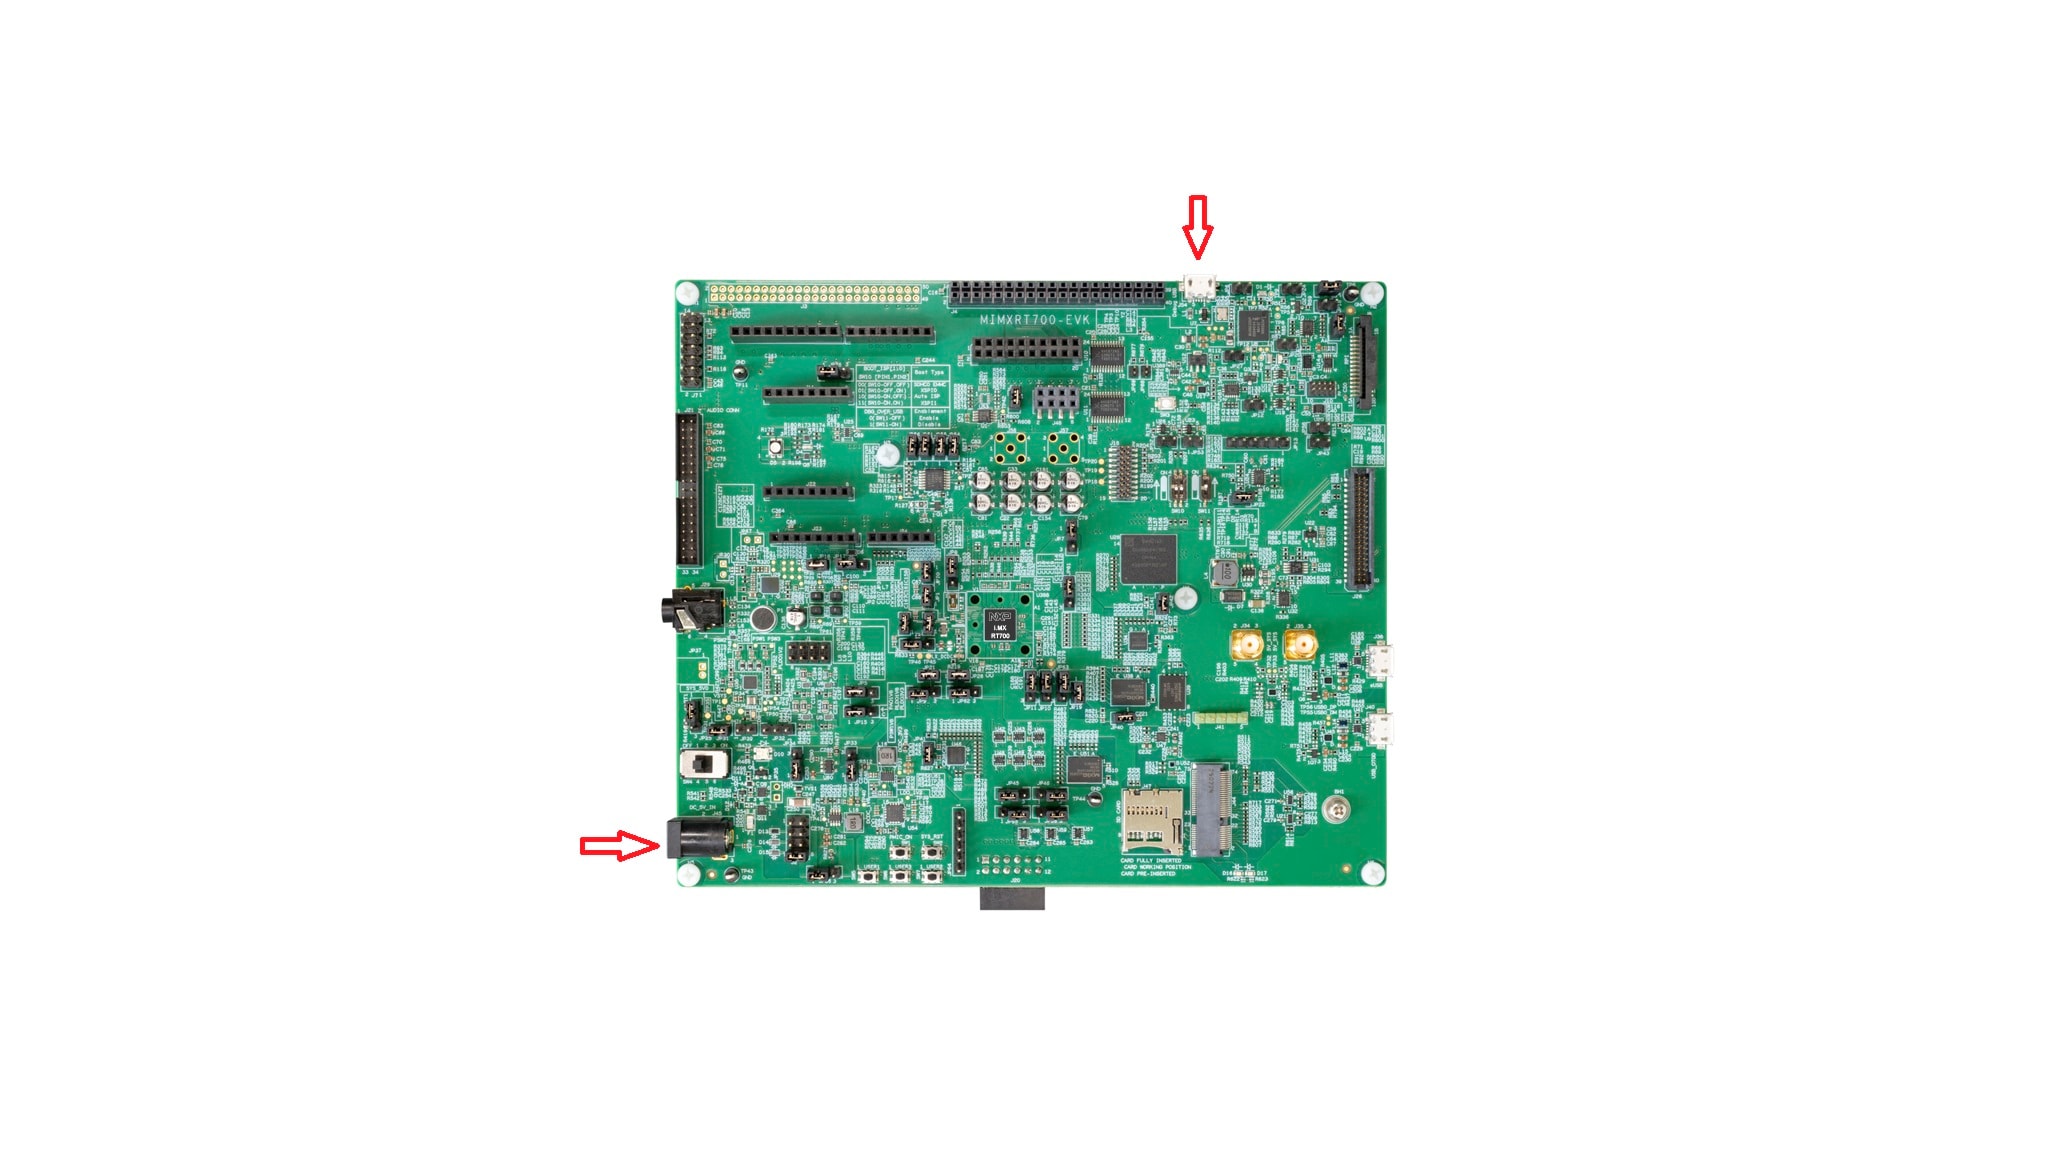
Connect a micro USB cable from connector J54 to a host computer or power supply to power up the board and run the demo program. At this point, you should see the RGB LED blinking at a steady rhythm.
2. Get Software
2.1 Install Your Toolchain
NXP offers complimentary toolchains, like the Visual Studio (VS) Code with extension from NXP, to enable, fast and flexible development.
Learn how to install VS Code for your host PC by following this tutorial.
2.2 Jump Start Your Design
The NXP extension adds tools to help add software repositories into the Visual Studio Code workspace. The software repository can be provided from three sources:
- Remote git URL
- NXP MCUXpresso SDK archive file
- Existing git folder
This section will import the MCUXpresso SDK using two methods one from the remote git repository and the remote archive option.
For the remote git repository option follow these steps.
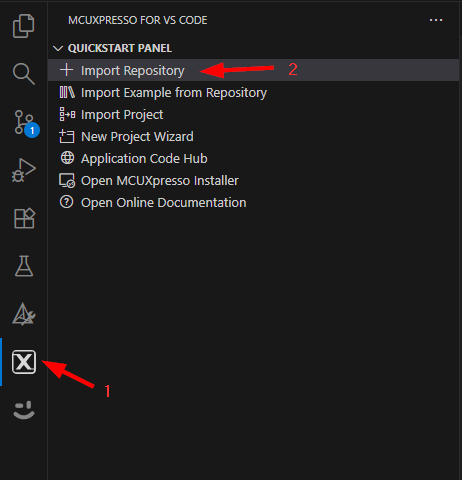
- Click on the MCUXpresso extension Icon
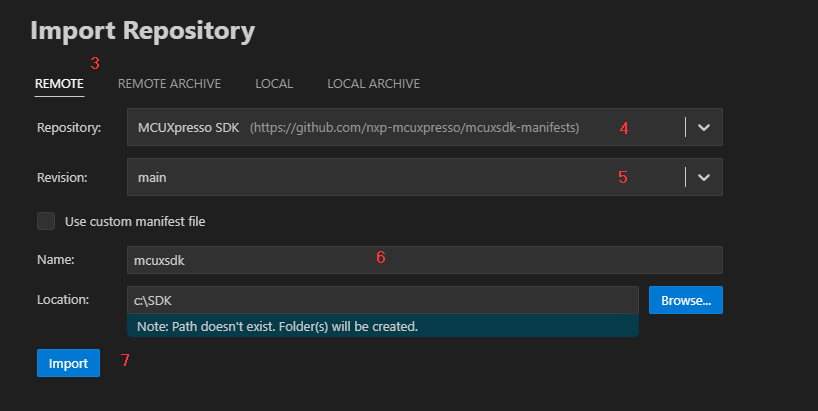
- Click on the “QUICKSTART PANEL” tab and then click on the "Import repositoty" button. After pressing that button a new import window will appear on your IDE
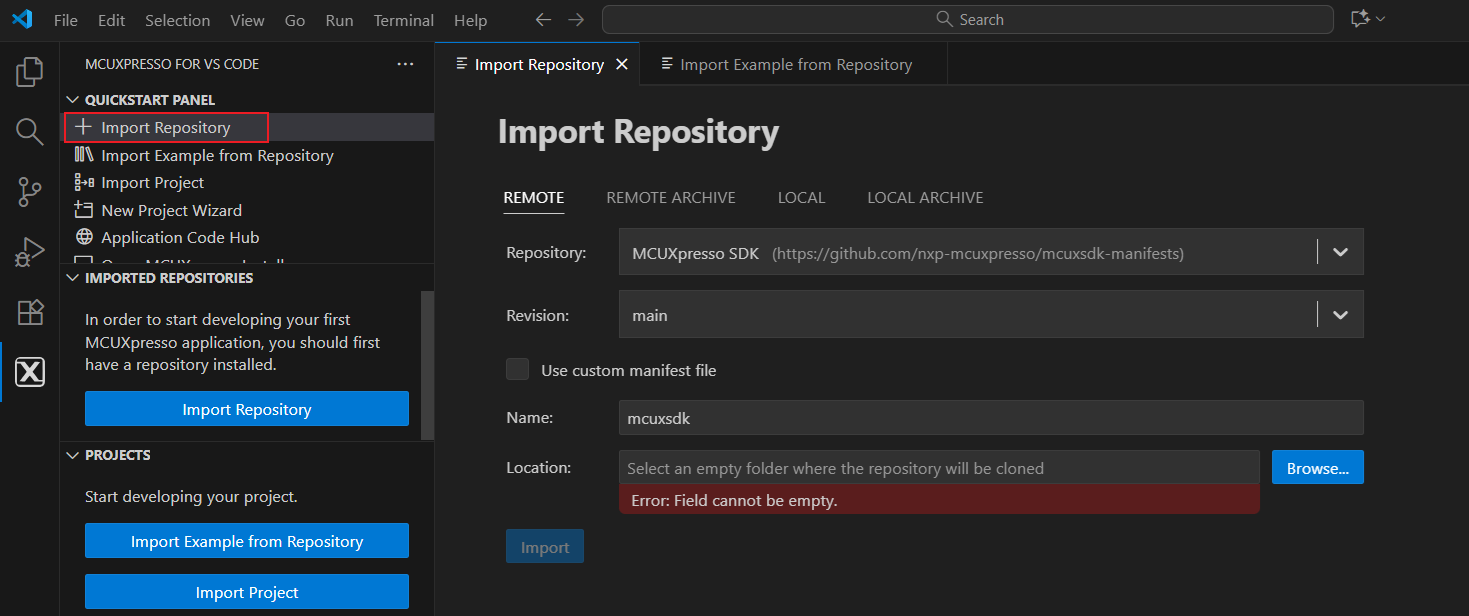
- Select the “Remote” option to import the provided SDK files
- Browse to the Repository options by clicking on the arrow button and search for "MCUXpresso SDK"
- Browse to the Revision options by clicking on the arrow button and search for latest version
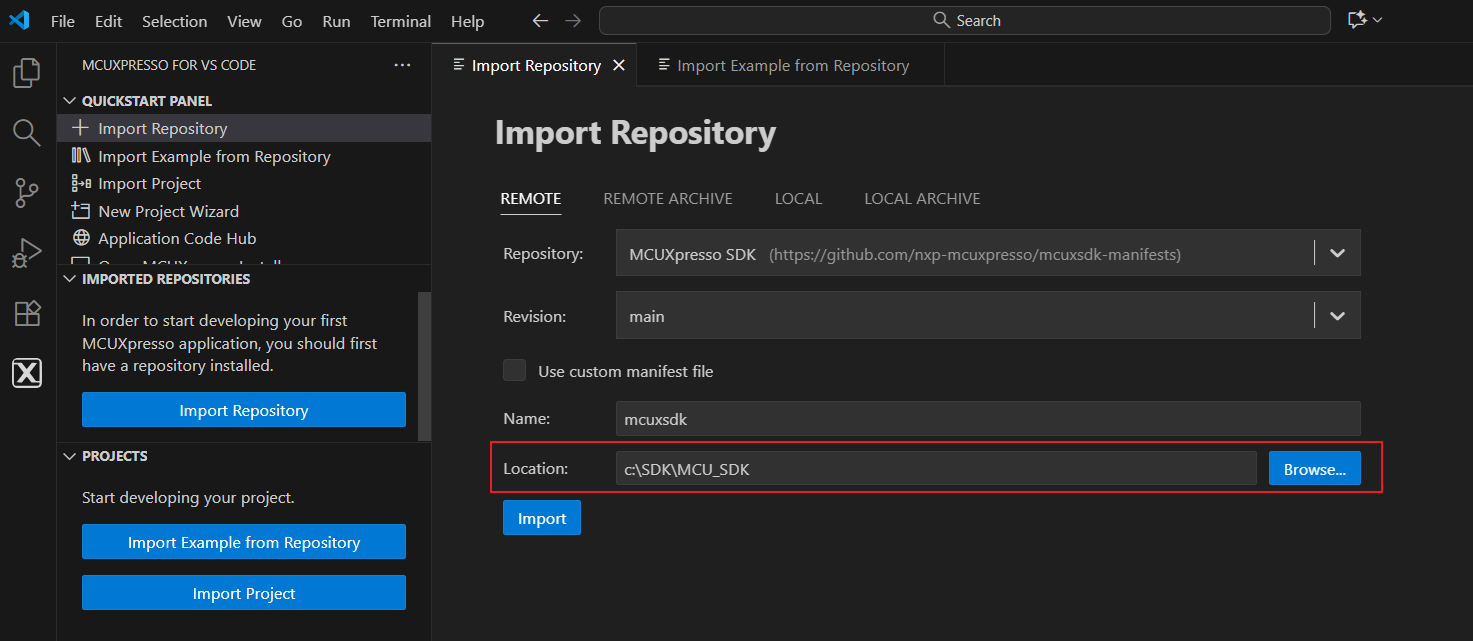
- Browse to a folder to be a common “Destination” to store SDKs. (i.e. C:\SDK ) Enter a name for the new SDK, in this case mcuxsdk
- Click on Import button and wait for the installation
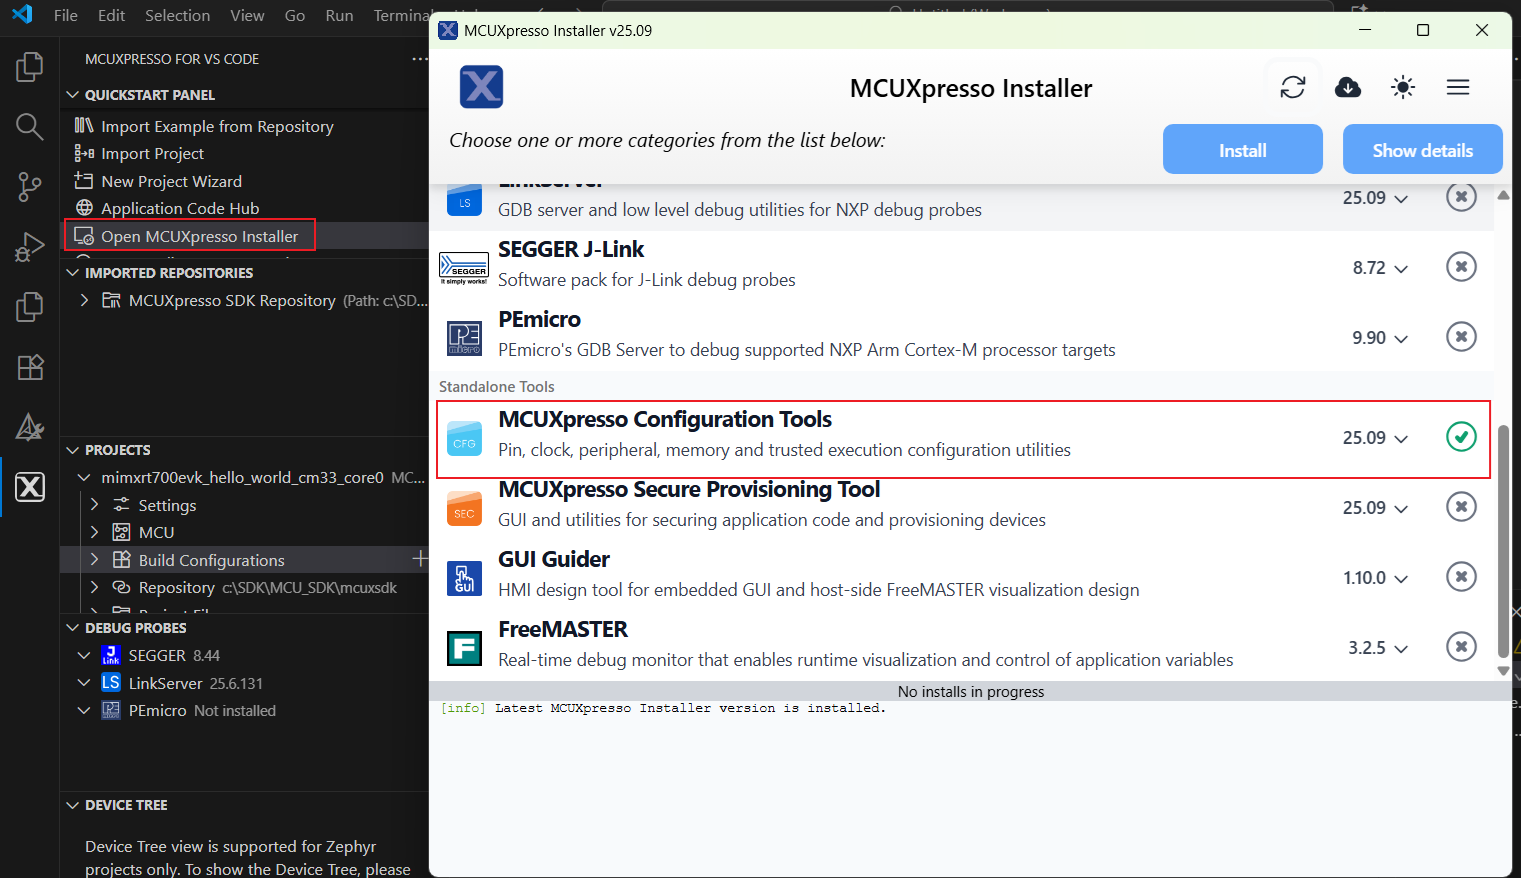
2.3 MCUXpresso Config Tools
The MCUXpresso Config Tool is an integrated suite of configuration tools that guides users in creating new MCUXpresso SDK projects, and also provides pin and clock tools to generate initialization C code for custom board support. It is fully integrated as a part of the MCUXpresso IDE and also as a separate tool if using a different IDE.
Click the Get MCUXpresso Config Tools button below to get the Config Tools installer.
2.4 Programming and Provisioning Tools
The MCUXpresso Secure Provisioning (SEC) Tool is a graphic user interface (GUI)-based application provided to simplify generation and provisioning of bootable executables on NXP microcontroller unit (MCU) devices. We recommend that all users begin with the MCUXpresso SEC tool for trial run and as a mass production use. It supports secure programming and device provisioning on NXP's MCUs at the production stage. After downloading the tool, you can find the user guide under the "Help" tab. Follow the instructions for your board in the "Processor-specific Workflow" chapter.

3. Build, Run
If one or more of the demo applications or driver examples sounds interesting, you're probably wanting to know how you can build and debug yourself. The Getting Started with Getting Started with MCUXpresso for Visual Studio Code provides easy, step-by-step instructions on how to configure, build, and debug demos for all toolchains supported by the SDK.
3.1 Build and Run an Example
The following steps will guide you through the hello_world demo application using VS Code for the Arm® Cortex®-M33 application on RT700.
Pre-requisites for:
This example is written for Windows 10, but MCUXpresso for VS Code can also be easily installed on MacOS and Linux.
Install the software for MCUXpresso for VS Code extension.
-
This section will import the MCUXpresso SDK for the RT700 microcontroller.
- 1. Click "Import Repository" button in the "QUICKSTART PANEL" tab as shown below
- 2. Select the “REMOTE” tab to import the repository from GitHub
- 3. Go to the "Location" area to store SDK and click import
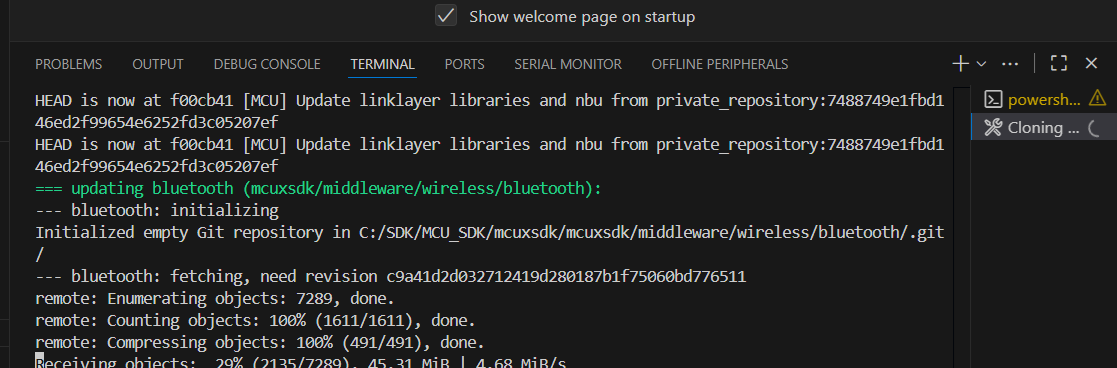
- 4. Terminal output will show the progress of the SDK download

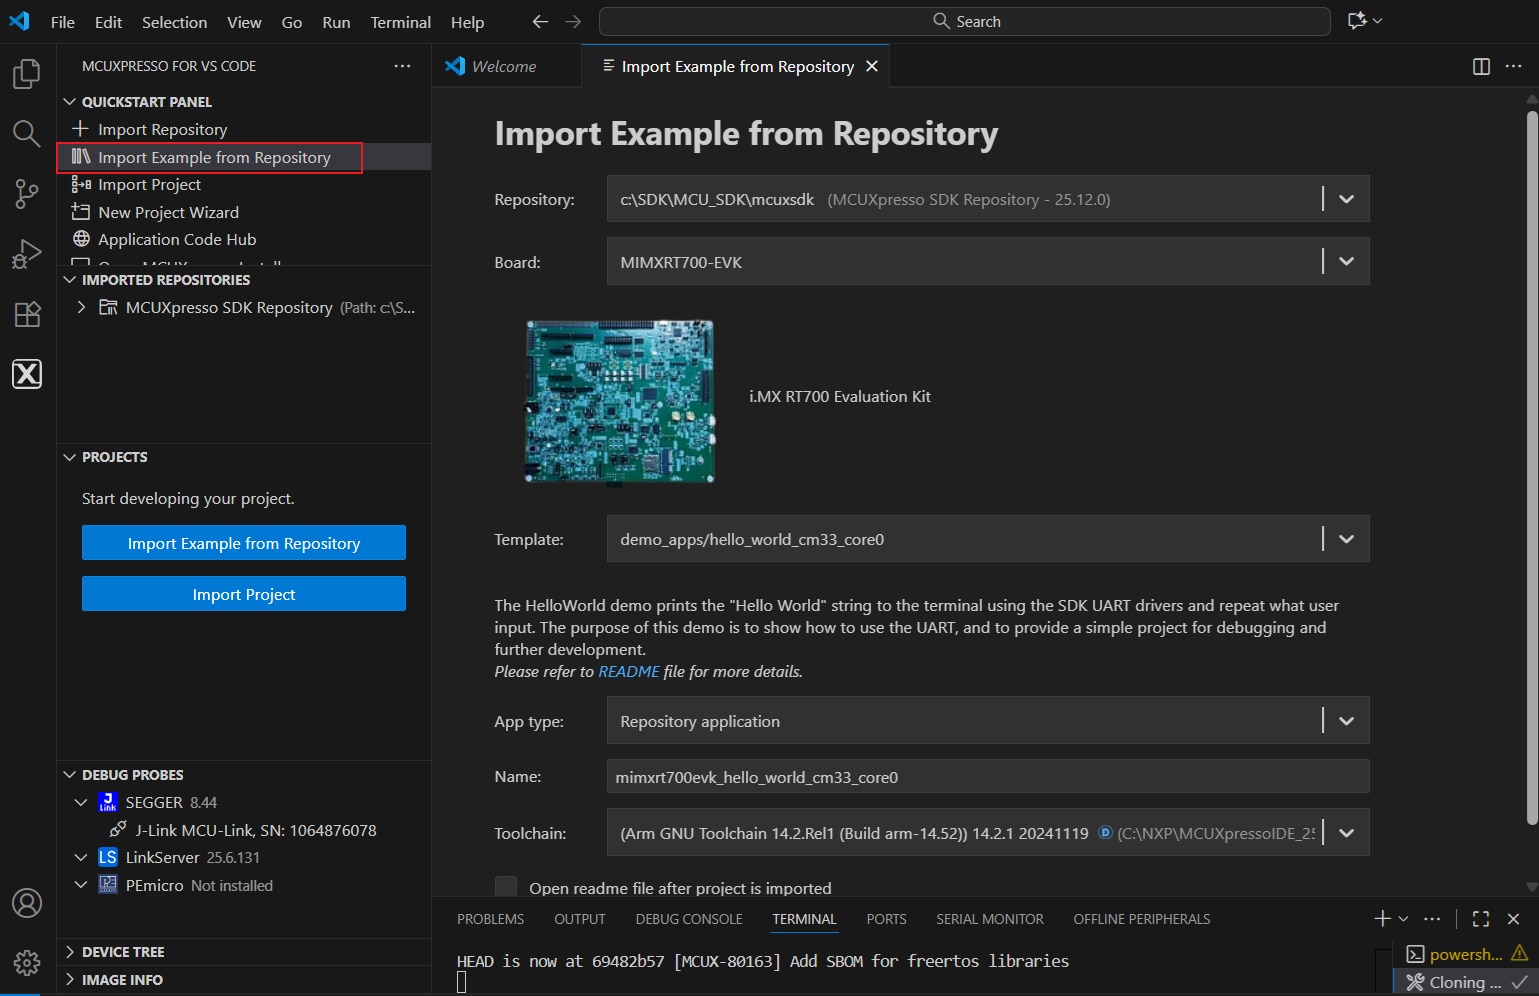
- Click "Import Example from Repository" button in the "QUICKSTART PANEL" and then fill out the appropriate information in the "Import Example from Repository" window
- Select repository from downloaded local folder
- Click the dropdown under "Board" to view the options for the selected repository, or search by filter by typing in the field
- Select MIMXRT700-EVK from the "Board" list and a picture of the board will appear
- Click the dropdown under "Template" to show a list of available examples in the selected repository, or search by filter by typing in the field (i.e. type Hello to filter Hello World examples)
- Select demo_apps/hello_world
- Click the dropdown under "Toolchain" to view the options of available build tools (the MCUXpresso Installer provides a default option of "ARM GNU tool chain version xx" but also looks in other default locations for MCUXpresso IDE installations and may be listed as alternative options for GNU Arm toolchains)
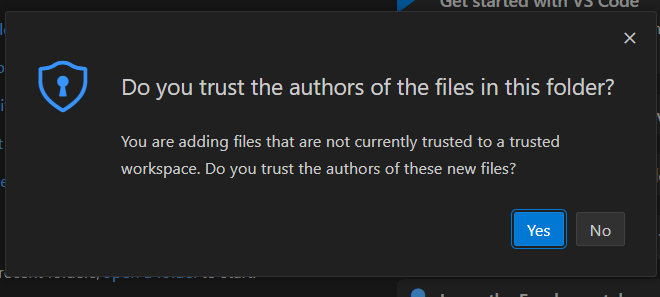
- Click "Create" to add a new "Hello World" example for the RT700 to your Projects panel (if an alert pops up to trust authors of the files, click "Yes")
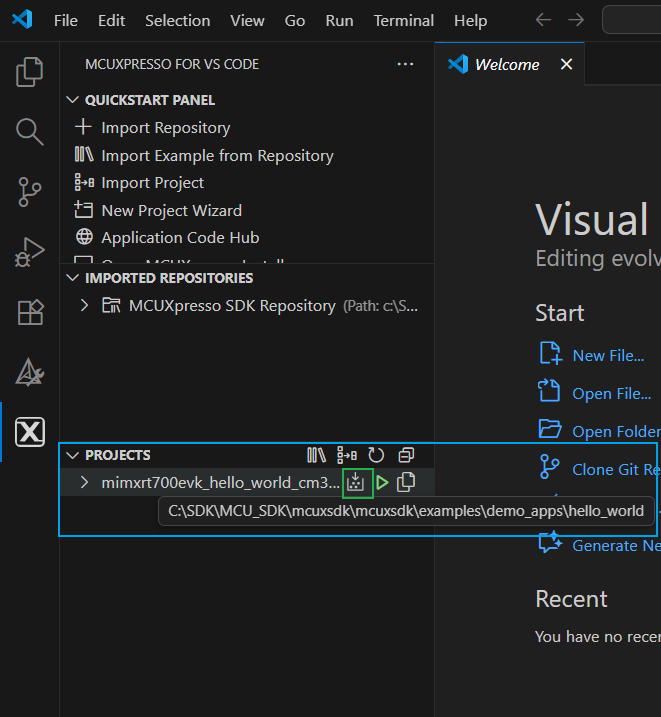
Import Example Project
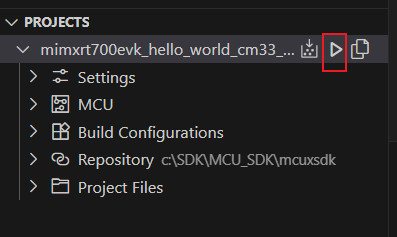
Build Project
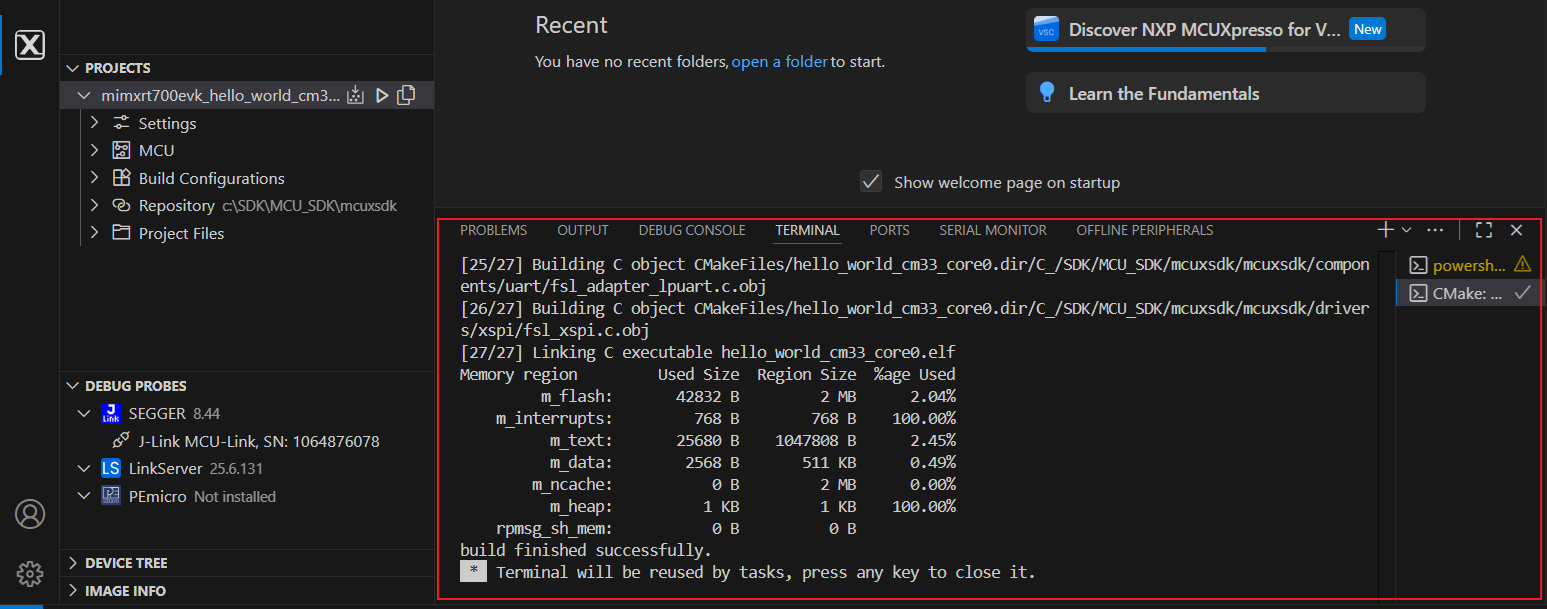
The build process is configured when the project is created. You can initiate the build from the icon in the project view. To the right of the project name, the build icon will start the build for that project. Return to the MCUXpresso extension perspective by clicking the “X” icon in the left navigation pane as you may still be in the Explorer perspective from the prior section. Click the build icon to the right of the hello_world project.
This will start the build process. The OUTPUT terminal tab at the bottom of the screen will display the build progress. Alternatively, you can right-click on the project name to display additional build options. Clicking Rebuild or Clean Build will remove build artifacts from prior builds to allow the project to be built again. Otherwise, clicking Build Selected will result in a response of "no work to do"
Flash and Debug Project
MCUXpresso for VS Code allows users to program and debug projects for NXP microcontrollers and also allows the use of popular debug probes from NXP, Segger and PEmicro. This includes the option to properly install support for the different debug probes, but these steps require that the debug probe drivers are properly installed and configured.
The built project output binary is flashed to the target board before launching a debug session. The debug session provides controls and views to help you analyze the operation of the project. The following steps will demonstrate how to successfully flash and program the RT700 EVK evaluation kit.
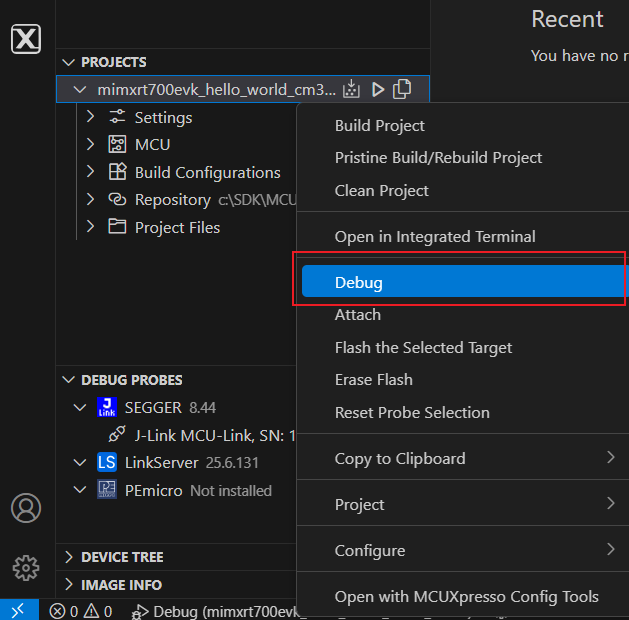
- Confirm that the onboard debug probe is connected to the PC USB port
- Click the Refresh arrow in the DEBUG PROBES pane to detect the connected Debug Probes
- 3.Starting a Debug session begins by programming the target device with the built project image where you can debug or flash the selected target as shown below.
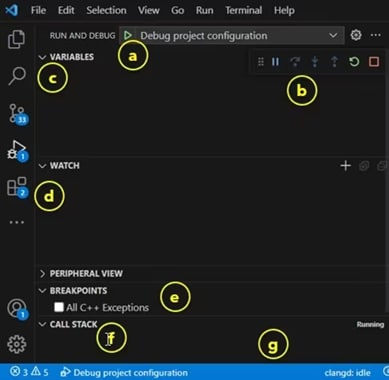
- 4.Visual Studio Code Debug sessions provide a different "Run and Debug" perspective for you as reflected by the
Bug icon in the primary left navigation as highlighted below where tools are labeled:
- a. RUN AND DEBUG: Another place to launch debug
- b. Debug Controls: Pause, Step Over, Step Into, Step Over, Restart and Stop
- c. VARIABLES: Locals and Registers
- d. WATCH: Add expressions to continuously monitor
- e. BREAKPOINTS: Add, Toggle and View targeted code
- f. CALL STACK: List of active subroutines in the program
- g. Status Ribbon: Bottom of screen changes status text and/or color to orange
4. Create and Modify
4.1 Import an Example Project
The following steps will guide you through the manipulation of the general-purpose outputs. The example sets up a general-purpose input/output (GPIO) the LED example to toggle LED on board.
- Click “Import Example from Repository” button in the "QUICKSTART PANEL" and then fill out the appropriate information in the “Import Example from Repository” window
- Select repository from downloaded local folder
- Click the dropdown under “Board” to view the options for the selected repository, or search by filter by typing in the field
- Select MIMXRT700-EVK from the “Board” list and a picture of the board will appear
- Click the dropdown under “Template” to show a list of available examples in the selected repository, or search by filter by typing in the field (i.e. type led to filter gpio LED examples), and select “driver_examples/gpio/led_output”
- Click the dropdown under “Toolchain” to view the options of available build tools (the MCUXpresso Installer provides a default option of “ARM GNU tool chain version xx” but also looks in other default locations for MCUXpresso IDE installations and may be listed as alternative options for GNU Arm toolchains)
- Click “Create” to add a new “gpio led output” example for the RT700 to your Projects panel (if an alert pops up to trust authors of the files, click “Yes”)

Build Project
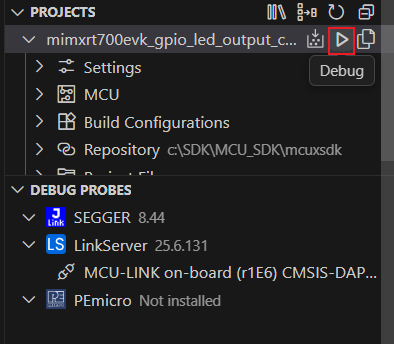
The build process is configured when the project is created. You can initiate the build from the icon in the project view. To the right of the project name, the build icon will start the build for that project. Return to the MCUXpresso extension perspective by clicking the “X” icon in the left navigation pane as you may still be in the Explorer perspective from the prior section. Click the build icon to the right of the gpio_led_output project.

This will start the build process. The OUTPUT terminal tab at the bottom of the screen will display the build progress.
Flash and Debug Project
MCUXpresso for VS Code allows users to program and debug projects for NXP microcontrollers and also allows the use of popular debug probes from NXP, Segger and PEmicro. This includes the option to properly install support for the different debug probes, but these steps require that the debug probe drivers are properly installed and configured.
The built project output binary is flashed to the target board before launching a debug session. The debug session provides controls and views to help you analyze the operation of the project. The following steps will demonstrate how to successfully flash and program the RT700 EVK evaluation kit.
- Confirm that the onboard debug probe is connected to the PC USB port
- Click the Refresh arrow in the DEBUG PROBES pane to detect the connected Debug Probes
- Starting a debug session begins by programming the target device with the built project image where you can debug or flash the selected target as shown below
- You should see the blue LED changing back and forth
- Terminate the debug session
4.2 Change an Example Project
The following steps will guide you through the manipulation of the general-purpose output. The example sets up an LED to change LED color from blue to green. Confirm that the MCUXpresso installer in the VS Code has the MCUXpresso Configuration tools.
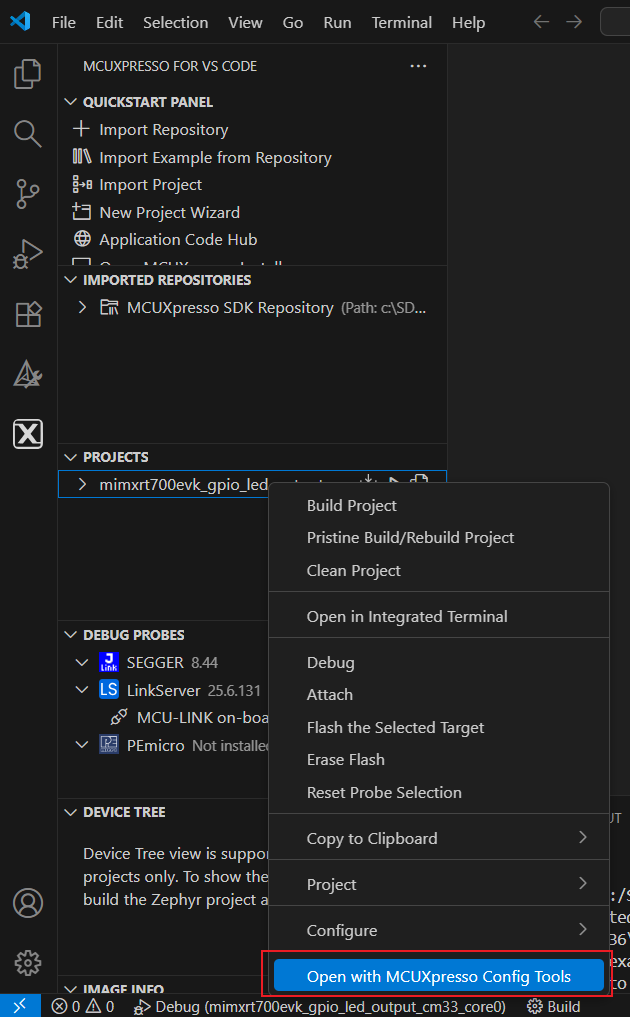
- Open the MCUXpresso Config Tool by right-clicking on the project example
- The configuration tool wizard will appear
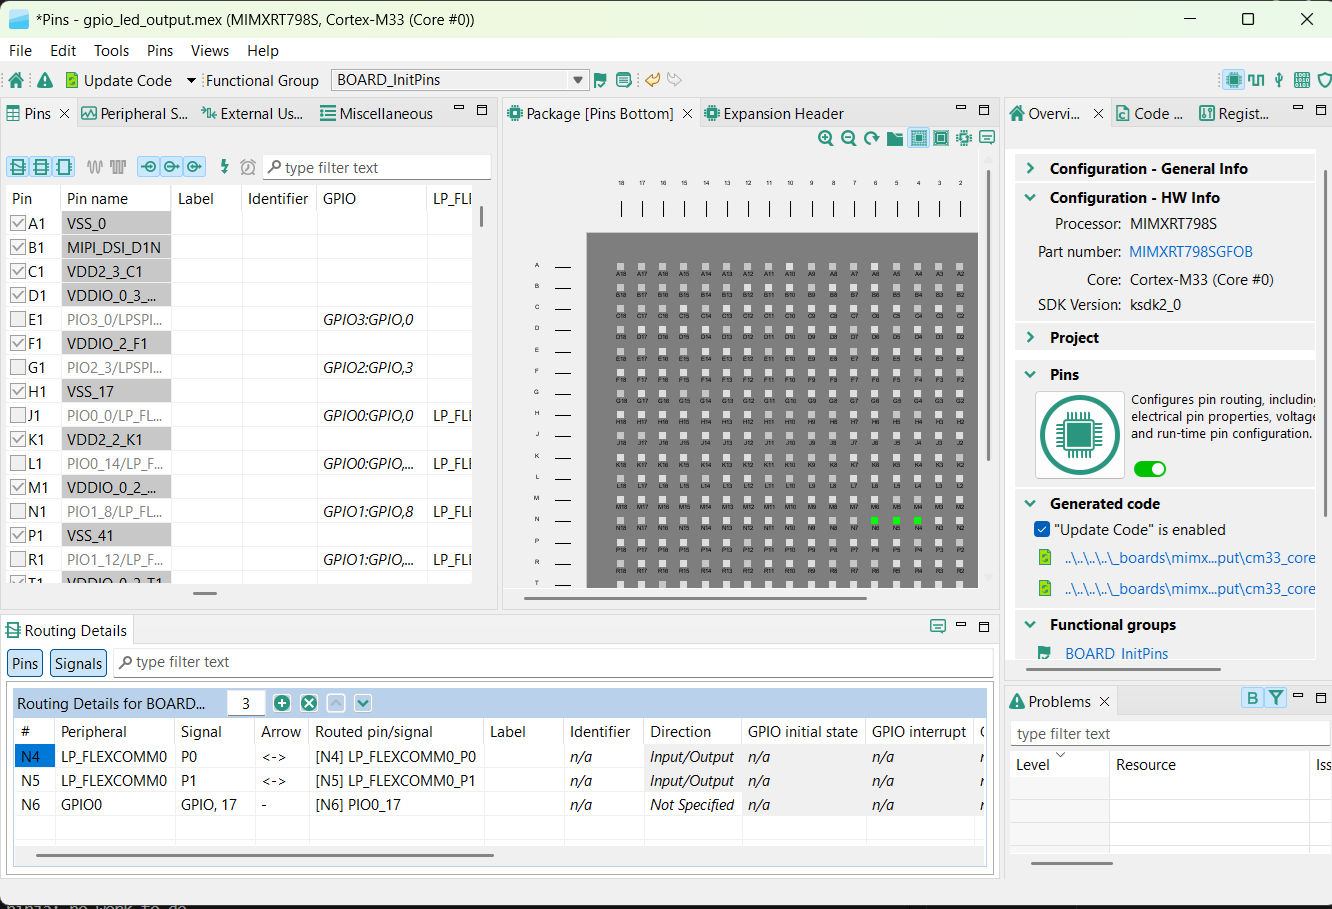
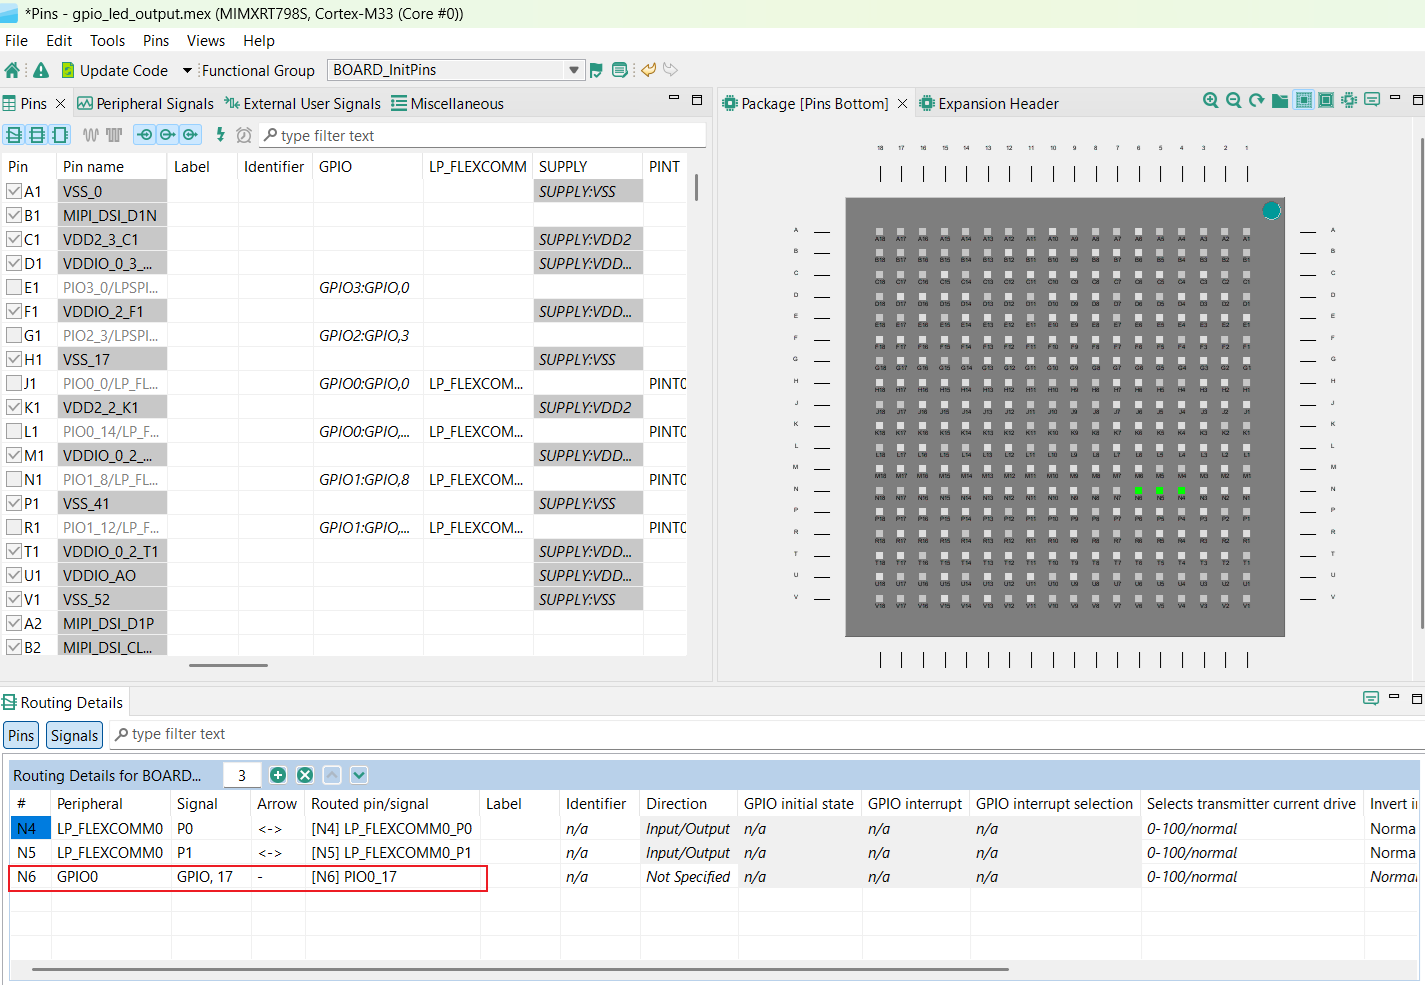
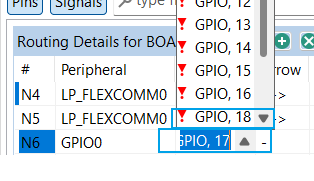
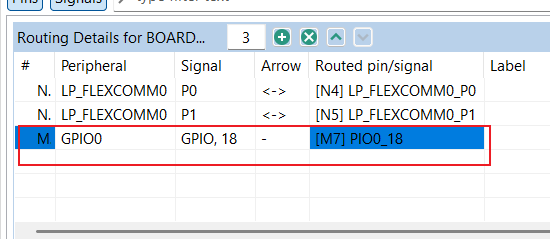
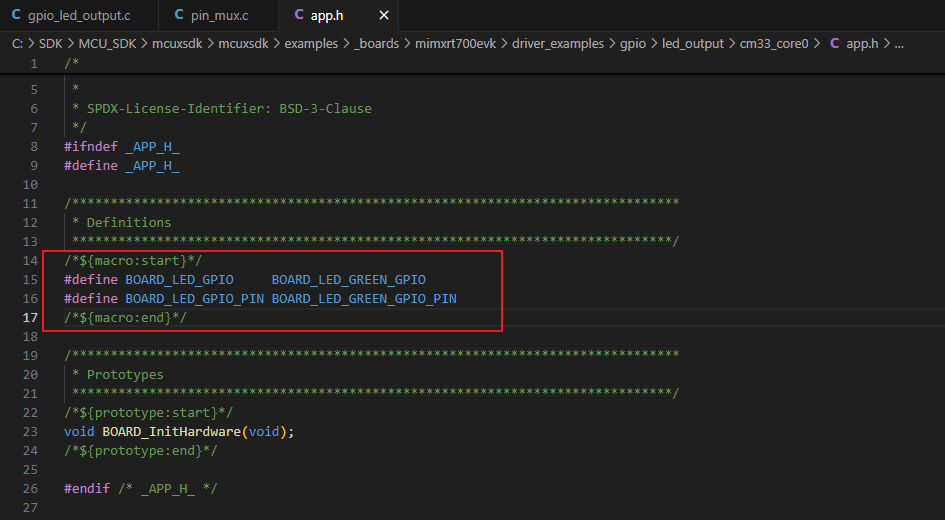
- Modify the pin configuration of PIO0_17 that is routed for LED by changing the pin from GPIO 17 to GPIO 18
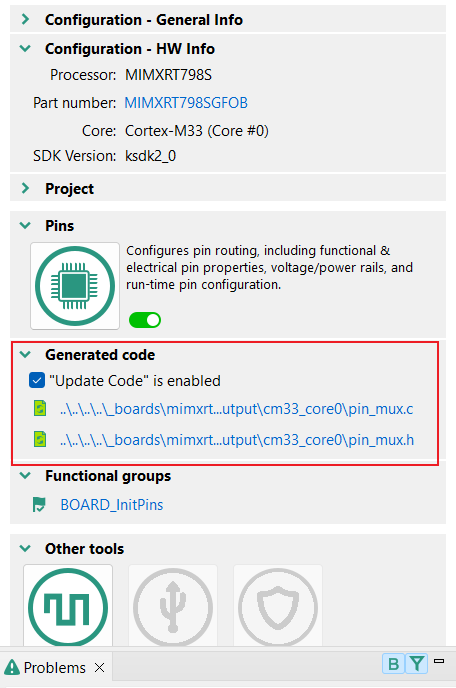
- Save and observe changes including Check pin_mux.c and pin_mux.h for updates
- To update the LED in VS Code, change the pins from blue to green
- Build the project in VS Code
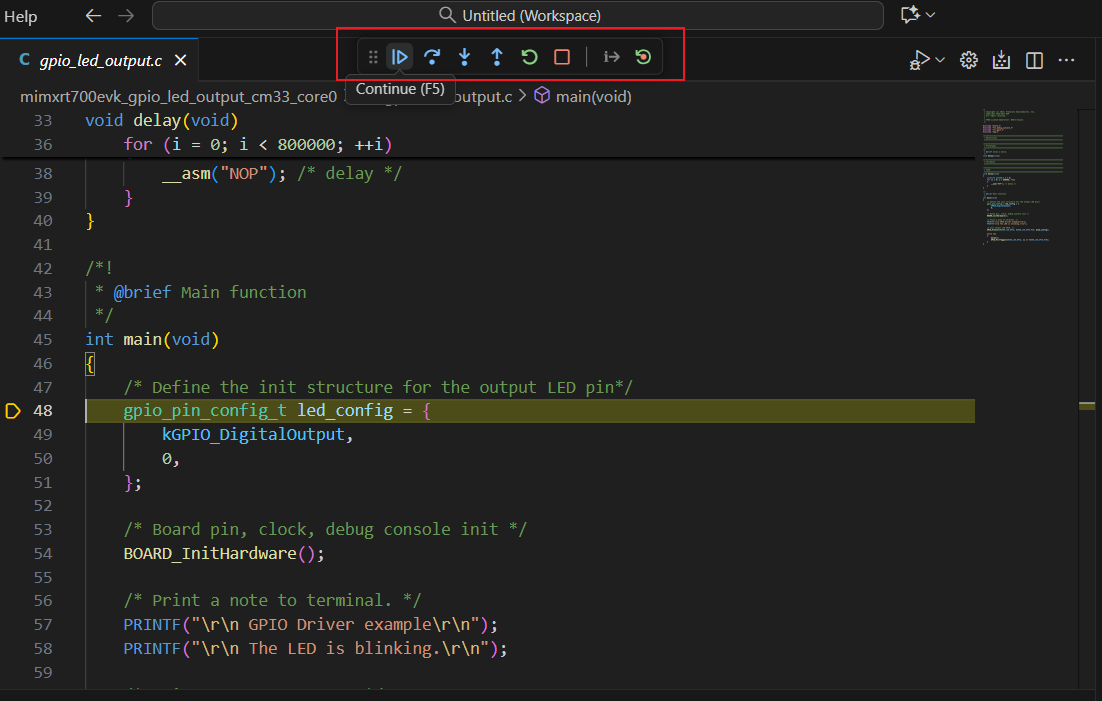
- To debug the project, click Debug
- To run the project, click the play button or press F5
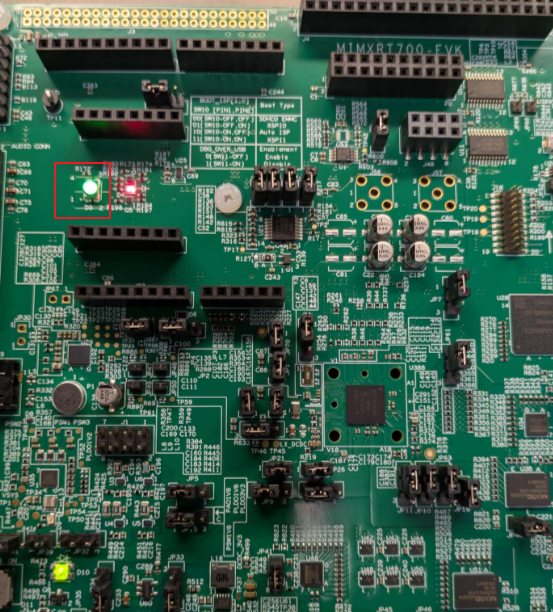
- The green LED toggling will confirm that the LED is operating as intended
- Terminate the debug session
5. Developer Experience
Check out each of the following sections to learn about the ecosystem provided for flexible protyping and development. The video below will provide you with an introduction to the FRDM platform, the full-featured evaluation kit (EVK) and the compatible shields for extended capabilities. In addition we will walk you through our Application Code Hub (ACH) portal where we provide numerous application examples through NXP's GitHub.
5.1 FRDM Platform, Full feature EVK and Shields
For quick prototyping platforms, we offer both the low-cost FRDM platform and the full-featured EVK.
FRDM development boards come with standard form factor and headers, easy access to MCU I/Os, onboard MCU-Link debugger and a USB-C cable. Our full-featured evaluation kits include extended I/O and interface access, extendibility with WiFi and additional MCU-Link features. There are also many compatible Click Boards and/or Arduino shields. For devices supported by an Open Cortex Microcontroller Software Interface Standard (CMSIS) Pack, example projects may be available on ACH. If not, many are still easy to use via serial interfaces like inter-integrated circuit (I²C), serial peripheral interface (SPI), and universal asynchronous receiver/transmitter (UART)—drivers and example code for these are included in the MCUXpresso software development kit (SDK).
5.2 Application Code Hub
The ACH further enhances our MCUXpresso Developer Experience by giving you an interactive dashboard to quickly locate the needed software. Visit the ACH today to start exploring or discover additional details and benefits of the new interactive Application Code Hub.
Software from the ACH is located in NXP’s GitHub repository so it can be easily accessed and cloned from that location directly.
5.3 Demo Walkthrough
The following demo walks you through importing a project from ACH using a system based on the FRDM platform including a motor control shield and a low cost LCD. Although your evaluation board may differ from this system, the following steps can be followed for all supported platforms.