KW47-EVKのスタート・ガイド
サインイン 進行状況を保存するには アカウントをお持ちでない方 アカウントを作成する。

お客様の KW47-EVK
1. 接続
KW47-EVKボードを実際に使ってみましょう。ショート・ビデオで手順を視聴するか、以下に記載された詳細な手順を参考にして、次の作業を進めてください。
1.1 ボードの概要
KW47-EVKボードには、ワイヤレスのデモが事前にプログラム済みです。これは、開梱したデバイスが正常に動作することをその場で検証するための動作確認用に使用できます。
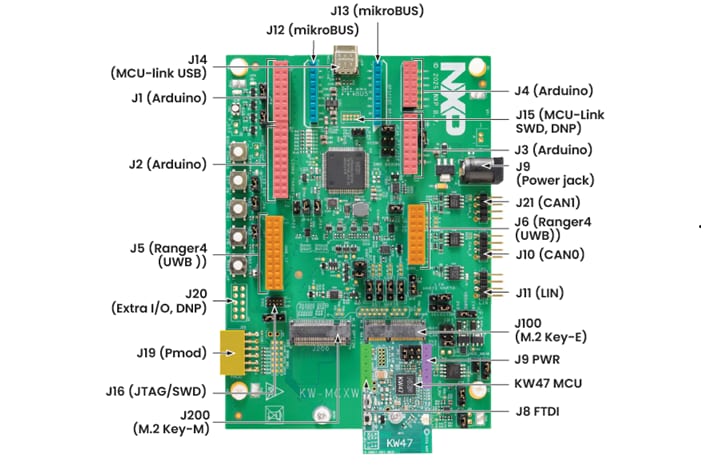
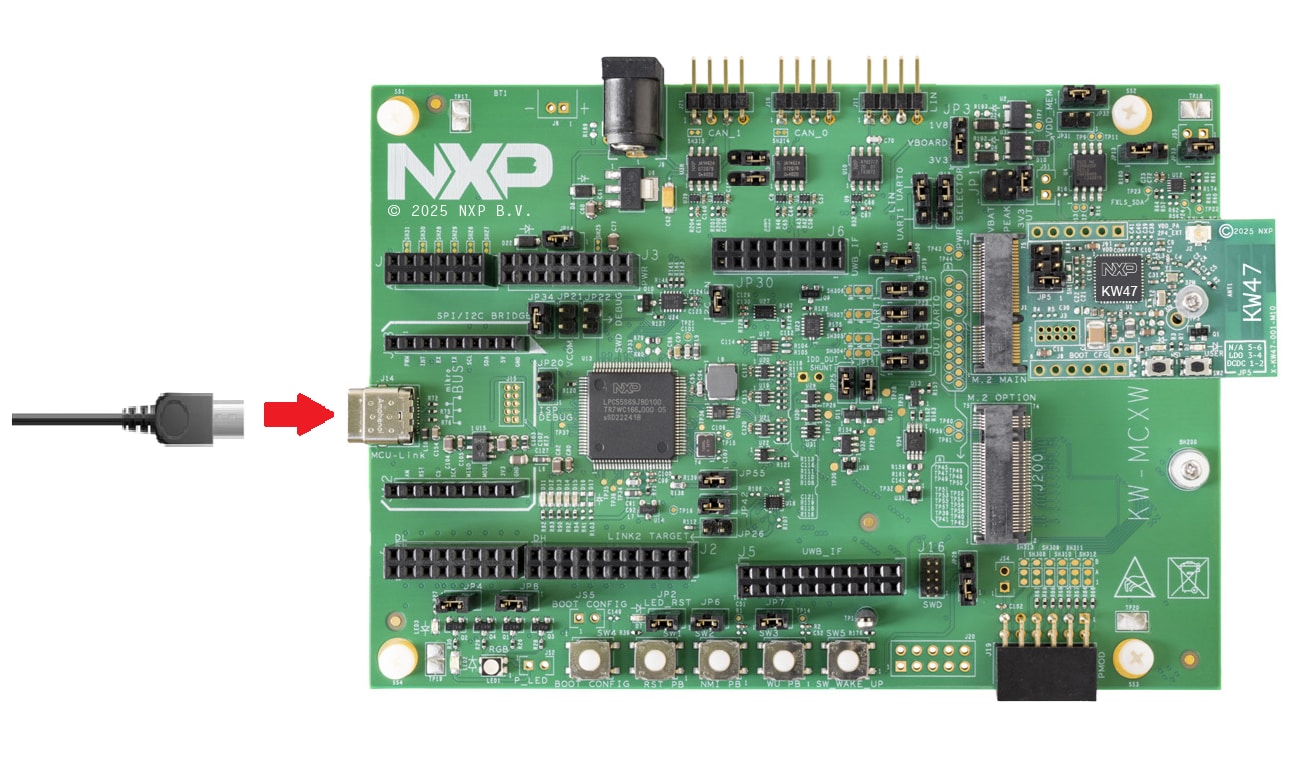
1.2 ボードの接続
USB Type-CケーブルをコネクタJ14からホスト・コンピュータまたは電源に接続して、ボードの電源を入れ、デモ・プログラムを実行します。このデモはNXPのIoT Toolboxアプリを使用してテストできます。設定を行わずにそのまま使う場合は、デバイスのアプリ・ストアからスマートフォンにNXPのIoT Toolboxアプリをダウンロードしてください。
1.3 クイック・スタート・デモを実行する
NXPのIoT Toolboxは、ワイヤレス・コネクティビティのデモおよびテストをサポートするように設計された汎用性の高いモバイル・アプリケーションです。NXPの開発プラットフォームを操作するための、直感的に使用できるインターフェースを備えています。
以下のリソースからインタラクティブなIoT Toolboxをスマートフォンにインストールして、今すぐ始めましょう。
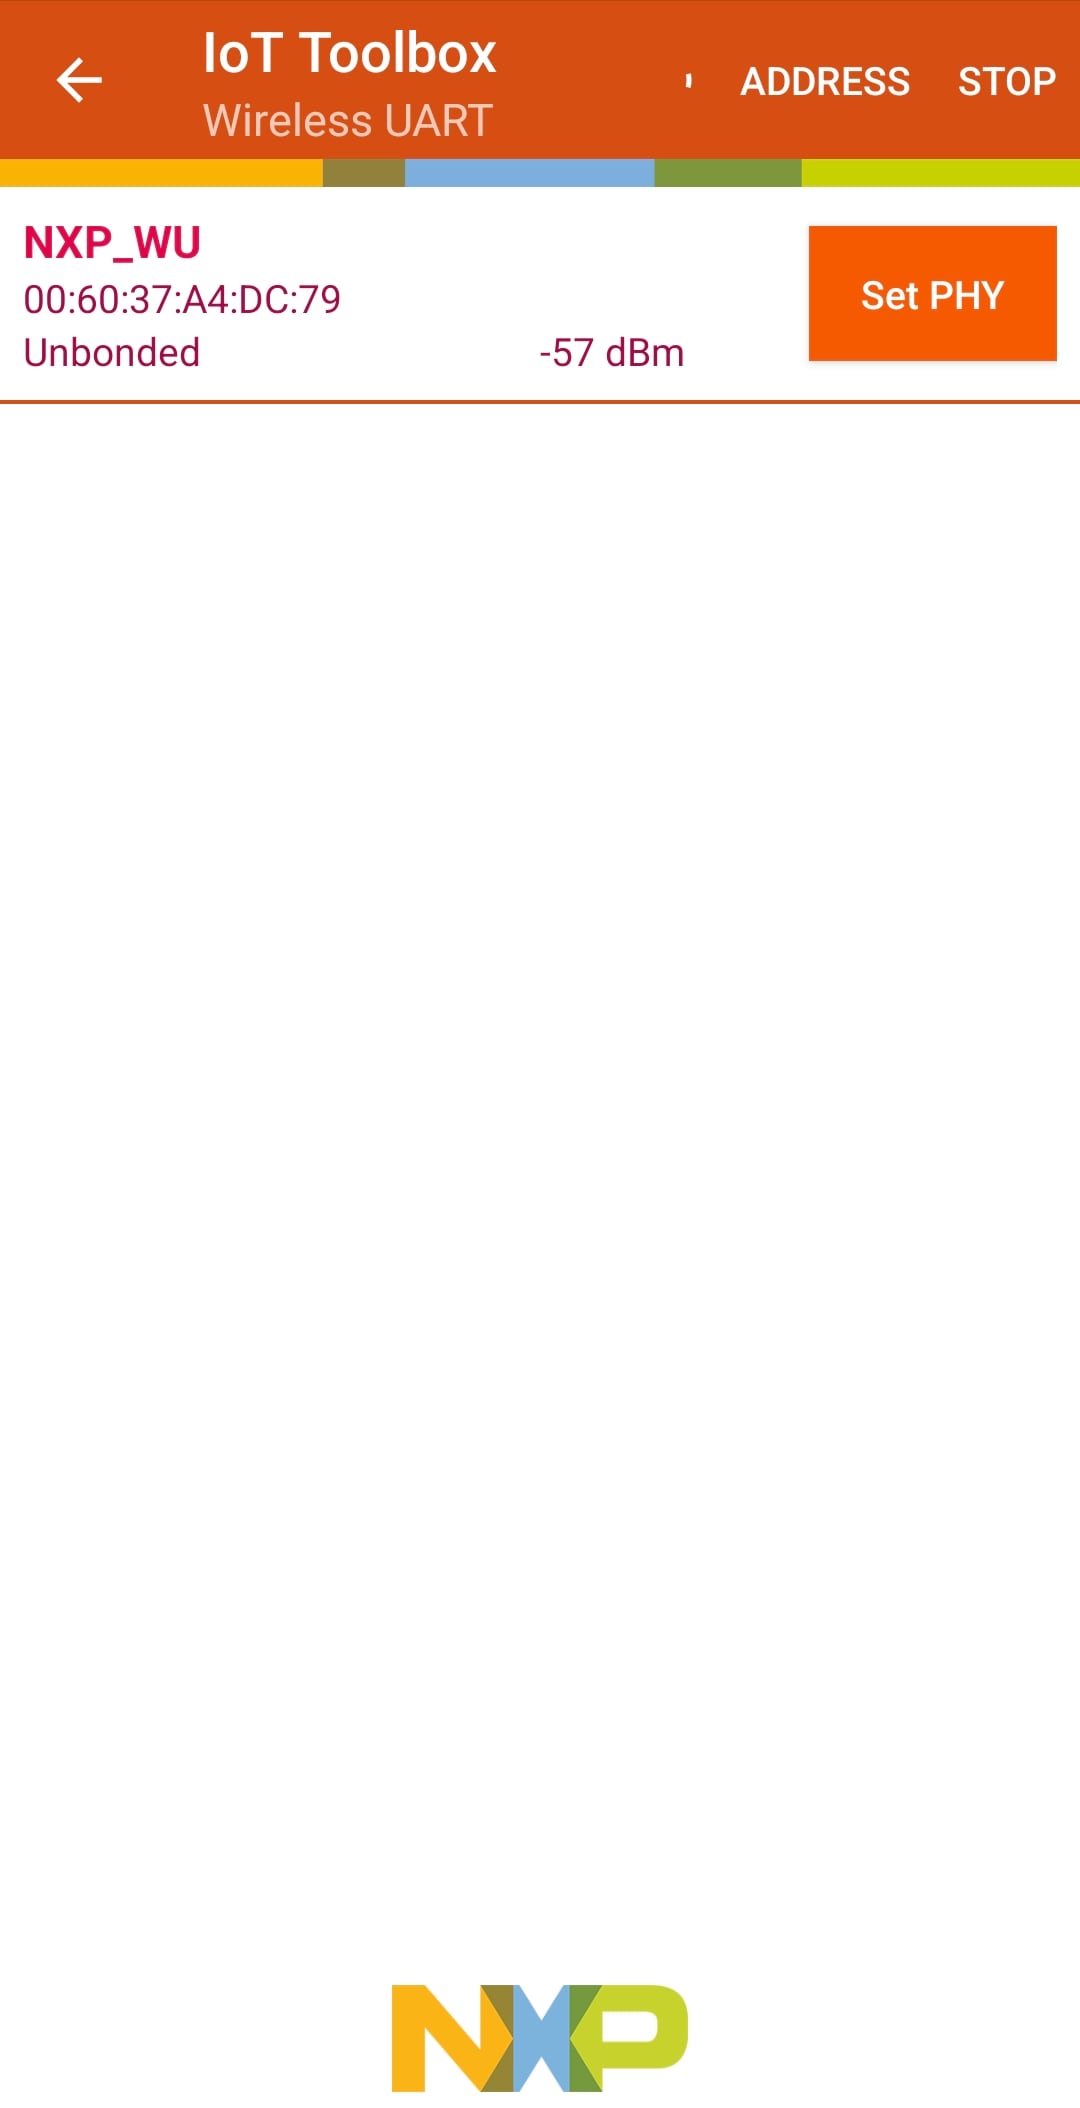
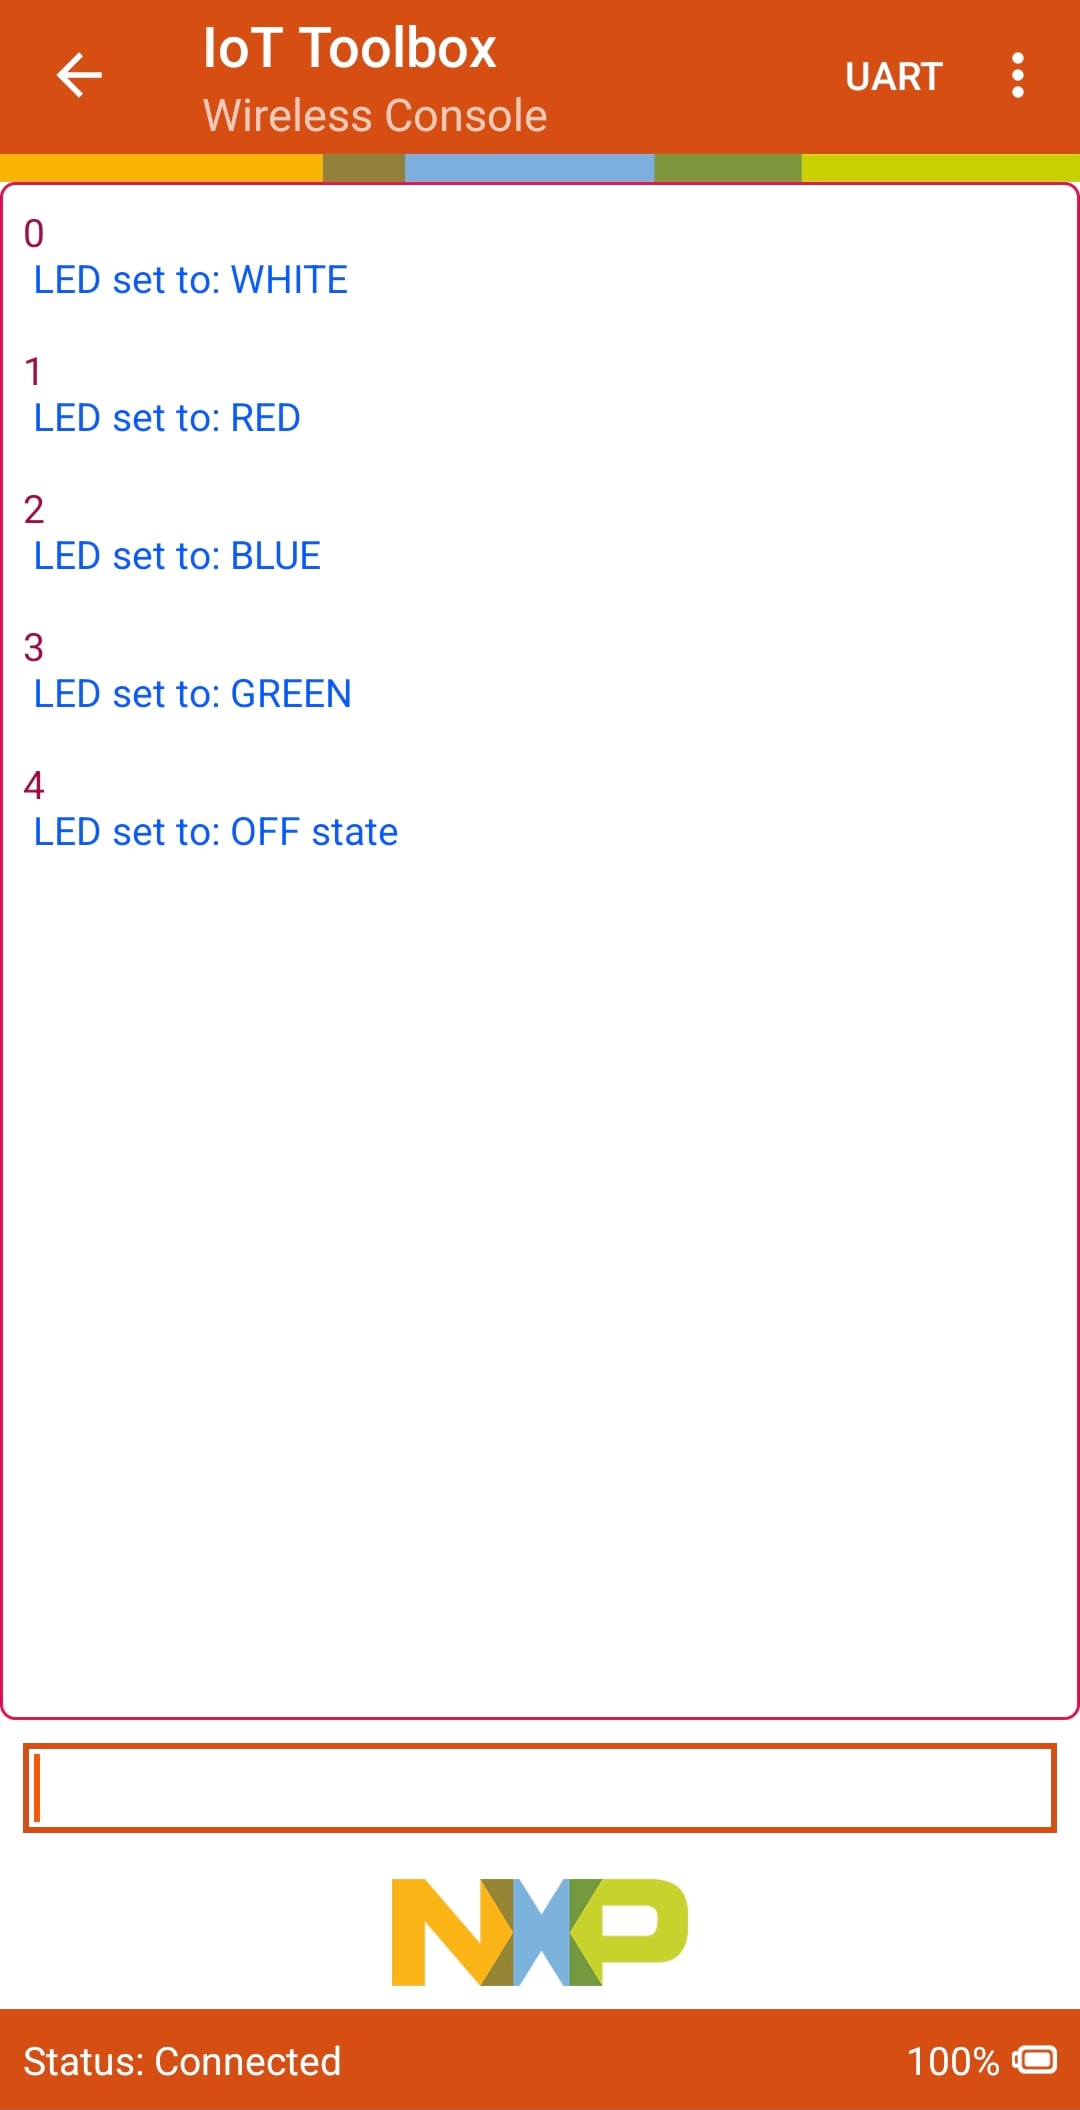
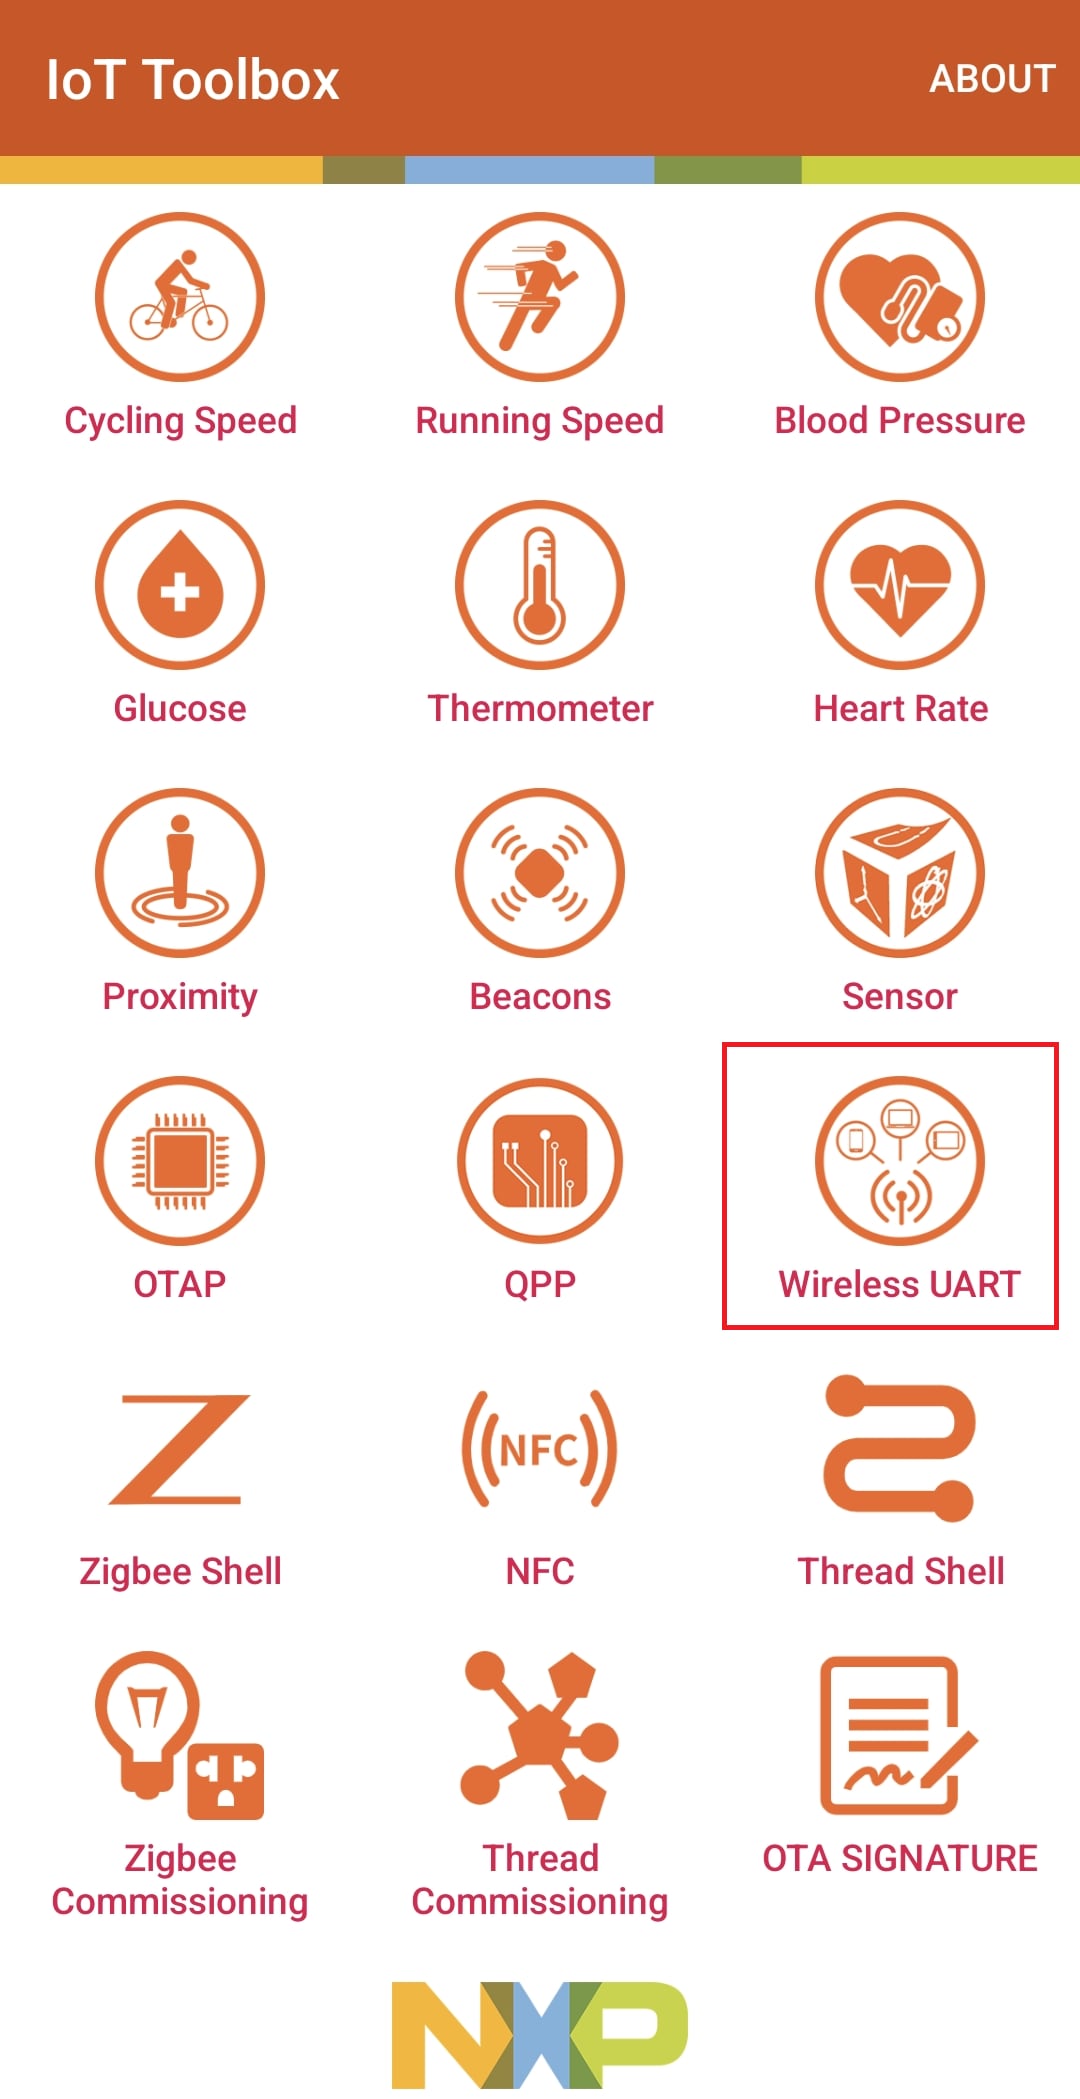
スマートフォンでNXP IoT Toolboxアプリを開きます。[Wireless UART(ワイヤレス汎用非同期送受信回路 (UART))]アイコンを選択します。ワイヤレスUART LEDデバイスを選択します。この時点で、IoT Toolboxアプリとシリアル・ターミナルの両方でデバイスのステータスが「Connected(接続済み)」と表示されているはずです。0~4の番号を選択してLEDの設定を変更します。
2. ソフトウェアの入手
ソフトウェアの入手方法については、以下のビデオをご覧ください。
2.1 ツールチェーンをインストールする
NXPは、MCUXpresso for Visual Studio (VS) Code というツールチェーンを提供しています。MCUXpresso for VS Code v25.09以降をダウンロードしてください。
以下のチュートリアルに従って、ホストPCにVS Codeをインストールする方法を学びましょう。
2.2 設計をすぐに開始する
MCUXpressoソフトウェア開発キット (SDK) は無償で利用することができ、オープンソースのライセンスに基づいて、すべてのハードウェア抽象化およびペリフェラル・ドライバ・ソフトウェアのすべてのソース・コードが提供されます。MCUXpresso SDKは、MCUXpresso SDKのウェブサイトから直接インストールできます。下のボタンをクリックすると、このボードのSDKビルダが開きます。

2.3 MCUXpresso Config Tools
MCUXpresso Config Toolsは、ユーザーがMCUXpresso SDKプロジェクトを新規に作成するための構成ツールの統合スイートであり、カスタム・ボード・サポート用の初期化Cコードを生成するためのピン・ツールとクロック・ツールも備えています。MCUXpresso統合開発環境 (IDE) の一部として完全に統合されていますが、別のIDEを使用する場合には独立したツールとしても使用できます。以下の[MCUXpresso Config Toolsを入手する]ボタンをクリックして、Config Toolsインストーラを入手してください。

2.4 プログラミング・ツールとプロビジョニング・ツール
MCUXpresso SECツールは、NXPのマイクロコントローラ・ユニット (MCU) デバイスでブート可能な実行ファイルを簡単に生成およびプロビジョニングできる、グラフィカル・ユーザー・インターフェース (GUI) ベースのアプリケーションです。いずれのユーザーも、試験運用および量産に向けてMCUXpressoセキュア・プロビジョニング (SEC) ツールから始めることをお勧めします。このツールは、生産段階におけるNXPのマイクロコントローラでのセキュア・プログラミングとデバイス・プロビジョニングをサポートします。
ツールをダウンロードすると、[Help(ヘルプ)]タブの下にユーザー・ガイドが表示されます。さらに、「プロセッサ固有のワークフロー」の章に記載されている、ボードに関する指示に従ってください。

注:NXPでは、より柔軟な設定のカスタマイズを必要とする上級ユーザー向けに、カスタムまたはパートナーのプログラミング・ツールを操作する際に役立つコマンドライン・ツールも提供しています。セキュア・プロビジョニングSDK (SPSDK) はオープンソースの開発キットであり、そのソース・コードはGitHubおよびPyPIでリリースされています。
3. ビルドと実行
デモ・アプリケーションやドライバのサンプルを使用していると、それを自分でビルドしてデバッグする方法を知りたくなる方もいるでしょう。MCUXpresso SDKのスタート・ガイドでは、SDKでサポートされているすべてのツールチェーンのデモを設定、ビルド、およびデバッグする方法について、わかりやすく手順に沿って解説しています。
3.1 ワイヤレス・サンプルのNBUのアップデート
使用しているアプリケーションのSDKバージョンに対応した狭帯域ユニット (NBU) イメージを使用する必要がある点にご注意ください。つまり、SDKをダウンロードする場合は、ワイヤレスSDKサンプルをロードする前に、SDKの次のフォルダに用意されているバイナリを使用してNBUイメージをアップデートします。
../middleware/wireless/ble-controller/bin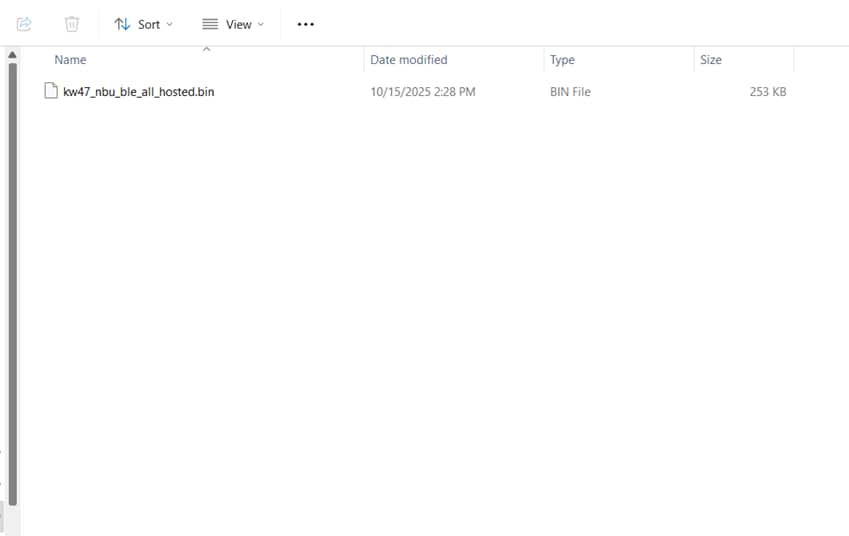
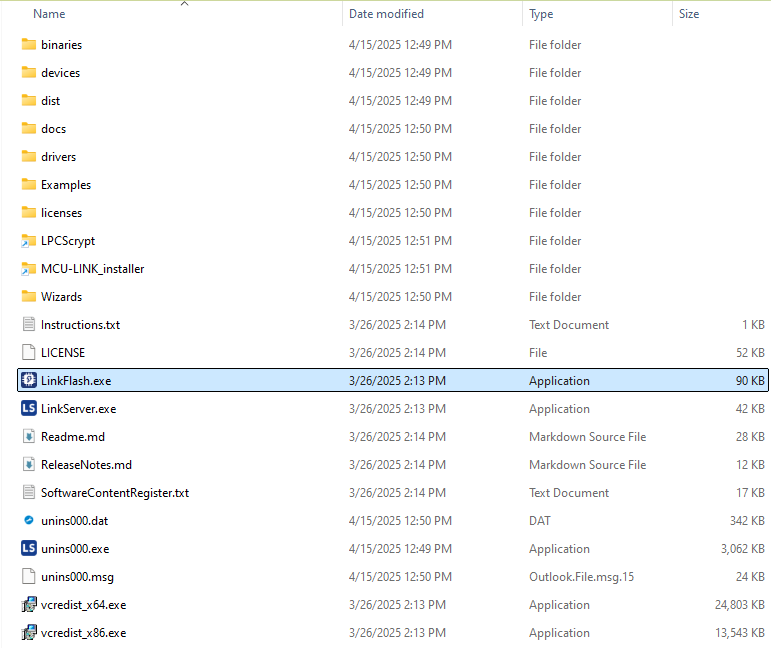
NBUをアップデートするには、以下のようにLinkFlashツールを使用します。
- LinkFlashツールのパスを開きます。通常、このパスは以下のようになります。
C:\nxp\LinkServer_xx.x.xx - [Device(デバイス)]として
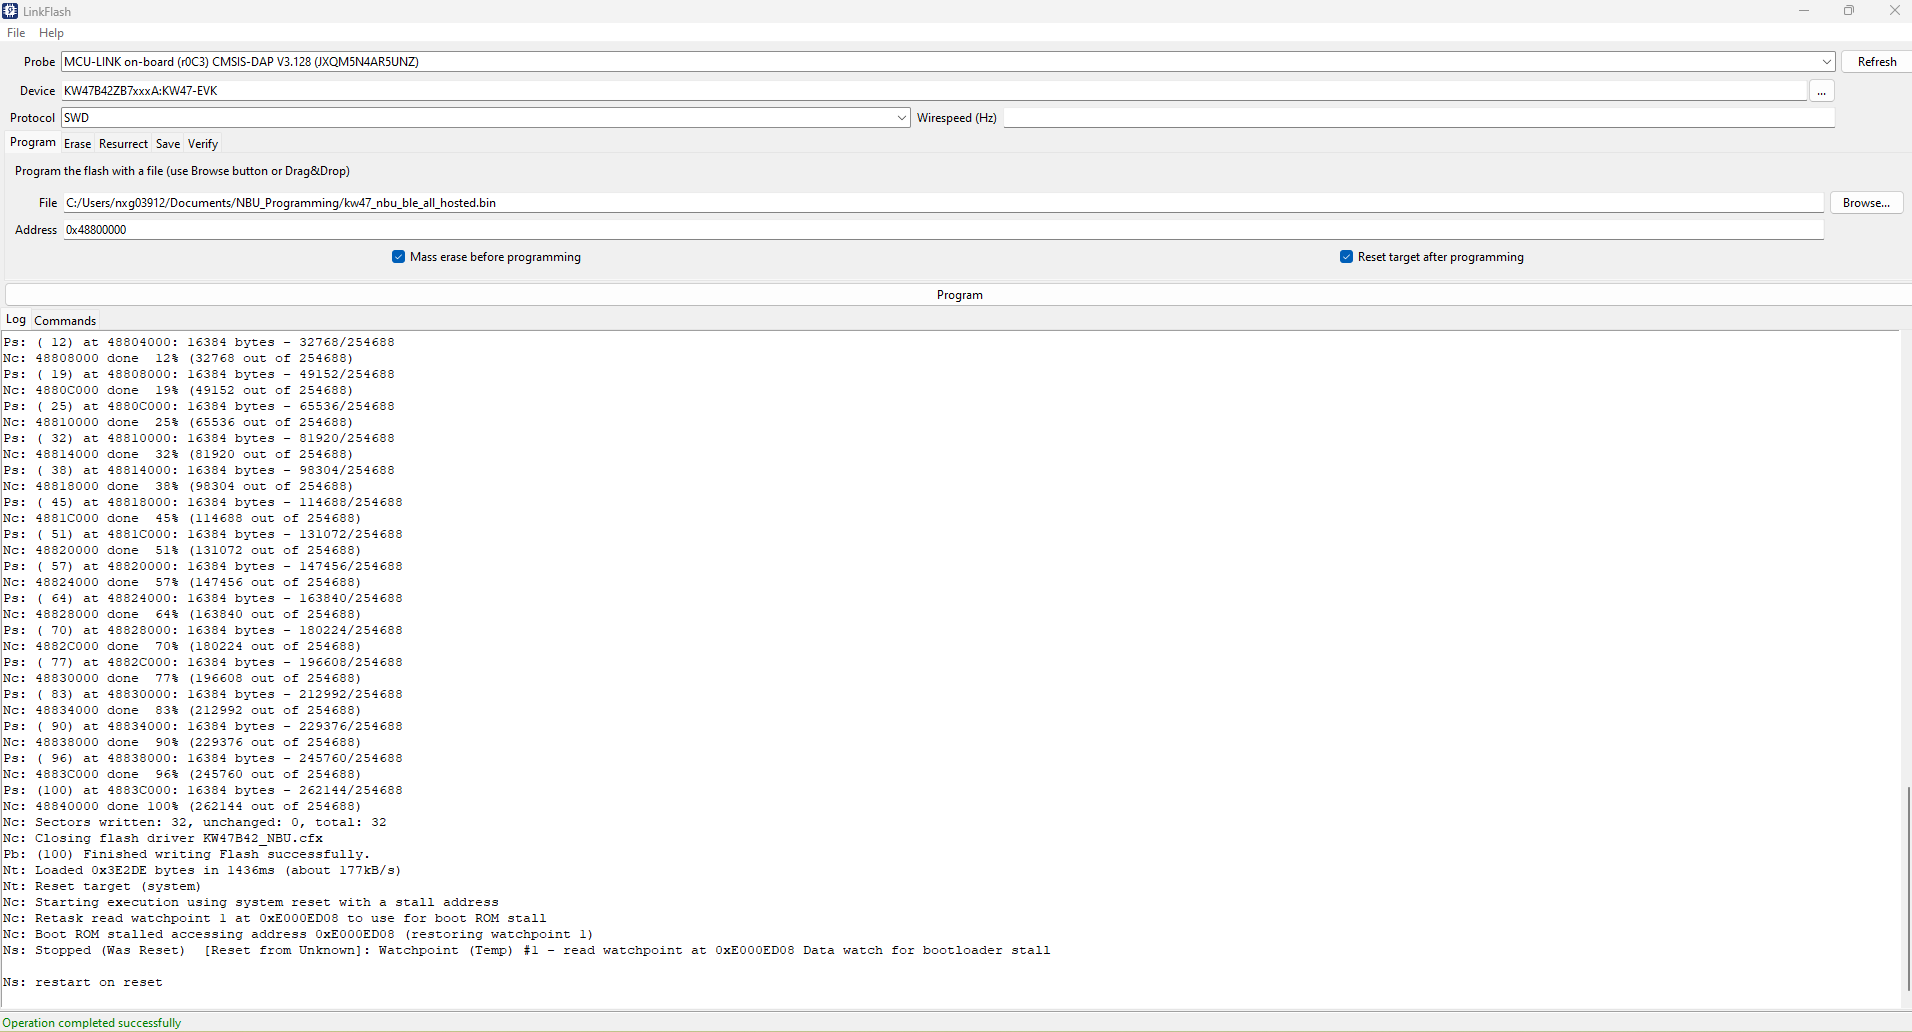
KW47B42ZB7xxxA:KW47-EVK、[Protocol(プロトコル)]として「シリアル・ワイヤ・デバッグ (SWD)」、[Address(アドレス)]として「0x48800000」を選択します。[Mass erase before programming(プログラミング前に一括消去する)]チェックボックスにチェックを入れます。 - イメージ・ファイルとして「
kw47_nbu_ble_all_hosted.bin」を選択します。[Program(プログラム)]ボタンをクリックし、フラッシュ処理が完了するのを待ちます。
3.2 MCUXpresso for VS Code IDEを使用したアプリケーションのビルドとフラッシュ
次の手順では、Arm® Cortex®-M33アプリケーション向けにMCUXpresso for VS Code IDEを使用したwireless_uartデモ・アプリケーションについて説明します。MCUXpresso for VS Code IDEのインストール手順およびKW47のSDKについては、このスタート・ガイドの「ソフトウェアの入手」セクションを参照してください。
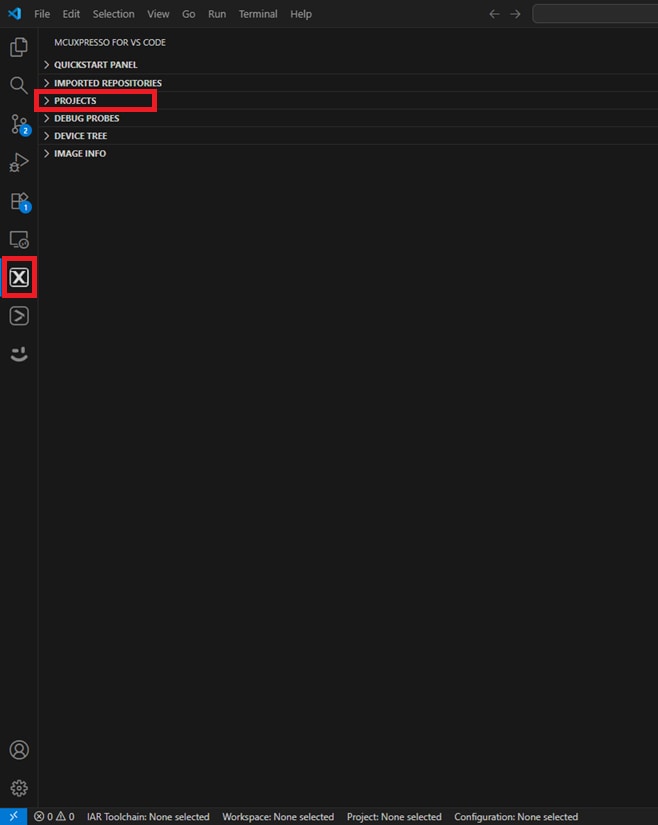
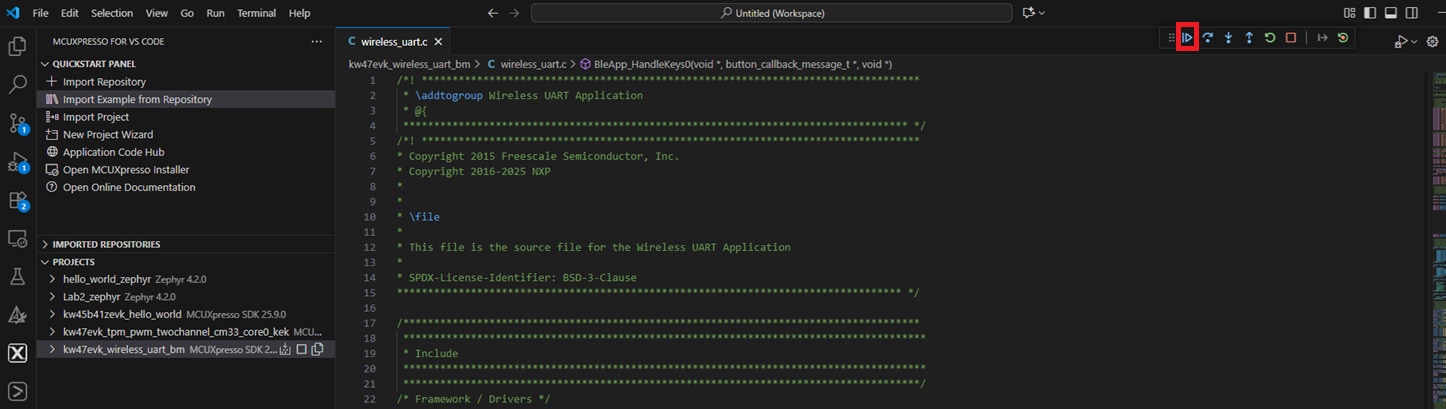
- VS Codeの左側にあるMCUXpressoアイコンをクリックしてアクティビティ・バーを開きます。次に、[Project(プロジェクト)]タブをクリックします。
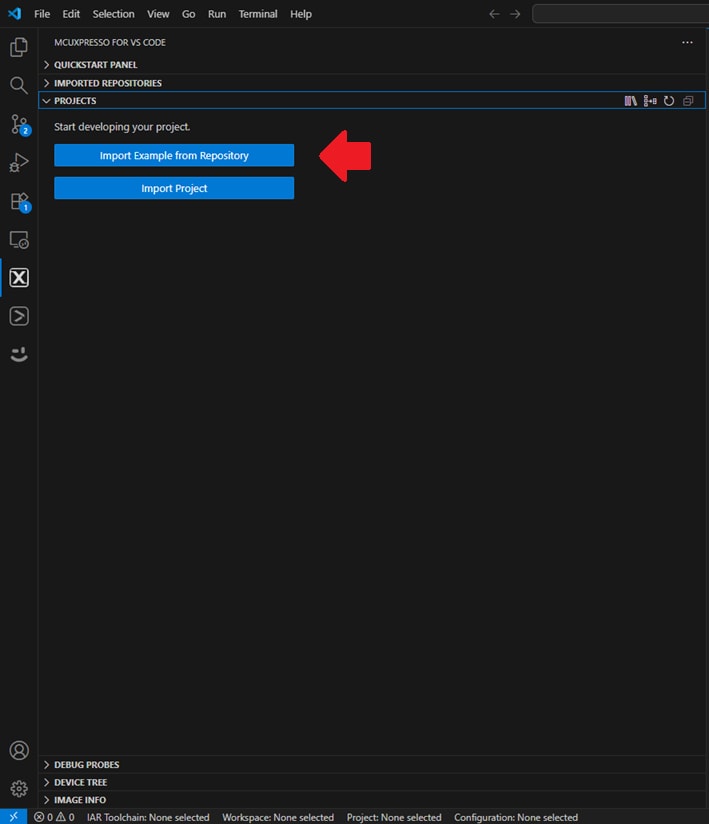
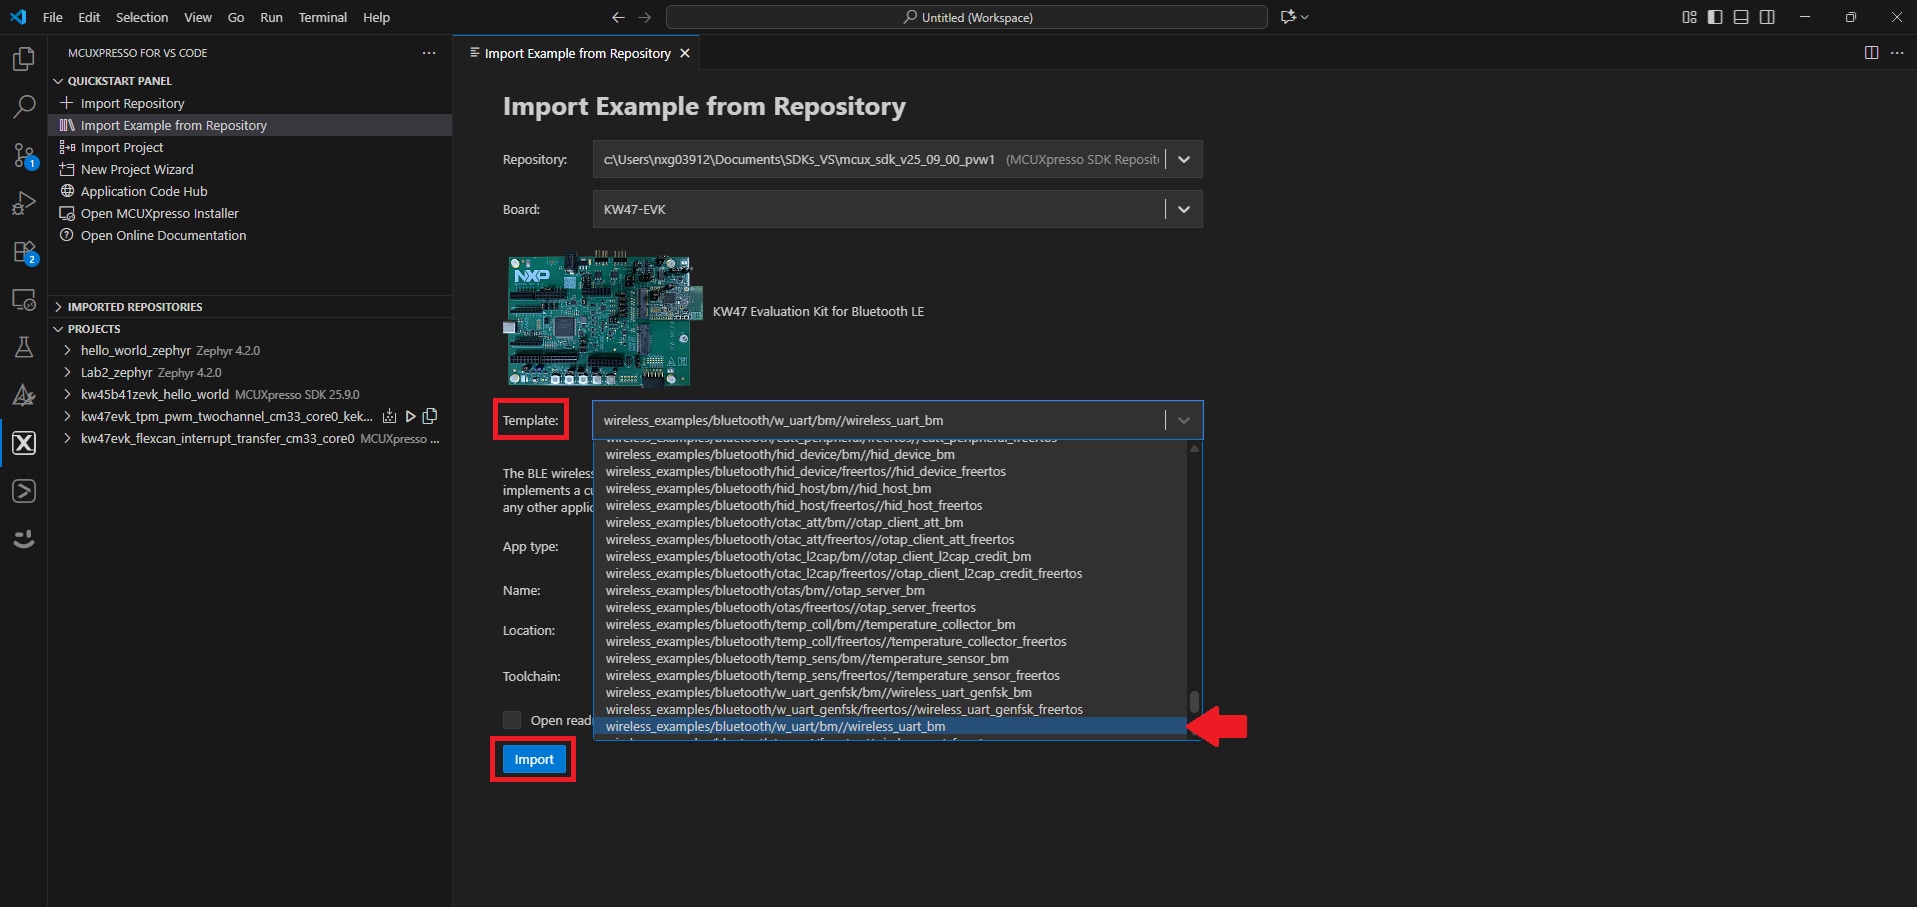
- [Import Example from Repository(リポジトリからサンプルをインポート)]オプションをクリックします
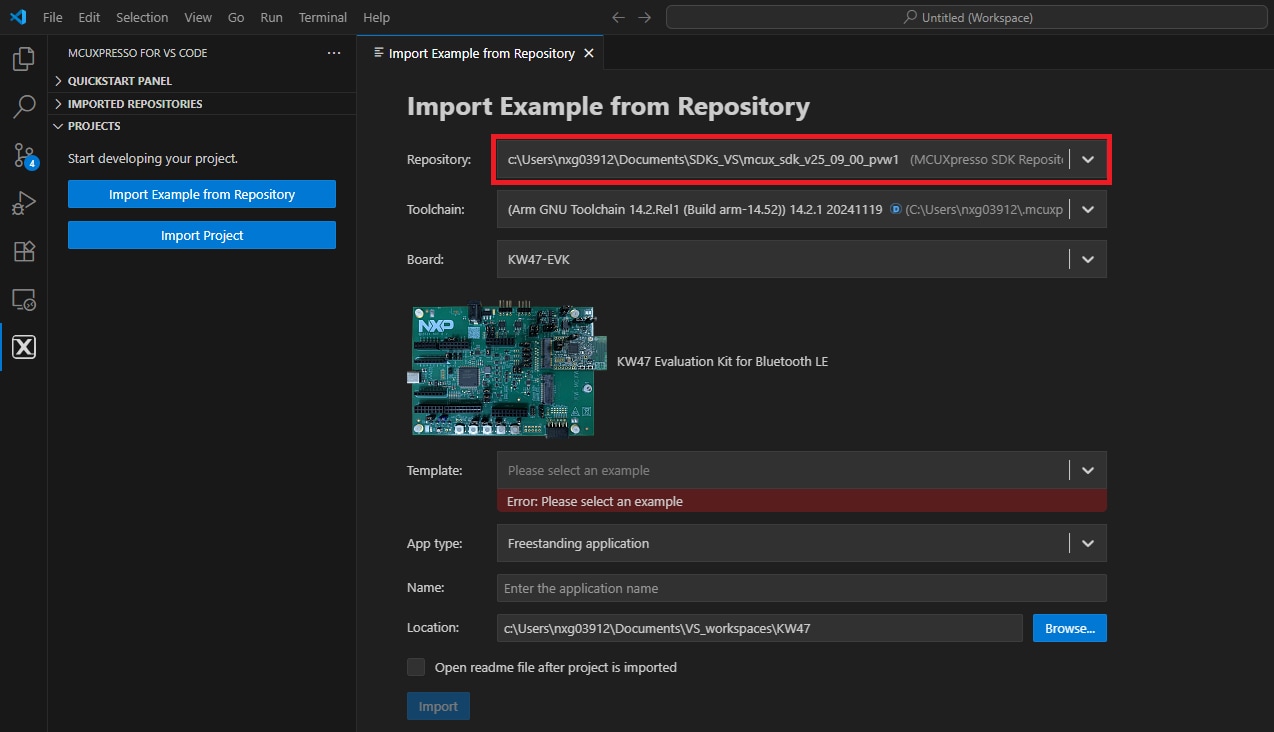
- [Repository(リポジトリ)]のドロップダウンの矢印をクリックして、前のステップでダウンロードしたKW47-EVKのSDKを選択します
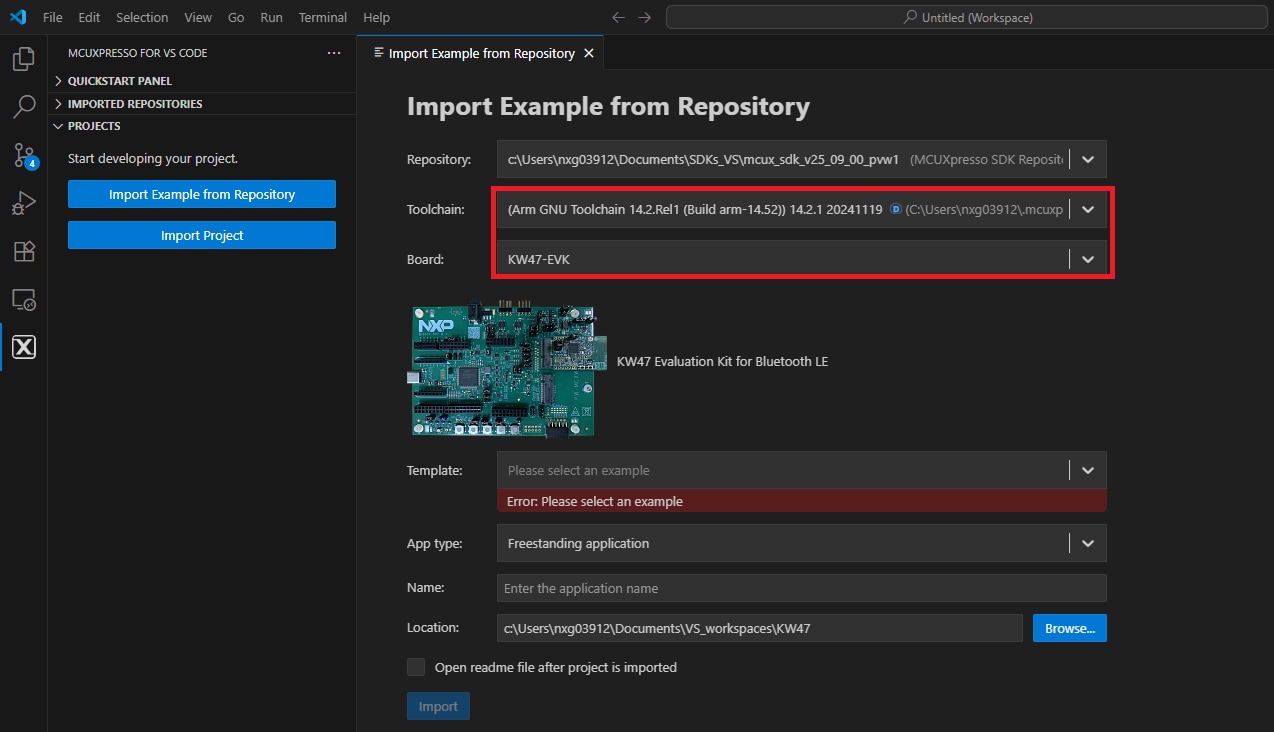
- [Toolchain(ツールチェーン)]のドロップダウンの矢印をクリックして、Arm GNUツールチェーンの最新バージョンを選択します。次に、[Board(ボード)]のドロップダウン・リストから「KW47-EVK」オプションを選択し、そのボードと互換性のあるテンプレート・アプリケーションを選択します
- [Template(テンプレート)]のドロップダウンの矢印をクリックして、以下を選択します。その後、[Import(インポート)]ボタンをクリックします
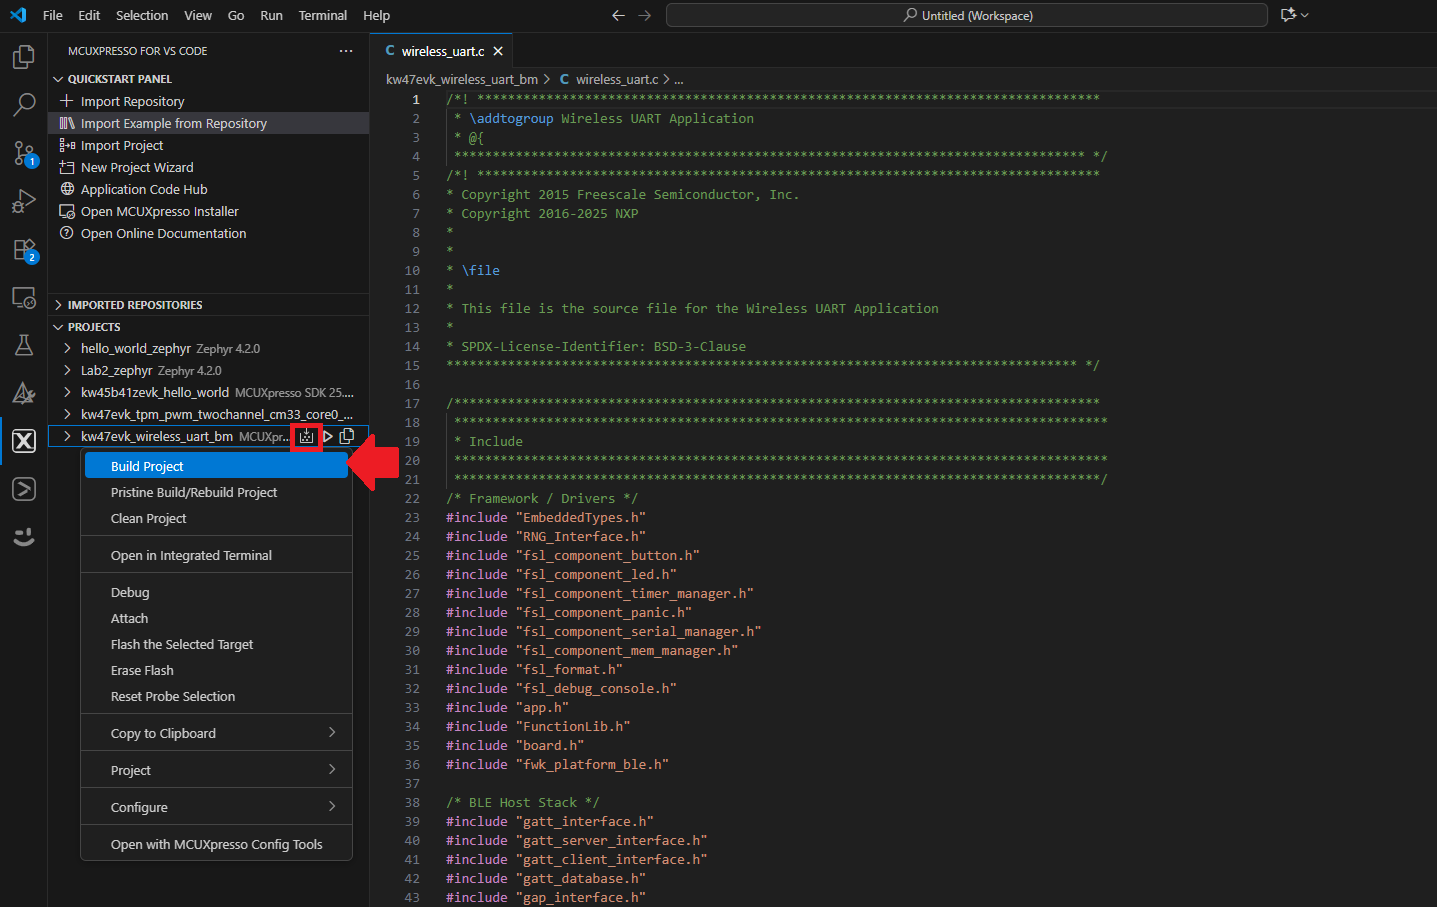
wireless_examples/bluetooth/w_uart/bm//wireless_uart_bm - アクティビティ・バーにある[PROJECTS(プロジェクト)]タブを展開します。前のセクションで作成したプロジェクトを右クリックし、[Build Project(プロジェクトのビルド)]を選択します。代わりに、プロジェクト名の横にある[Build Project(プロジェクトのビルド)]アイコンをクリックすることもできます
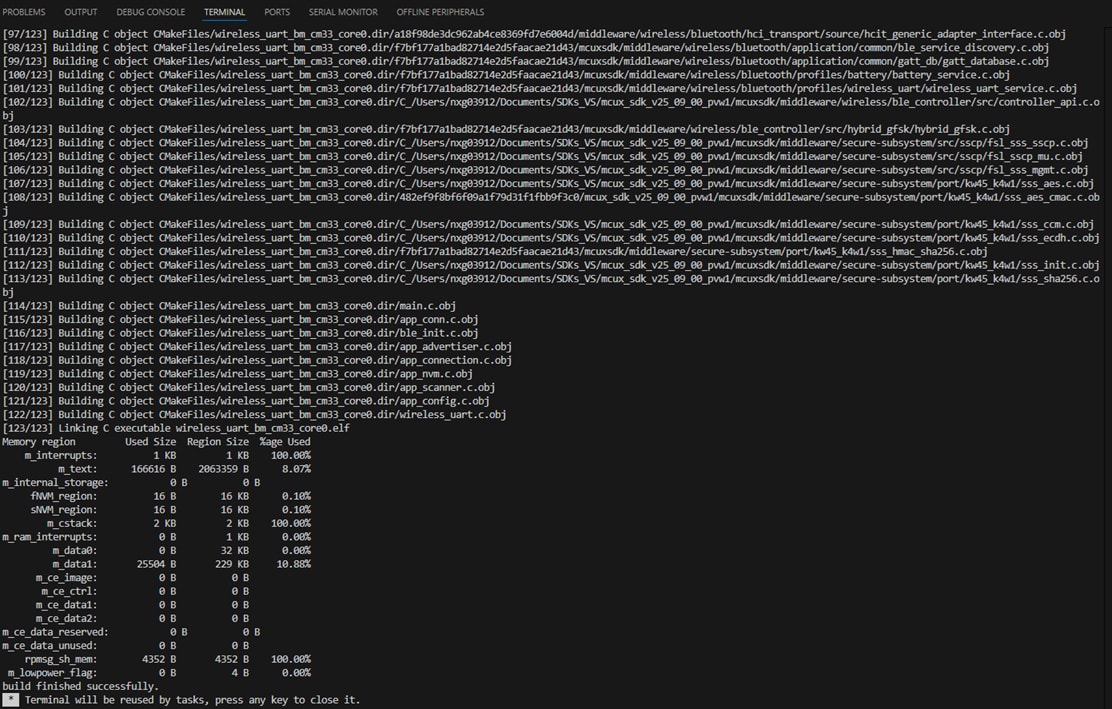
- プロジェクトは、コンソールにエラーや警告が表示されることなくビルドされる必要があります
- micro USBケーブルを
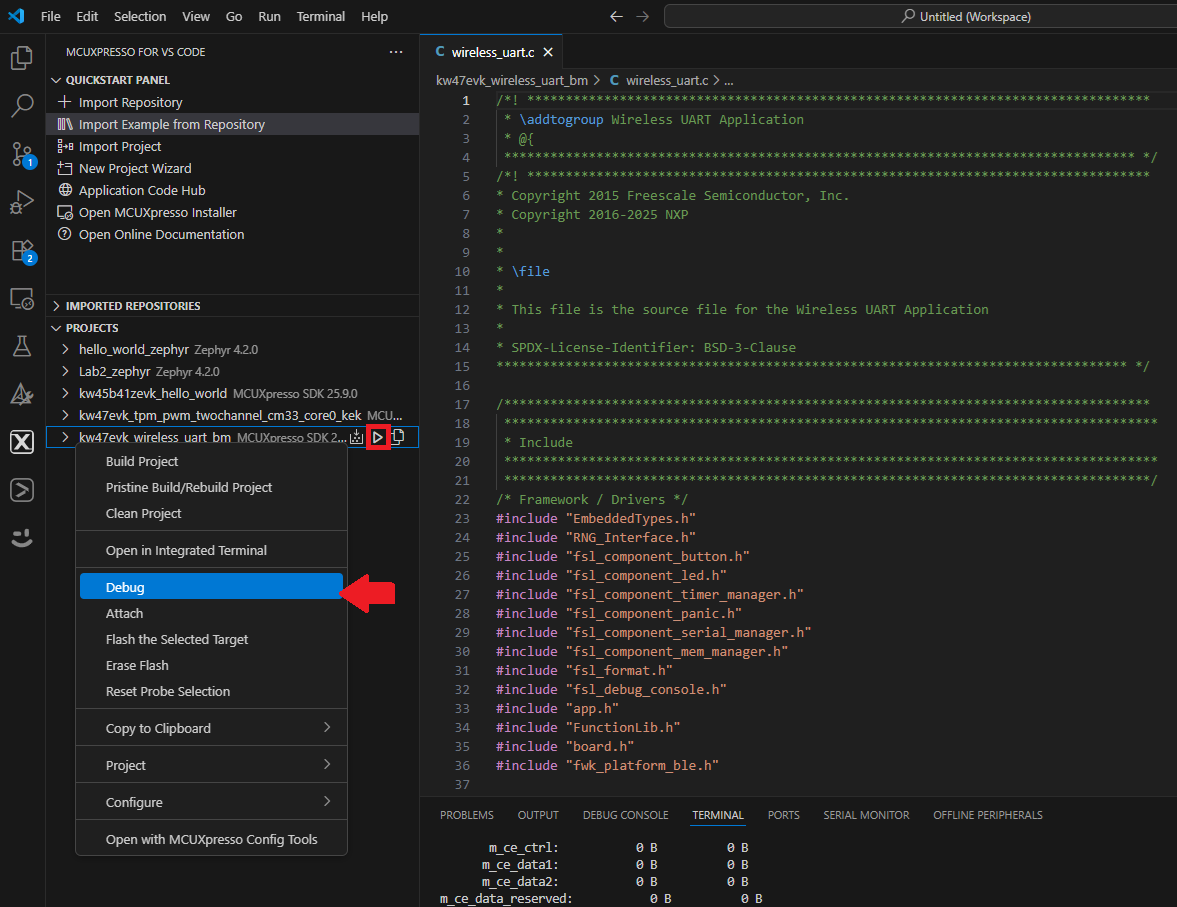
J14「MCU-LINK」ポートに挿入して、ボードをコンピュータに接続します - 前のセクションで作成したプロジェクトを右クリックし、[Debug(デバッグ)]を選択します。代わりに、プロジェクト名の横にある[Debug(デバッグ)]アイコンをクリックすることもできますこれにより、アプリケーションがボードにダウンロードされます
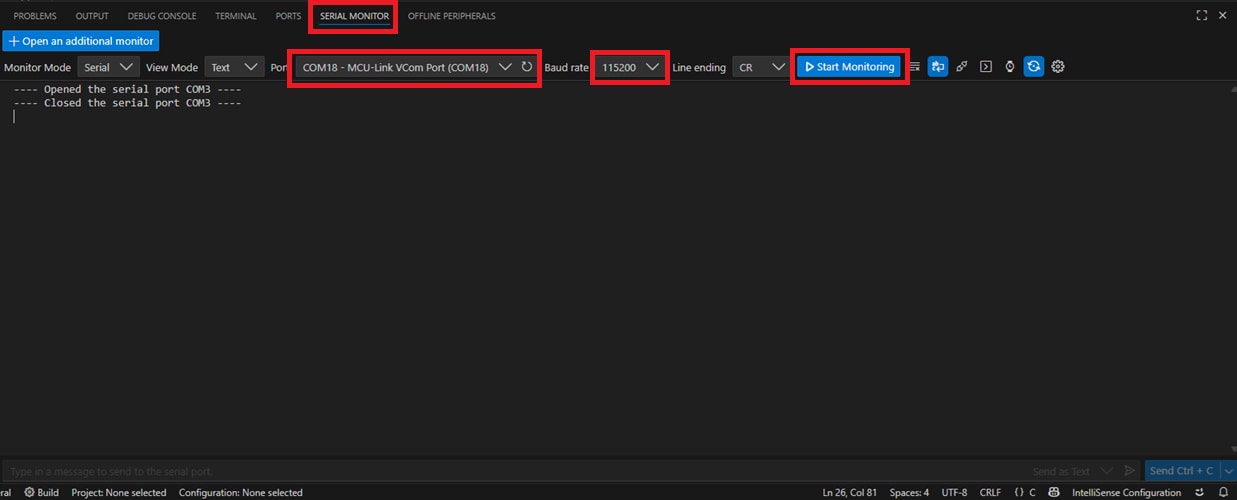
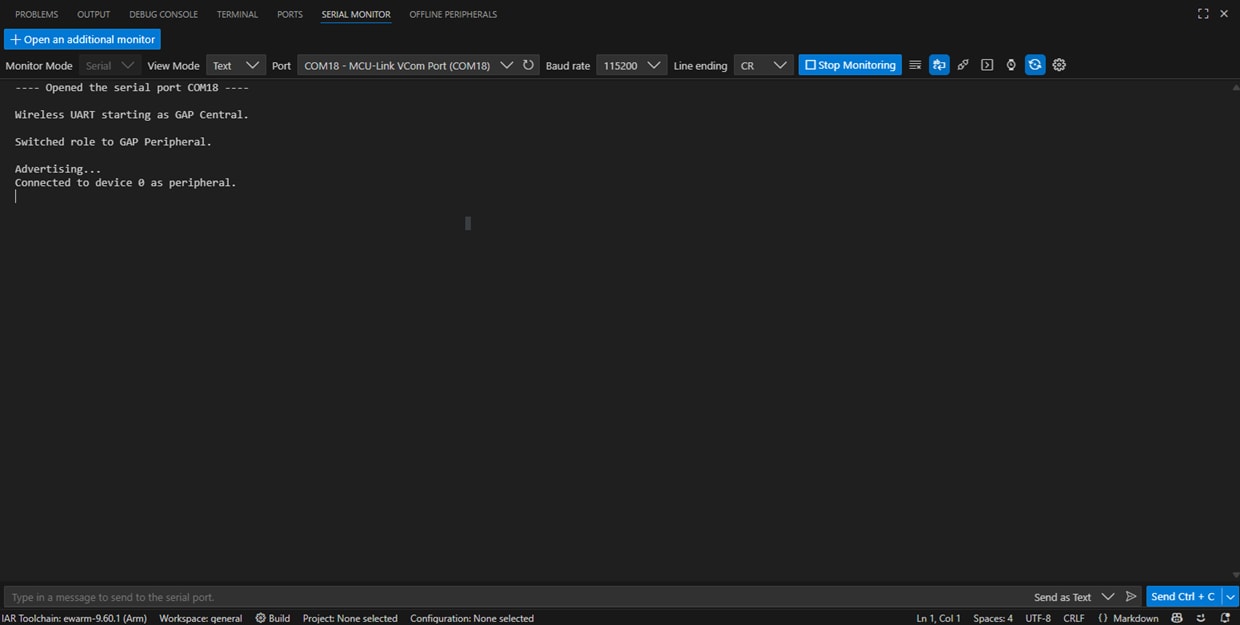
- VS Codeは、アプリケーションの出力を確認するために使用可能なネイティブのシリアル・ターミナルをサポートしています。パネル内の[Serial Monitor(シリアル・モニタ)]オプションをクリックします。次に、[Port(ポート)]として
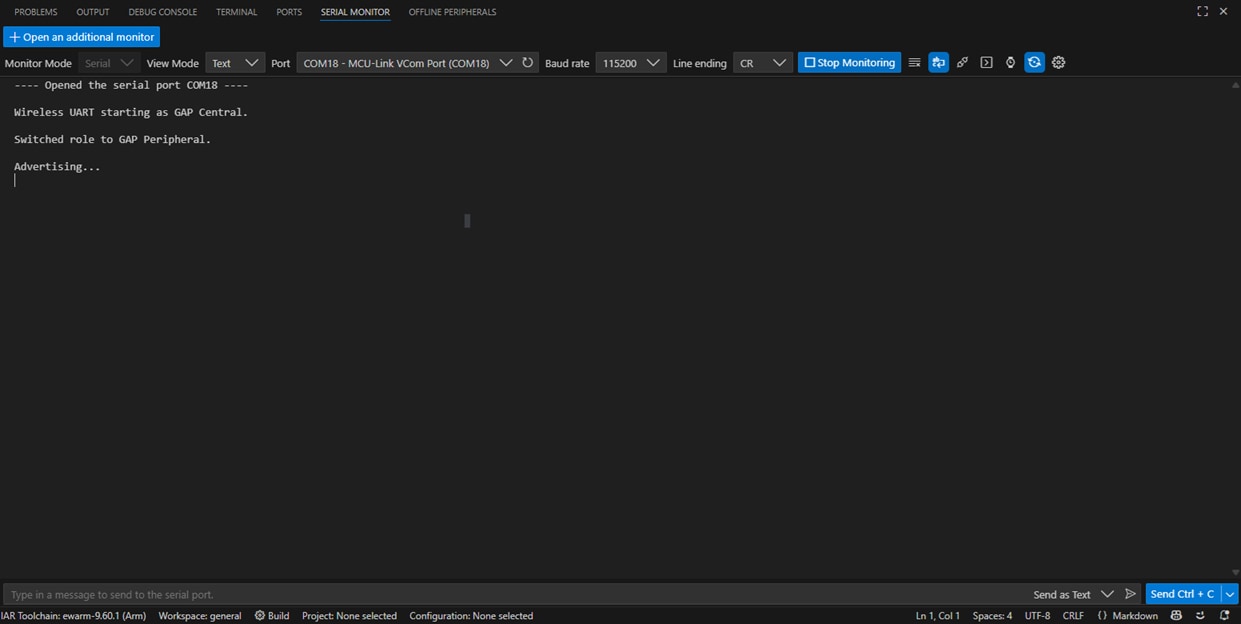
COMx - MCU-Link VCom Port(COMx - MCU-Link VComポート)を選択し、ボーレートを「115200」に設定します。最後に、[Start Monitoring(モニタリングの開始)]をクリックします - [Continue(続行)]アイコンをクリックしてアプリケーションを実行します。[Serial Monitor(シリアル・モニタ)]の[View the output(出力の表示)]をクリックします。
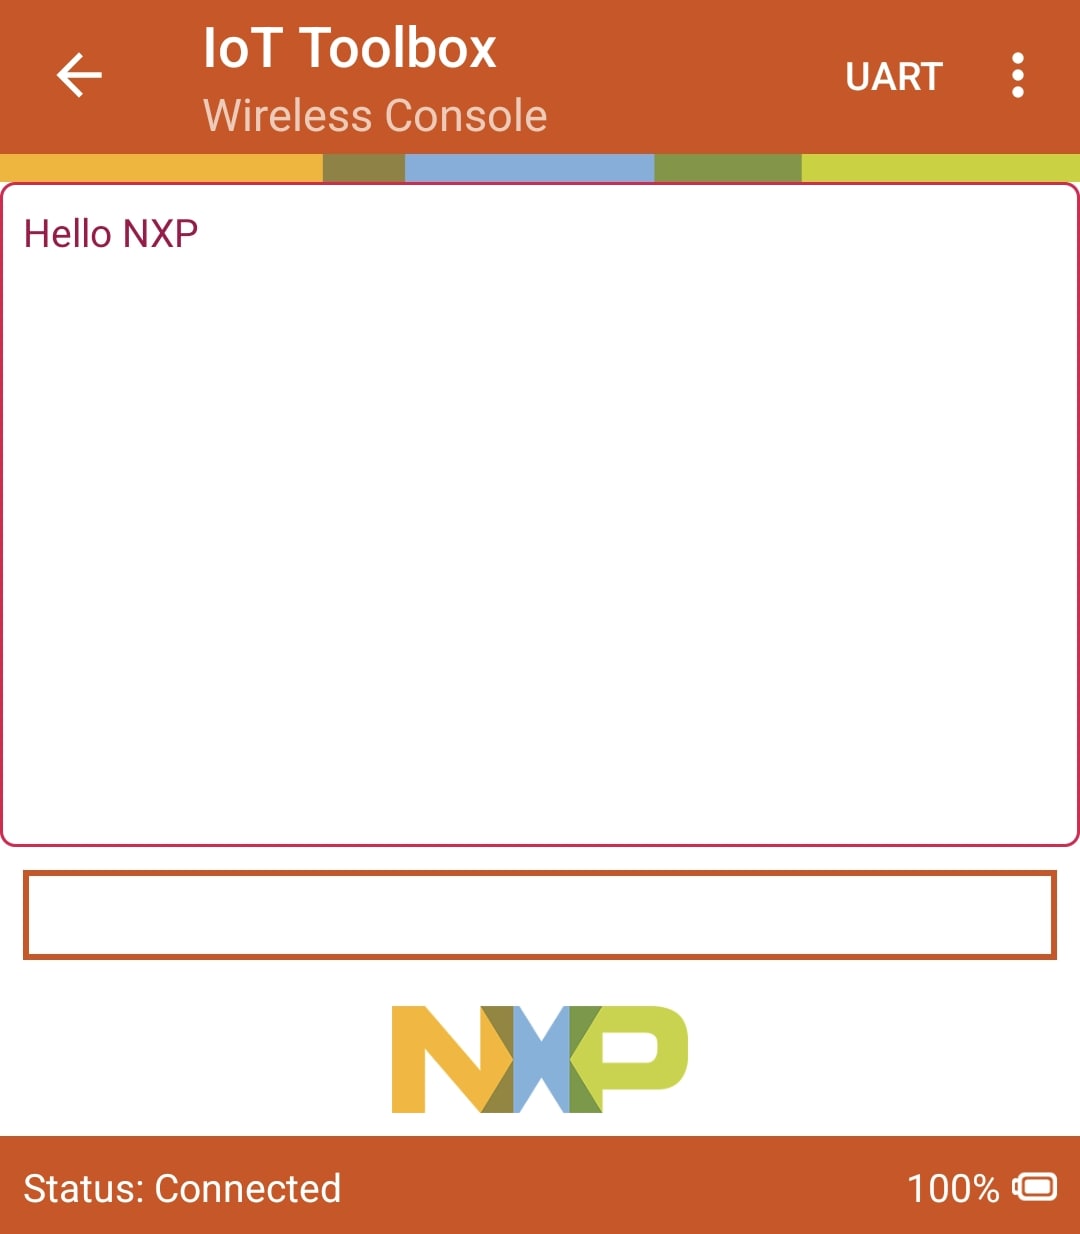
SW3ボタンを押して、BLEの役割をペリフェラルに切り替えます。次に、SW2を押して、BLEアドバタイジングを開始します。ターミナルに出力されたメッセージを確認してください - スマートフォンでNXP IoT Toolboxアプリを開きます。[Wireless UART(ワイヤレスUART)]アイコンを選択します。ワイヤレスUART対応デバイスを選択します。この時点で、IoT Toolboxアプリとシリアル・ターミナルの両方でデバイスのステータスが「Connected(接続済み)」と表示されているはずです
- NXPのIoT Toolboxアプリで任意のメッセージを入力し、送信します。シリアル・ターミナルにこのメッセージが表示されます
- シリアル・ターミナルで任意のメッセージを入力し、送信します。NXPのIoT Toolboxアプリにこのメッセージが表示されます


3.3 代替ツールチェーンを使用したアプリケーションのビルドと書き込み
MCUXpresso for VS Codeは、コードの編集と開発向けに最適化された組込み開発者エクスペリエンスを提供します。VS Codeでアプリケーションをビルドし、フラッシュに書き込む方法を習得しましょう。
別のツールチェーンを使用する場合:
IARおよびKEIL向けのデモも提供しています。
4. 作成
4.1 MCUXpresso for VS Code IDEからサンプル・プロジェクトのクローンを作成する
次の手順では、汎用出力 (GPO) の操作方法について説明します。このサンプルでは、パルス幅変調 (PWM) 信号を生成し、RGB LEDの輝度を変更するように、タイマPWMモジュール (TPM) を設定します。
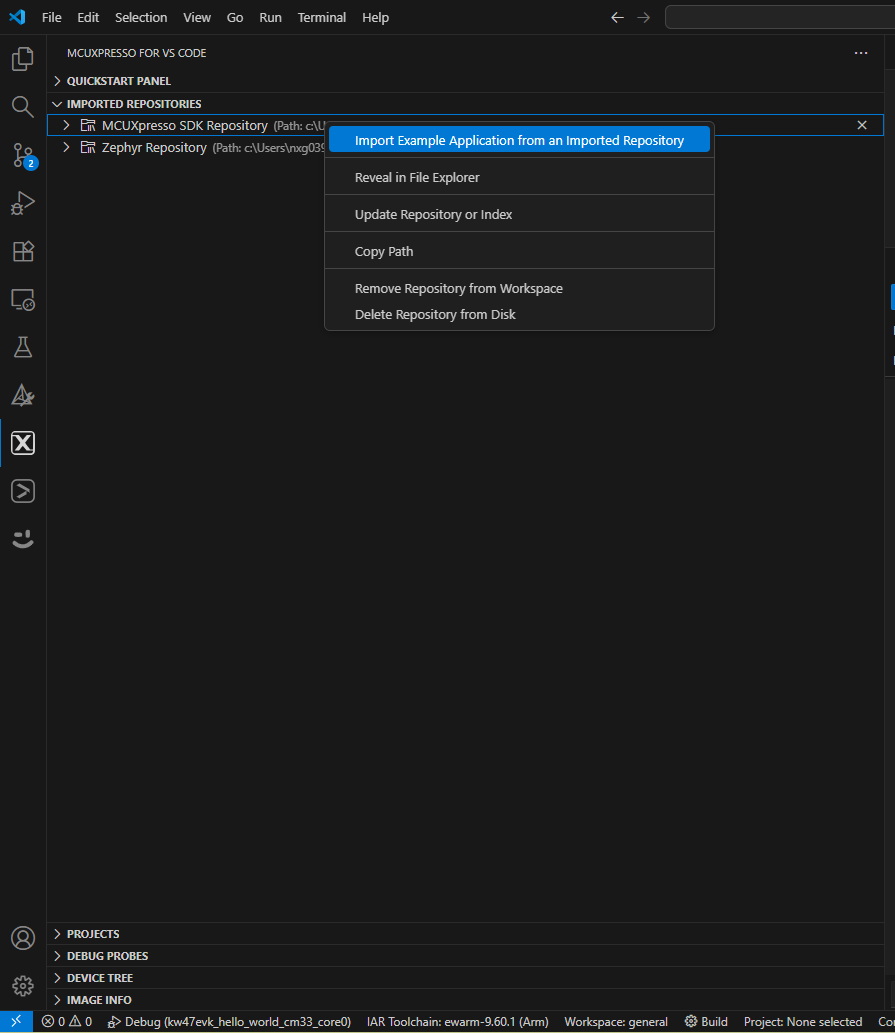
- [IMPORTED REPOSITORIES(インポートされたリポジトリ)]タブを展開したら、前のステップでダウンロードしたKW47-EVKのSDKを選択します。次に、[Import Example Application from an imported Repository(インポートされたリポジトリからサンプル・アプリケーションをインポート)を選択します
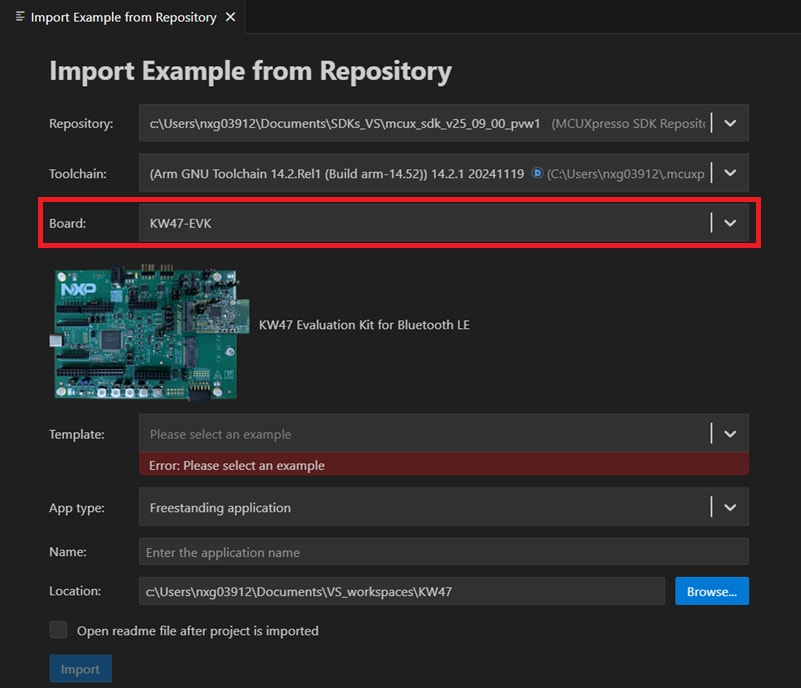
- 次に、[Board(ボード)]のドロップダウン・リストをクリックしたら、その「ボード」と互換性のあるテンプレート・アプリケーションとして「KW47-EVK」オプションを選択します
- [Template(テンプレート)]のドロップダウンの矢印をクリックして、以下を選択します。その後、[Import(インポート)]ボタンをクリックします。
driver_examples/tpm/tpm_pwm_twochannel_cm33_core0 - 前のセクションで作成したプロジェクトを右クリックし、[Debug(デバッグ)]を選択します。代わりに、プロジェクト名の横にある[Debug(デバッグ)]アイコンをクリックすることもできますこれにより、アプリケーションがボードにダウンロードされます。
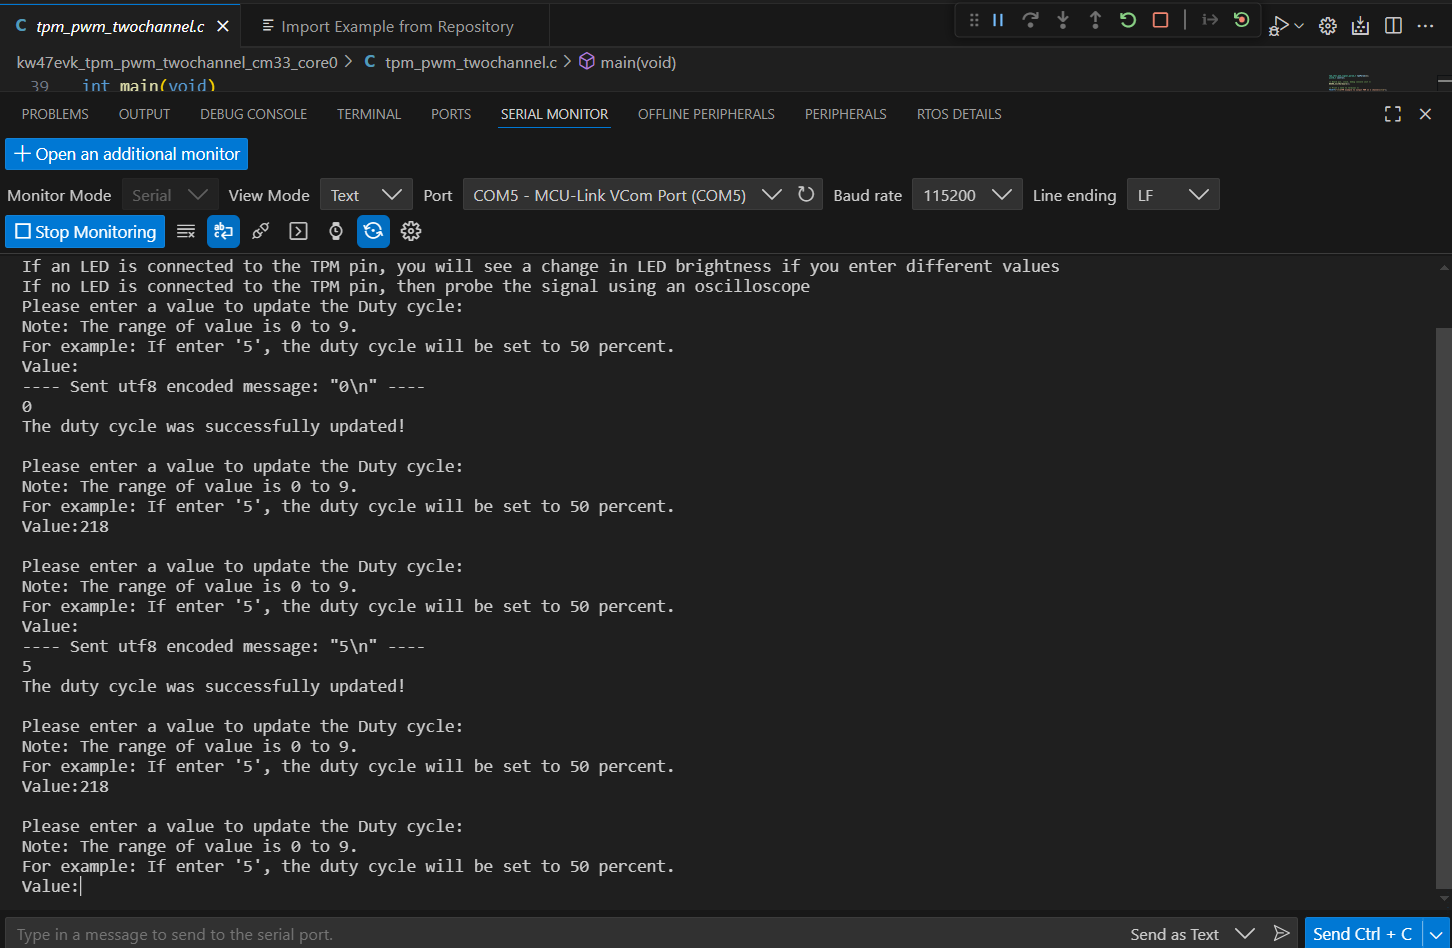
- VS Codeには、アプリケーションの出力を確認するために使用可能なネイティブのシリアル・ターミナルが含まれています。パネル内の[Serial Monitor(シリアル・モニタ)]オプションをクリックします。次に、[Port(ポート)]として
COMx - MCU-Link VCom Port(COMx - MCU-Link VComポート)を選択し、ボーレートを「115200」に設定します。最後に、[Start Monitoring(モニタリングの開始)]をクリックします - [Continue(続行)]アイコンをクリックしてアプリケーションを実行します。[Serial Monitor(シリアル・モニタ)]で出力を確認します。アプリケーションに、0~9の数字を入力するよう求めるプロンプトが表示されます。この数字を指定することでデューティ・サイクルを変更し、RGB LEDの輝度を調整します


4.2 サード・パーティ製IDE向けMCUXpresso Config Toolsを使用してサンプル・プロジェクトのクローンを作成する
次の手順では、汎用出力の操作方法について説明します。このサンプルでは、PWM信号を生成してRGB LEDの輝度を変更するよう、TPMを設定します。
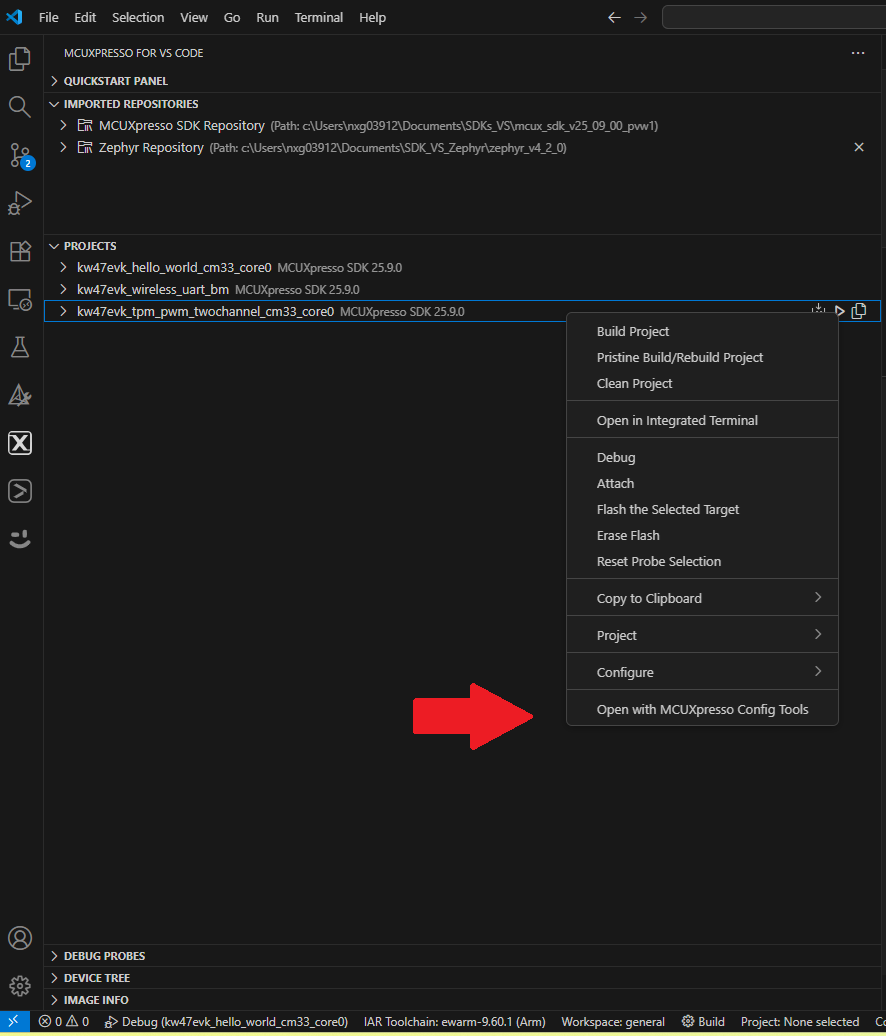
- アクティビティ・バーにある[PROJECTS(プロジェクト)]タブを展開します。前のセクションで作成したプロジェクトを右クリックし、[Open with MCUXpresso Config Tools(MCUXpresso Config Toolsで開く)]を選択します
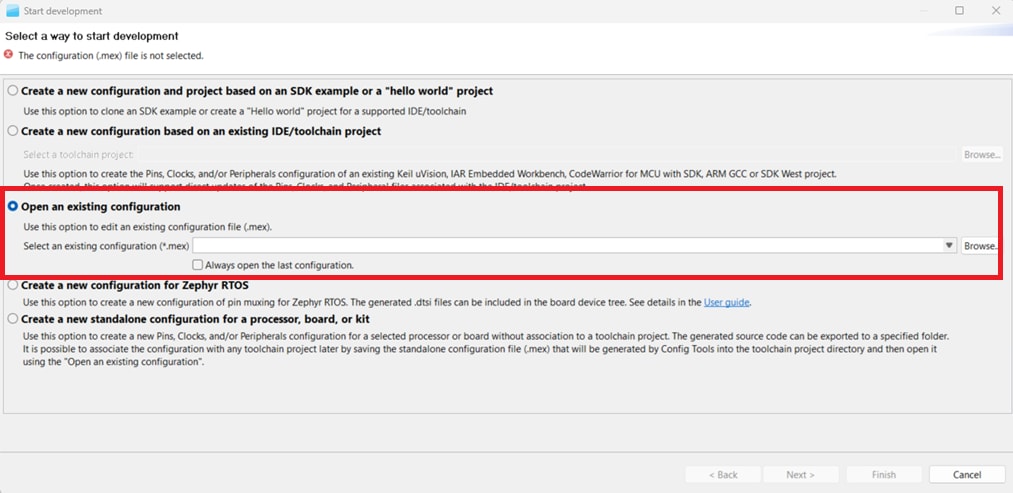
- ウィザードが表示されたら、[Open an existing configuration(既存の構成を開く)]ボタンを選択し、[Next(次へ)]をクリックします。インポートしたサンプル・プロジェクトに構成の
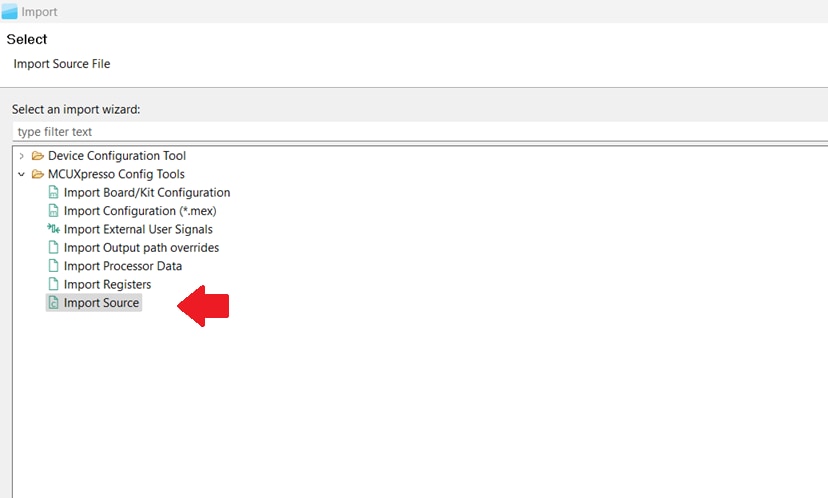
.mexファイルが含まれていない場合は、[Cancel(キャンセル)]ボタンをクリックしてください。 - 次の画面で、インポート・ウィザード由来の[Import Source(ソースのインポート)]オプションを選択します。この後、[Next(次へ)]ボタンをクリックします。
- 次の画面で、[Browse(参照)]オプションをクリックします。この後、インポートするpin_mux.cソース・ファイルを検索します。このファイルは以下のパスにあります。[Finish(完了)]ボタンをクリックします。
\mcuxsdk\examples\_boards\kw47evk\driver_examples\tpm\pwm_twochannel - ソース・ファイルがインポートされると、MCUXpresso Config Toolsのインターフェースにプロジェクトのピン構成が表示されます。


4.3 ピン・ツールを使用して、LEDがルーティングされたピンを変更する
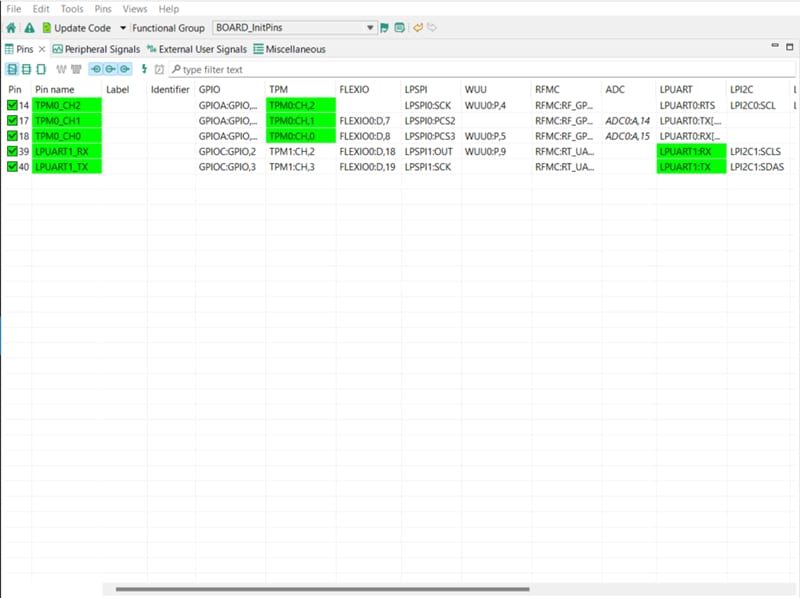
以降の手順ではMCUXpresso Config Toolsを使用します。[Pins(ピン)]ビューの[Show dedicated pins(専用ピンを表示)]および[Show not routed pins(ルーティングされていないピンを表示)]のチェックボックスのチェックを外すと、ルーティングされているピンのみが表示されます。ルーティングされたピンには、ピンの名称の横に緑色のボックスが表示されます。
- ルーティングされた各ピンに選択された機能は、緑色にハイライト表示されます。
- 現在の設定では、
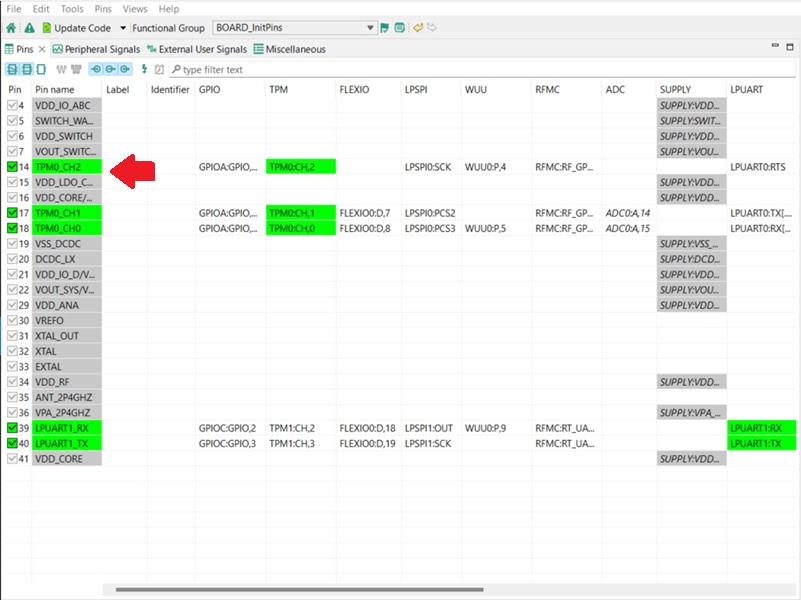
PTA20とPTA21が「TPM」の出力としてルーティングされています。ここで、緑色LEDを有効にするためにピン構成を追加しましょう。 - [Show not routed pins(ルーティングされていないピンを表示)]を選択し、他のすべてのオプションを表示させます。緑色LEDを有効にするには、
PTA19を検索し、「TPM」列でTPM0_CH2を選択します。 - 次に、ピン・ツールによって生成された、新たに更新された
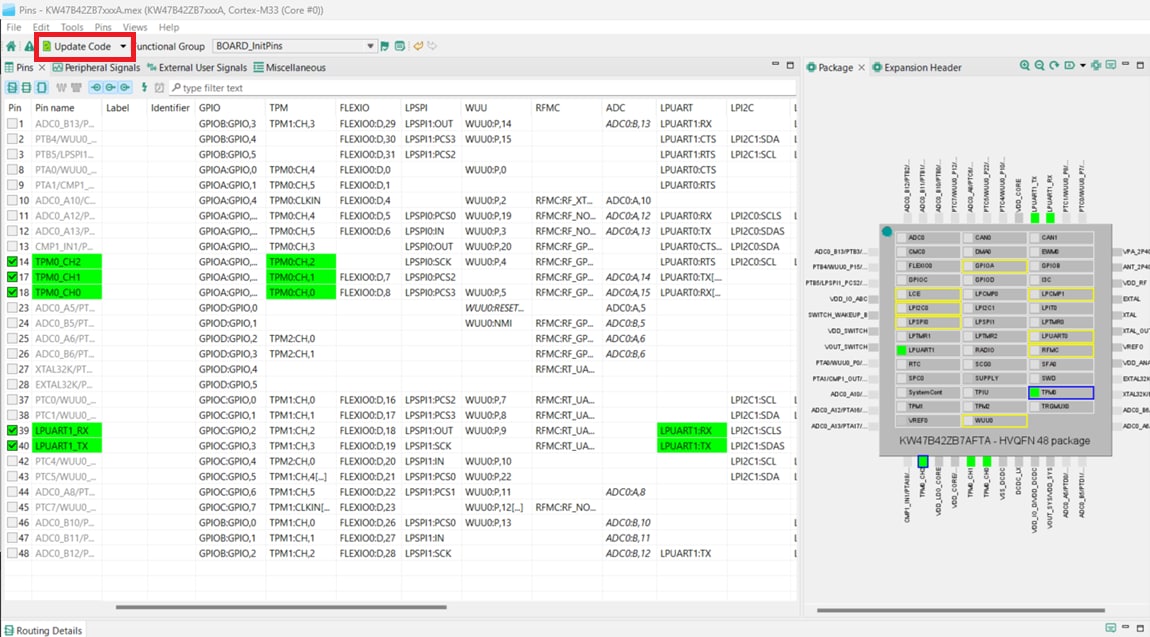
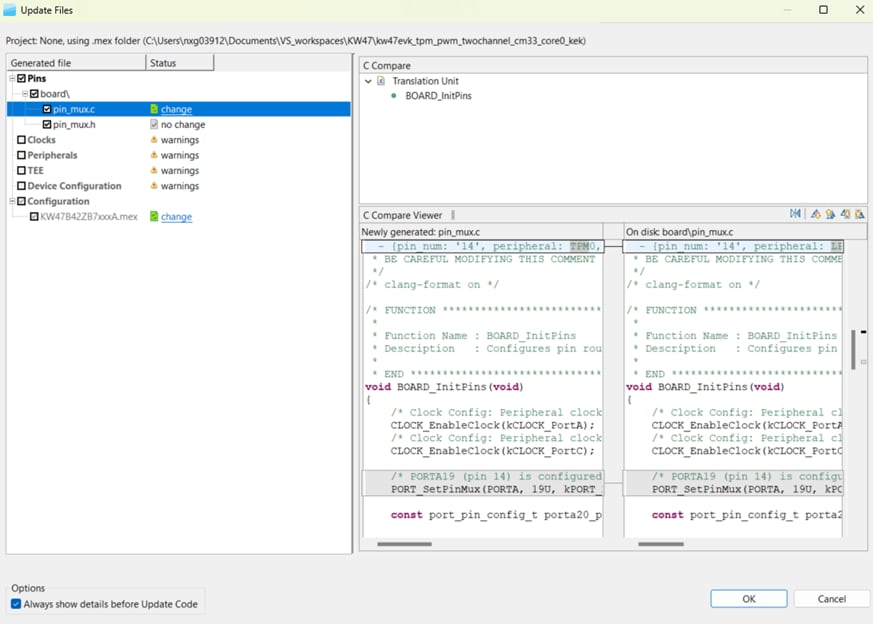
pin_mux.cファイルとpin_mux.hファイルをエクスポートすることで、この変更内容をプロジェクトに実装します。構成ファイル(.mexファイル)がディスクに保存されていない場合には、[File(ファイル)]メニューのオプションを使用して保存します。次に、メニュー・バーの[Update Project(プロジェクトの更新)]をクリックします - ポップアップ画面に変更するファイルが表示されます。[diff]をクリックすると、現在のファイルとピン・ツールで生成された新しいファイルとの違いを確認できます。[OK]をクリックして、新しいファイルをプロジェクトに上書きします。
- この後、Config Toolsにより、対応するピン構成のソース・コードが生成されているはずです。ソース・コードは、構成ファイル (
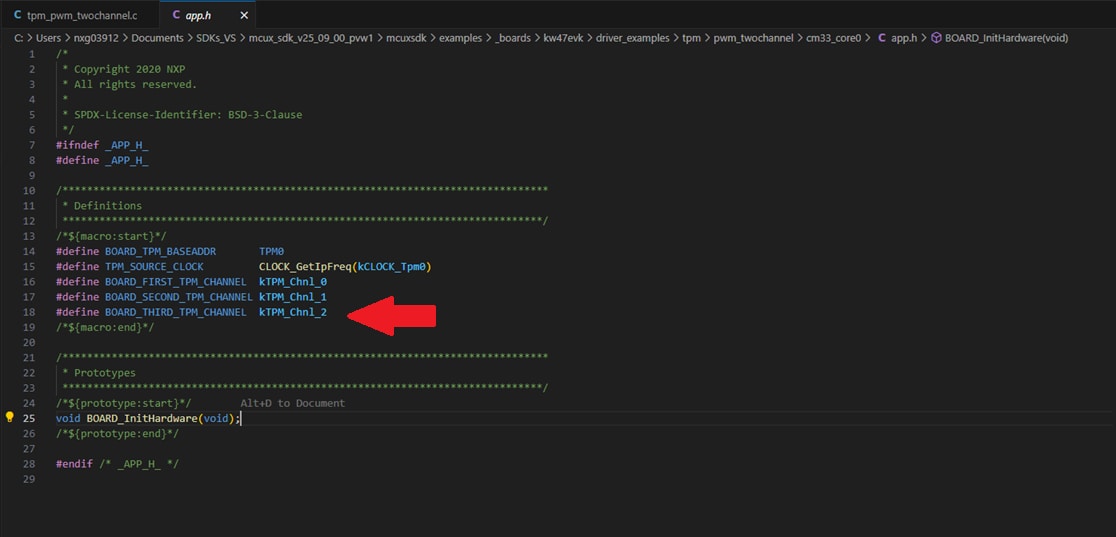
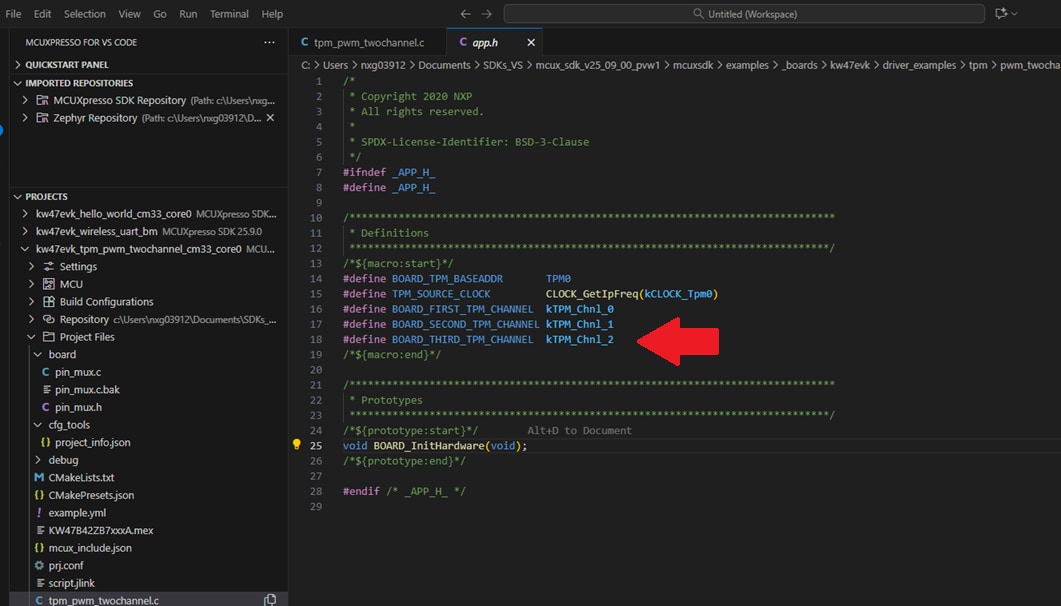
.mex) と同じディレクトリにある「board(ボード)」フォルダに生成されます。生成されたpin_mux.cソース・ファイルとpin_mux.hソース・ファイルを検索します。ここで、\mcuxsdk\examples\_boards\kw47evk\driver_examples\tpm\pwm_twochannelファイルにあるプロジェクトのソース・ファイルを、新しく生成されたソース・ファイルに置き換えます。 app.hソース・ファイルでのTPM0チャネル2の使用を有効にするためのマクロを追加します。- 次に、
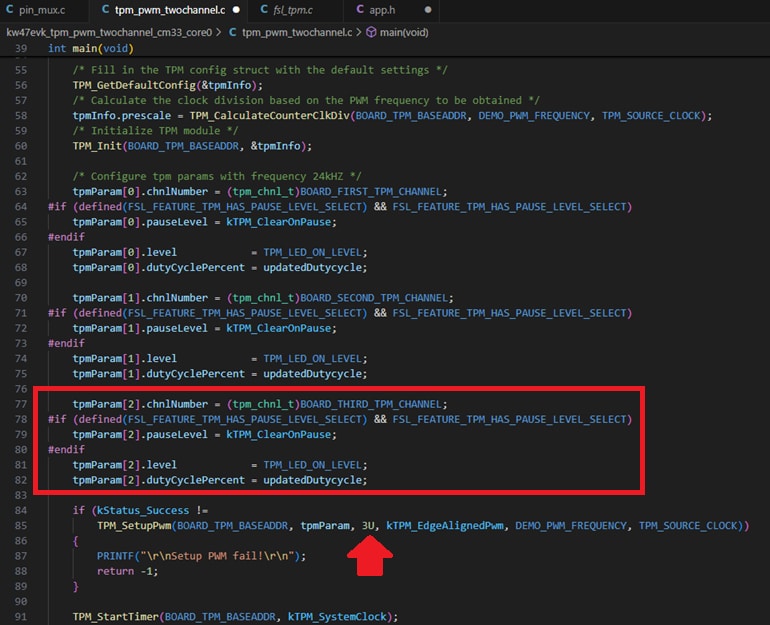
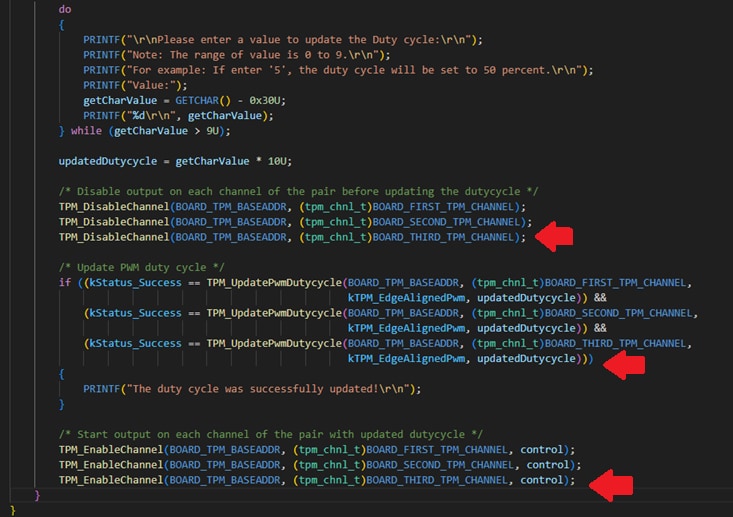
TPM0チャネル2を有効にするために必要なコードを追加します。tpm_pwm_ twochannel.cコードを編集するには、以下の画像を参考にしてください。 - 前のセクションで行ったように、プロジェクトをビルドしてダウンロードします。
- アプリケーションを実行します。RGB LEDが白色で点灯しているのが確認できるはずです[Serial Monitor(シリアル・モニタ)]を使用して輝度を調整します。
- デバッグ・セッションを終了します。
5. MCUXpresso開発者エクスペリエンス
以下の各セクションで、柔軟なプロトタイピングと開発のために提供されているエコシステムについてご覧ください。以下のビデオでは、FRDMプラットフォーム、フル機能のEVK、および拡張機能向けの互換シールドについて紹介しています。さらに、NXPのGitHubを通じて多数のアプリケーション・サンプルを提供しているアプリケーション・コード・ハブ (ACH) ポータルについて詳しく説明しています。
5.1 FRDMプラットフォーム、フル機能のEVK、シールド
迅速なプロトタイピングのためのプラットフォームとして、低コストのFRDMプラットフォームまたはフル機能のEVKを選択できます。
FRDM開発ボードは、標準のフォーム・ファクタとヘッダー、MCU I/Oへの簡単なアクセス、オンボードMCU-Linkデバッガ、USB-Cケーブルを備えています。フル機能の評価キットには、I/Oおよびインターフェースへの拡張アクセス、Wi-Fi拡張機能のほか、追加のMCU-Link機能が含まれます。互換性のあるClickボードやArduinoシールドも多数あります。Open CMSIS Packでサポートされているデバイスについては、ACHでサンプルが提供されている場合があります。そうでない場合でも、その多くがI²C (Inter-Integrated Circuit)、シリアル・ペリフェラル・インターフェース (SPI)、汎用非同期送受信回路 (UART) などのシリアル・インターフェースを利用して容易に使用でき、MCUXpresso SDKでドライバとサンプルが提供されています。
5.2 アプリケーション・コード・ハブ
ACHは、ソフトウェアをすばやく見つけることができるインタラクティブなダッシュボードであり、NXPのMCUXpresso開発者エクスペリエンスをさらに向上させます。ACHに今すぐアクセスして、この新しいインタラクティブなアプリケーション・コード・ハブの詳細やその利点について確認しておきましょう。
ACHのソフトウェアはNXPのGitHubリポジトリに置かれているため、その場所に直接アクセスして簡単にクローンを作成することができます。
5.3 デモのご紹介
次のデモでは、モータ制御シールドと低コストLCDを備えた、FRDMプラットフォームを基盤とするシステムを使用して、ACHからプロジェクトをインポートする方法を示しています。評価ボードがこのシステムと異なる場合でも、以降の手順はサポート対象のすべてのプラットフォームにも当てはまります。