Getting Started with the FRWY-LS1046A
このドキュメントの内容
-
Plug It In
-
Get Software
-
Build, Run
サインイン 進行状況を保存するには アカウントをお持ちでない方 アカウントを作成する。
お客様の LS1046A Freeway
1. Plug It In
1.1 Out of the Box
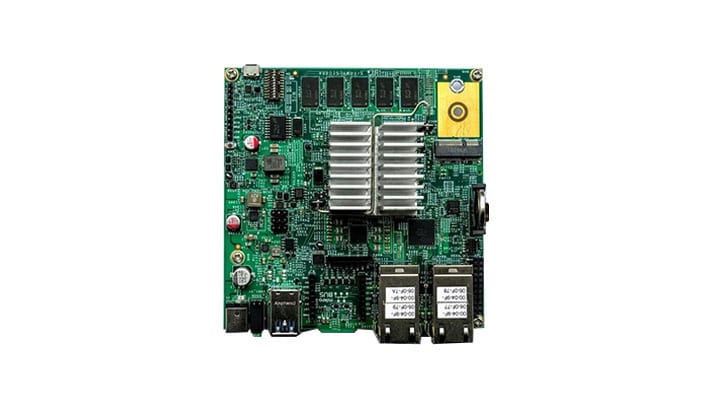
The FRWY-LS1046A is a high-performance, low-cost edge computing, evaluation, and development platform that supports the LS1046A architecture quad-core 64-bit processor and is capable of supporting more than 40,000 CoreMark performance. The platform can enable a wide range of high-compute applications including AI/ML, industrial gateway, smart building gateway, wireless gateway, and many more.
1.1 Out of the Box
The FRWY-LS1046A comes in two development platform configurations - the FRWY-LS1046A-AC and the FRWY-LS1046A-TP, which adds a Google TPU module for accelerated inferencing for AI/ML applications. Unbox your new hardware kit and review the contents inside the box.
 "
"
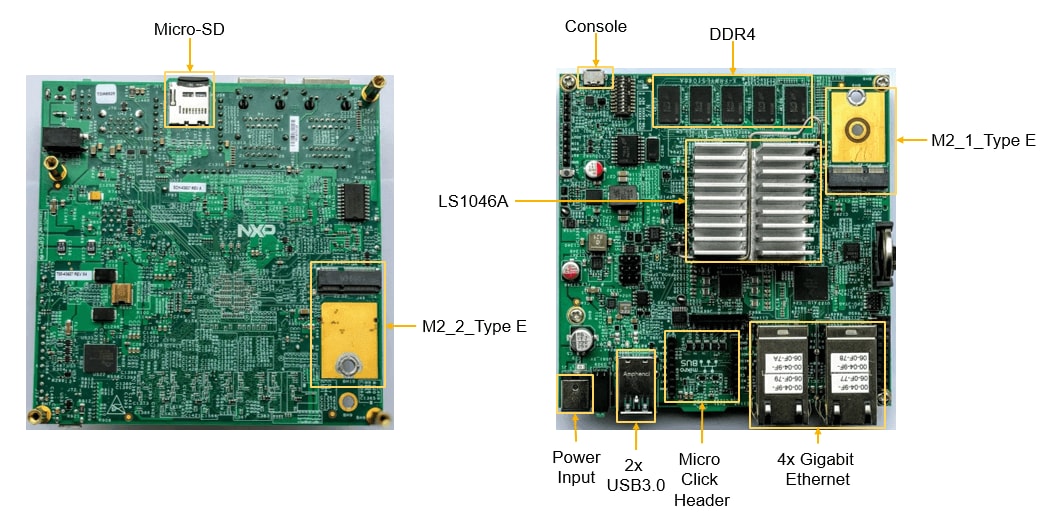
Figure 1. FRWY-LS1046A board back and front.
| FRWY-LS1046A-TP | FRWY-LS1046A-AC |
|---|---|
| FRWY-LS1046A board hardware assembly with enclosure. | FRWY-LS1046A board hardware assembly with enclosure. |
M.2 cards
installed:
|
M.2 card
installed:
|
| 12 V, 5 A DC power adapter | 12 V, 5 A DC power adapter |
| Universal AC input adapter1 | Universal AC input adapter1 |
| USB Type A to micro-B cable | USB Type A to micro-B cable |
| 32 GB TF (micro-SD) card, programmed for FRWY-LS1046A-TP | 32 GB TF (micro-SD) card, programmed for FRWY-LS1046A-AC |
| Shunt jumpers (5) | Shunt jumpers (10) |
| Antennas (2) | Antennas (2) |
| Quick reference card2 | Quick reference card2 |
1.2 Getting Started with FRWY
Watch the video below or follow the steps to set up and boot your development kit. Note that the FRWY-LS1046A-PA development platform referenced in the video is no longer in production.
- Insert the SD-Card in the SD-socket. This is required for the FRWY-LS1046A system to boot.
- Mount the provided Wi-Fi antennas into the SMA plugs on the FRWY-LS1046A system.
- Plug in the USB webcam to either one of the two USB ports on FRWY-LS1046A board.
- Power on the board by plugging in the power supply to the barrel connector with the included 12V power supply.
- Wait for 2 minutes for the board to boot up and broadcast the Wi-Fi SSID, which comes up automatically.
- Connect cell phone, tablet, personal computer etc. to the SSID “FRWY-LS1046A-[MAC ADDRESS]”, with password "frwyls1046a". The [MAC ADDRESS] can be found as the last four digits of the first Ethernet MAC address labeled on the sticker at the bottom surface of board.
- Open a web browser on your device and type in 192.168.99.1 to demonstrate the use cases for Performance Benchmarking, Data Analytics, Machine Learning and Demo Videos. Make sure you enable pop-ups in your browser, or you will not be able to view the results of these demonstrations.
Note:
- If you are using a cell phone, please turn off the mobile data as the above URL is local to the board.
- Ethernet port “1G PORT2” can also be used to access GUI at the same URL above, in case Wi-Fi is not available on board.
- You will need a USB webcam and the PN7120 NFC MikroBUS(TM) add-on board to run the onboard demos.
2. Get Software
2.1 USB-to-UART bridge virtual COM port (VCP) drive
To add a serial connection between the host computer and board, download and install the appropriate driver (based on Windows version) onto the host computer from the following link.
2.2 Tera Term (serial terminal emulator)
To configure a serial connection and see console prints, download and install Tera Term on the host computer from the following link:
2.3 CodeWarrior® for NET Applications
To debug and control the board, order CodeWarrior Development Studio from the following link:
2.4 Layerscape SDK for FRWY-LS1046A
Review the LSDK packages available for the LS1046A Platform.
2.5 FRWY-LS1046A Demo Patches for LSDK
Demo patches for the latest version of the LSDK are available at the following link. If you want to compile LSDK 1909 images with LS1046A-FRWY demos, use the demo patches at the link below and follow this application note.
3. Build, Run
3.1 FRWY-LS1046A System GUI Introduction
This video walks you through the Graphical User Interface (GUI) and introduces the various demos that are available on the FRWY-LS1046A. Refer to application note AN12737 Demonstrating FRWY-LS1046A Board Capabilities for additional specifics about each demo.
The demos that are pre-loaded on the FRWY-LS1046A are described below. Demos labeled as TPU are only available on the FRWY-LS1046A-TP.
-
Face Recognition Demo(CPU)
- Face Recognition Demo using NCNN and MobileFaceNet shows we can train any number of people and store names in database for future use.
Multi face detection at single time. - Face Recognition Demo using NCNN and MobileFaceNet shows we can train any number of people and store names in database for future use.
-
People Counting Demo(CPU)
- A pre-trained coco model is used for people counting.
The model can detect up to 80 objects.
ML/AI capabilities powered by TensorFlow and OpenCV which provide ease of use and smooth deployment and development options to users.
- A pre-trained coco model is used for people counting.
-
Industrial Safety and Security Demo(CPU)
- Industrial Safety demo using TensorFlow shows Machine learning and AI capabilities of FRWY-LS1046A.
Trained model for almost any object can be added using this method.
ML/AI capabilities powered by TensorFlow and OpenCV which provide ease of use and smooth deployment and development options to users.
- Industrial Safety demo using TensorFlow shows Machine learning and AI capabilities of FRWY-LS1046A.
-
Industrial Safety and Security Demo(TPU)
- Industrial Safety demo using TFLite shows Machine learning and AI capabilities of FRWY-LS1046A.
With the help of TPU we can process approx 30 frame per second and detection speed is very good.
In this demo, we are showing the count of google detection on UI. - Industrial Safety demo using TFLite shows Machine learning and AI capabilities of FRWY-LS1046A.
-
Pose Detection Demo(TPU)
- Pose Detection Demo is use for the activity and position of user.
This demo is running on TPU so we can process approx 30 frames per second.
ML/AI capabilities powered by TFLite and OpenCV which provide ease of use and smooth deployment and development options to users. - Pose Detection Demo is use for the activity and position of user.
Boot Options
By default, the FRWY-LS1046A board comes preloaded with an LSDK composite firmware image. You can deploy Ubuntu userland on the board; however, due to limited NOR flash memory (64 MB), you need to use an external memory device, such as a micro-SD card or USB mass storage device for storing the LSDK images.
| Documents and Videos | Description |
|---|---|
| AN5260 PBL Configuration using QCVS | Describes the steps required to configure pre-boot loader (PBL) on NXP QorIQ platform using the PBL tool included in QorIQ Configuration and Validation Suite (QCVS). |
| AN12279 Configure QSPI Bus Width and Frequency in Pre-Boot Loader Stage on LS Series Processors | This application note is intended for users who want to optimize boot time in their applications when QSPI is selected as the boot source. |
| AN12246 Loading Boot Loader on LS1046ARDB through PCIe | Details the implementation of a use case where PCIe root complex (RC) provides boot images to the LS1046A configured as a PCIe endpoint (EP). |
| AN12081 RAM Boot using CodeWarrior on LS1046ARDB | This document can be used to deploy U-Boot directly to the DDR of QorIQ LS1046ARDB using CodeWarrior and allows the user to initialize the board. The purpose of this document is to bring-up a new board when no valid RCW or bootloader is available and onboard flash is not supported in CodeWarrior. |
Requirement for build and Secure Root Key generation
Build LSDK 19.09 as per instructions from LSDK User Guide. On LSDK19.09 build source path,
Download and untar the flexbuild 1909 tar file.
-
Build source path:
$ cd flexbuild_lsdk1909_update_221019 -
Set environment for build:
$ source setup.env -
Compile CST application:
$ flex-builder -c cst -a arm64 -
Enable secure boot in RCW if not enabled:
$ cd packages/firmware/rcw/ls1046afrwy/NN_NNQNNPNP_3040_0506
Based on the desired use case, user can enable the specific rcw and compile images:
-
For SD-boot mode:
$ vi rcw_1600_sdboot_sben.rcw

        BOOT_HO=0

SB_EN=1 -
Build SD secure firmware:
$ flex-builder -i mkfw -m ls1046afrwy -b sd -s -
Build QSPI secure firmware:
$ flex-builder -i mkfw -m ls1046afrwy -b qspi -s -
Check SRK Key from build path:
$ cat packages/apps/cst/srk_hash.txt -
Build secure bootpartition:
$ flex-builder -i mkbootpartition -a arm64 -m ls1046afrwy -s -
All the images for preparing card will be in the build path.
$ cd build/images
Procedure to run secure boot
With nonsecure firmware Power ON the board and stop at U-Boot.
-
Check SNVS state:
        =>md 0x1e90014

        002b0088
Note:
The second nibble indicates that the OTPMK is not blown.
-
Raise POVDD by executing below two commands:
        =>mw 0x2320000 80000000

=>mw 0x2320008 f01c0000 -
Program OTPMK:
        =>mm 0x01E80234

        01e80234: 00000000 ? 11111111

        01e80238: ffffffff ? 22222222

        01e8023c: ffffffff ? 33333333

        01e80240: ffffffff ? 44444444

        01e80244: ffffffff ? 55555555

        01e80248: ffffffff ? 66666666

        01e8024c: ffffffff ? 77777777

        01e80250: ffffffff ? 88888888

01e80254: 00000000 ? . -
Check SNVS state:
        =>md 0x1e90014

        00290080
Now you can see ‘0’ in second nibble.
-
Check for parity error:
        =>md 0x1e80024

        00000000
Note:
Parity error state should be all zero. Non-zero value indicate parity error, then Please rewrite OTPMK value and cross check POVDD is raised properly.
Program SFP registers
-
Get SRK Key from build path:
$ cat packages/apps/cst/srk_hash.txt -
SRK (Public Key) Hash:
43b38d3660ddf23067842974875f8af9ecfa2c3ad9d243abe6f4e18448eee0b7=> mm 0x1e80254
01e80254: 00000000 ? 368db343
01e80258: 00000000 ? 30f2dd60
01e8025c: 00000000 ? 74298467
01e80260: 00000000 ? f98a5f87
01e80264: 00000000 ? 3a2cfaec
01e80268: 00000000 ? ab43d2d9
01e8026c: 00000000 ? 84e1f4e6
01e80270: 00000000 ? b7e0ee48
01e80274: 00000000 ? . -
Check for parity error:
          =>md 0x1e80024

          00000000
Note:
Parity error state should be all 0. Non-zero value indicate parity error. Please rewrite OTPMK value and cross check POVDD is raised properly.
-
Blow the OTPMK to fuses if no parity error is found:
=>mw 1e80020 0x02000000Note:
The fuse programming is permanent so make sure there is no parity error before running the above command.
Validation of Secure Boot
Switch Setting
After flashing image into SD card, insert the SD-card to board, and make sure the switch setting for sd/qspi respective booting mode:
QSPI NOR boot : 0_0100_0100_0
SD boot : 0_0100_0000_0
Now boot the board.
On U-Boot log, you should be able to see “validating secure boot” and “esbc_validate command successful”.
At linux, check SEC_MON register whether Board is booted in Secure mode:
    root@localhost:~# busybox devmem 0x1e90014

    0x00AD0080
SD card preparation
Flashing the signed SD boot image commands:
    $ flex-installer -f firmware_ls1046afrwy_uboot_sdboot_secure.img -b

    >bootpartition.tgz< -r >rootfs.tgz< -m ls1046afrwy -d >/dev/sdx<
Flashing the signed qspi boot image commands:
$ flex-installer -b >bootpartition.tgz< -r >rootfs.tgz< -m ls1046afrwy -d >/dev/sdx<
Once SD-card is ready, plug the console of the board to the X86 machine/Laptop and open the minicom using:
$ sudo minicom -sw
Make sure the minicom setting should be same as below output:
- A - Serial Device: /dev/ttyUSB0
- B - Lockfile Location: /var/lock
- C - Callin Program:
- D - Callout Program:
- E - Bps/Par/Bits: 115200 8N1
- F - Hardware Flow Control: No
- G - Software Flow Control: No
Save and exit from minicom
Flashing the qspi secure firmware steps:
- Unplug the SD card from Linux pc and insert in to FRWY-LS1046A board, stop at U-Boot follow below steps.
- Program the secure firmware to flash at 0x0:
-
      =>ext2load mmc 0:x 0xa0000000 firmware_ls1046afrwy_uboot_qspiboot_secure.img

      =>sf probe 0:0

      =>sf erase 0x0 +$filesize

      =>sf write 0xa0000000 0x0 $filesize

      =>reset
External Memory
| Documents and Videos | Description |
|---|---|
| AN5097 Hardware and Layout Design Considerations for DDR4 SDRAM Memory Interfaces | Provides general hardware and layout considerations and guidelines for hardware engineers implementing a DDR4 memory subsystem. |
| AN12081 RAM Boot using CodeWarrior on LS1046ARDB | This document can be used to deploy U-Boot directly to the DDR of QorIQ LS1046ARDB using CodeWarrior and allows the user to initialize the board. The purpose of this document is to bring-up a new board when no valid RCW or bootloader is available and onboard flash is not supported in CodeWarrior. |
| DDR Bring-up and Validation with QCVS DDRv Tool | DDR4 Initialization flow, checklist and common issues. |
Security and Integrity
| Documents and Videos | Description |
|---|---|
| Solution Brief: Fortinet and NXP Security @ SD-WAN Solution | The Fortinet and NXP solution leverages the NXP Layerscape network functions virtualization (NFV) platform and Fortinet FortiGate virtual network functions (VNFs) to deliver integrated security and software-defined wide-area networking (SD-WAN) services in a virtualized environment. |
Tools and References
LS1046A Security (SEC) Reference Manual
Layerscape Secure Platform Addresses security and trust concerns in all aspects of product lifecycle - design, manufacturing, run-time and connectivity.
Wired Communications
| Documents and Videos | Description |
|---|---|
| AN12750 Enabling 10GBase-KR on QorIQ Platforms | The purpose of this document is to enable the backplane system at 10 Gbps on a system design with QorIQ family of devices. This document describes 10GBase-KR link training to get optimal training parameters and the procedure to validate it. |
| AN12572 Ethernet Backplane Driver Support | How to enable backplane support for Layerscape and QorIQ devices with embedded support for this type of connection. |
| LS1046A RDB in PCIe Endpoint Mode | How to setup the LS1046A RDB to be used to emulate a PCIe add-in card. |
| AN12098 LS1043A Interfacing with CPLD in LS1043RDB | How IFC interface is used to connect the LS1043A processor and CPLD used on the LS1043A reference design board (RDB). |
Wireless Connectivity
Building Access Control Demo
This demo shows how the FRWY-LS1046A and NFC can be used by companies to manage employee access to a premises.
Note: You will need a USB webcam and the PN7120 NFC MikroBUS(TM) add-on board to run the onboard demos.
| Documents and Videos | Description |
|---|---|
| AN5378 Implementation of IEEE Standard 1149.6™ on LS1046A/LS1026A Processor | How to implement the IEEE standard 1149.6™ on NXP's QorIQ LS1046A/LS1026A processor. |
Multicore and Hardware Acceleration
CPU Benchmarking Demo
This demo allows you to run different performance benchmarks including CoreMark and Dhrystone. You can also select the number of cores you want to run to view changing performance measurements.
| Documents and Videos | Description |
|---|---|
| AN13138 Xen Deployment on Layerscape Platforms | Provides the necessary information to hardware, software, and system engineers to run the Xen hypervisor on NXP Layerscape platforms. |
Power Management
| Documents and Videos | Description |
|---|---|
| Proven and Scalable Power Solutions for the latest QorIQ Series Processors | Design guidelines and key considerations for robust and scalable power solutions for the T1023, LS1043, LS1046 and LS1088. |
Machine Learning
The LS1046A-TP platform includes a Coral Tensor Flow Processing Unit (TPU) on an add-in card for accelerated inferencing for AI/ML applications.
Docker is an open, container-based platform for developing highly portable workloads. Docker containers can run on a developer's local laptop, on physical or virtual machines in a data center, on cloud providers, or in a mixture of environments. The Facial Detection Demo shown below is an example of a demo running in Docker.
Facial Detection Demo
The FRWY-LS1046A can be used for both learning and recognition using NCNN and MobileFacenet software, even without cloud connectivity.
Note: This demo is a slightly older version that what is shipping on the LS1046A-FRWY today, but it demonstrates the same functionality.
Sensor Data Analytics Demo
This demo shows how the LS1046A-FRWY can track and store sensor data such as static acceleration of gravity in tilt-sensing applications as well as dynamic acceleration resulting from motion or shock. It can run on both 2 or 4 cores, and can monitor up to 50 sensor values concurrently in a sensor table.
Cold Storage Data Analytics Demo
This demo shows the compute power of the FRWY-LS1046A, with 24,000 data points processed and pushed to a local database per minute.. The user can choose from among 400 simulated refrigerators to check internal temperature, external temperature and deviation from set-point. The gateway will flag any refrigerator that is not performing within the specified range of temperature. A local database is used to check past performance up to 24 hours.
Jupyter Notebook
The Jupyter Notebook is an open source web application that you can use to create and share documents that contain live code, equations, visualizations, and text. Its flexible interface allows users to configure and arrange workflows in data science, scientific computing, computational journalism and machine learning.
Advantages of Jupyter Notebook
- Offload work: On LS platform, one can deploy Jupyter Notebook and access it from web browser, so that LS board won’t get heavy running Python itself.
- Ease in implementation and solve problems: With a Jupyter Notebook, you can view code, execute it, and display the results directly in your web browser.
- Tutorial and documentations: Jupyter enables the combination of code with more detailed documentation and results. This can be effective for multiple purposes, like with working on creating a AI/ML model, including tutorials which you might have already come across.
- Access to shell: Jupyter notebook also provides access to terminal over the web browser, and one can modify the files on go, if needed, without getting worried about the console or board access or to switch the screen in between.
Configure Jupyter notebook on LS Platform
Some of the packages to be download:
    apt install python3-pip python3-dev

    pip3 install --upgrade pip

    pip3 install virtualenv

    pip install jupyter
Run the below command with user permission on LS platform to start jupyter notebook:
$ jupyter notebookOutput:
[I 21:23:21.198 NotebookApp] Writing notebook server cookie secret to /run/user/1001/jupyter/notebook_cookie_secret
[I 21:23:21.361 NotebookApp] Serving notebooks from local directory: /home/nxp/my_project_dir
[I 21:23:21.361 NotebookApp] The Jupyter Notebook is running at:
[I 21:23:21.361 NotebookApp] http://localhost:8888/?token=1fefa6ab49a498a3f37c959404f7baf16b9a2eda3eaa6d72
[I 21:23:21.361 NotebookApp] Use Control-C to stop this server and shut down all kernels (twice to skip confirmation).
[W 21:23:21.361 NotebookApp] No web browser found: could not locate runnable browser.
[C 21:23:21.361 NotebookApp]
Copy/paste this URL into your browser when you connect for the first time, to login with a token:
http://localhost:8888/?token=1fefa6ab49a498a3f37c959404f7baf16b9a2eda3eaa6d72
VNC Remote Desktop
Virtual network computing (VNC) is a type of software that makes remote control of a computer possible. It allows a user to view the desktop display of another computer remotely, and control the computer over the network. TigerVNC is a high-performance, platform-neutral implementation of VNC.
VNC presents a graphical desktop (Gnome or LXDE) running on the FRWY-LS1046A. The default desktop shipped with the FRWY-LS1046A is the LXDE desktop environment.
Configure VNC server on LS Platform
Some of the packages to be download:
    apt-get install tigervnc-standalone-server

    apt-get install lxde-common

    apt-get install openbox-lxde-session

    apt-get install emacs
Set configuration and password for VNC.
Run the below command with user permission on LS platform to start vncserver:
/usr/bin/perl /usr/bin/vncserver -localhost no -geometry 1024x768 This server can be enabled to start automatically. On FRWY-LS1046A console issue:
# systemctl enable vncserver-user@:1.serviceConnection to FRWY-LS1046A vncserver is possible using:
$ vncviewer 192.168.99.1:1Note:
- Export display: export DISPLAY=:0
- To run the demo using VNC, image should have support of OpenCV.
- Python script should imshow, for streaming the output.
- Download the vncviewer for X86 machine, use port 1 for connection.
TigerVNC
TigerVNC is a high-performance, platform-neutral implementation of VNC (Virtual Network Computing), a client/server application that allows users to launch and interact with graphical applications on remote machines.
The default desktop shipped with FRWY-LS1046A is the LXDE desktop environment.
Advantages of TigerVNC
- Virtual display with development environment: LS board supports VNC server, which will provide desktop experience similar as x86, with support of basic tools like GMAC, terminal, web browser, file manager etc.
- User-Friendly: User can modify the code directly opening the file in edit window, can copy paste the file from one location to another and even run video/camera stream.
- Highly secure: Full session encryption, multifactor authentication and many other security features.
- Support multiple devices: VNC is a light weighted tool and can be easily ported to any LS platform family.
- Multiple user support: One can create multiple users on LS platform with different access permission, so that each user can access the area they have to work on.
| Documents and Videos | Description |
|---|---|
| AN12737 Demonstrating FRWY-LS1046A Board Capabilities | This document describes various capabilities and features of the LRWY-1046A board including machine learning, data analytics and more. |
| NXP Helps Industrial System Developers Apply AI/ML to Their Designs | Layerscape processors are well suited to hosting AI/ML workloads, and software from NXP and third parties helps enable developers to create industrial applications using AI/ML technology. |
| Docker Docs | Everything you need to know about getting started with and deploying Docker applications. |
Tools and References
Artificial Intelligence Learn about our broad IC portfolio, NXP artificial intelligence (AI) core technologies enable AI and machine learning for edge applications in automotive, industrial, and IoT.
Edge Computing The EdgeVerse platform offers primary edge computing capabilities. Our comprehensive portfolio of processors, microcontrollers and signature software is built on a foundation of scalability, energy efficiency, security, machine learning and connectivity.
Motion Control
| Documents and Videos | Description |
|---|---|
| NXP Motor Control Solutions | NXP offers a comprehensive and cost-effective motor control portfolio of products, tools and software, together with expert support. |
| Motion Control and Robotics Demo | Demonstrates the ability to display HMI for industrial applications as well as Time Sensitive Networking (TSN) capabilities integrated on LS1028 SoC. |
Design Resources
Board Documents
- AN12737 Demonstrating FRWY-LS1046A Board Capabilities
- Layerscape FRWYLS1046A Board Getting Started Guide
- Layerscape FRWY-LS1046A Board Reference Manual
- LS1046DRB Design Files Rev C
- AN5226 Common Board Design for LS1046A, LS1043A and LS1088 Processors
Chip Documents
- LS1046A, LS1026A Data Sheet
- LS1046A Reference Manual
- Errata to LS1046A Data Path Acceleration Architecture (DPAA) Reference Manual
- LS1046A Interface Quick Reference
- LS1046A Design Checklist
Software
Get Help
Trainings
Want to learn more about using the FRWY-LS1046A Platform? Check out our selection of training offerings ranging from online mini tech sessions to hands-on deep-dive training for help.
| Training | Description |
|---|---|
| Learn from Our Experience! | Tips and tricks to speed your QorIQ LS1012A, LS1043A and LS1046A Design Cycle. |
| LS1046 Training | Full list of on-demand training, how-to videos and webinars from NXP about this product. |
| Benefits of Shifting Cloud Data Management and Processing to Powerful Edge Devices | Explore tools, production-ready Arm® modules and Linux®-based software solutions that collect, manage and analyze large volumes of IoT data. demonstration with real code samples. |
Forums
Connect with other engineers and get expert advice on designing with the FRWY-LS1046A Platform on one of our community sites.
- QorIQ Processing Platforms
- Layerscape
- Power Management
- Wireless Connectivity
- CodeWarrior
- Processor Expert Software
Product Forums
Software Forums