Trimension SR250用開発ボードのスタート・ガイド
このドキュメントの内容
-
パッケージの内容
-
接続
-
ソフトウェアの入手
-
ビルド環境のセットアップ
-
Westコマンド・ラインを使用したビルドとロード
-
VS Codeを使用したビルドとロード
-
VS Codeのトラブルシューティング
-
VS Code Continuationのトラブルシューティング
サインイン 進行状況を保存するには アカウントをお持ちでない方 アカウントを作成する。
お客様の UWB測距およびレーダー・アプリケーションに適した、Trimension SR250用開発ボード
1. パッケージの内容
Trimension SR250用開発ボードは、超広帯域無線(UWB:Ultra-Wideband)測距およびレーダーを民生機器やインダストリアルIoTソリューションに統合するための柔軟なプラットフォームを提供します。Trimension SR250と簡単に統合して存在検知、位置検出、モーション検知を実現し、効率と安全性を高められます。
このページでは、Trimension SR250用開発ボードのセットアップと操作について説明します。
1.1 キットの内容と同梱物一覧
キットには以下のものが含まれています。
- 組立て済み/テスト済みの評価ボード(静電気防止バッグ入り)
1.2 追加ハードウェア
キットの内容物のほかに、以下のハードウェアも必要になります。
FRDM-RW612評価ボード。APIインターフェースのピンをArduinoヘッダにルーティングし、SR250-ARDボードと適切に通信するためには、若干の作業が必要です。
SR250-ARDシールドがSPIを介してFRDM-RW612ボードと通信できるようにするには、ArduinoヘッダにSPI信号を割り当てるために若干の作業が必要です。
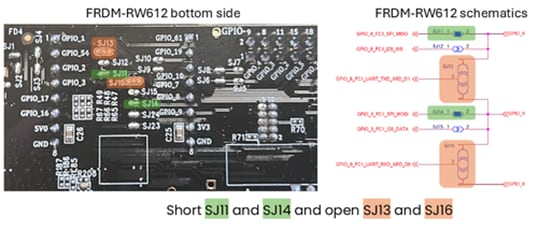
または、ジャンパ線を使用して、FRMD-RW612 Arduino互換ヘッダ・ピンD0をD11に、D1をD12に接続します。
2. 接続
2.1 接続
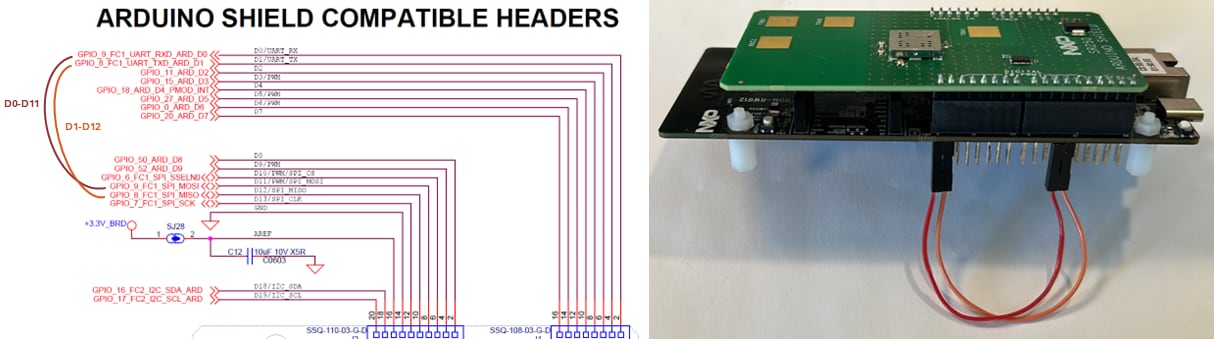
最初のステップでは、Arduinoヘッダを使用してボードを組み立てます。

FRDM-RW612ボードの両方のUSB-Cポートがノートパソコンに接続されていることを確認します。
追加のガイダンスについては、SR250 UWBプラグ・アンド・プレイ・アプリケーションを参照してください。
3. ソフトウェアの入手
開発環境をセットアップする際には、次のソフトウェアが必要です。
3.3 Python
Python 3.8以降。
および次の依存関係:
- Ninja:最新バージョン
- West:Zephyrのメタツール
# Install Python dependencies
pip3 install west ninja
# Verify installations
python3 --version
cmake --version
ninja --version
west --version4. ビルド環境のセットアップ
以下の手順は、Zephyrベースのプロジェクトのビルド環境をセットアップする方法を示しています。
4.1 ステップ1:SR250用のUWBIoTミドルウェアを取得する
# Download SR250 Software to working directory
git clone https://github.com/nxp-uwb/sr250-uwbiot-zephyr.git4.2 ステップ2:West Workspaceを初期化する
# Initialize west workspace
cd ~/sr250-uwbiot-zephyr
west init -l --mf west.yml uwbiot-top4.3 ステップ3:依存関係を更新する
# Download Zephyr OS and all dependencies
west update4.4 ステップ4:Pythonの依存関係をインストールする
# Install Zephyr Python dependencies
pip install -r zephyr/scripts/requirements.txt4.5 ステップ5:環境をセットアップする
# Set the environment (required for each new terminal session)# Windows:
zephyr\zephyr-env.cmd# Linux:
source zephyr/zephyr-env.sh5. Westコマンド・ラインを使用したビルドとロード
5.1 デモ・アプリケーションのビルド
# Example: Build ranging controller demo
west build -b frdm_rw612 -p auto uwbiot-top/demos/common/demo_ranging_controller/zephyr
# Example: Build radar demo
west build -b frdm_rw612 -p auto uwbiot-top/demos/radar/demo_radar/zephyrデモ・パスを、ビルドする特定のデモに置き換えます。
- uwbiot-top/demos/SR2xx/demo_sr2xx_fw_update
- uwbiot-top/demos/SR2xx/demo_device_calibration
5.2 アプリケーションのフラッシュ
# Flash built application using west flash5.3 アプリケーションの実行
シリアル・ターミナル・アプリケーションを開き、次の構成に設定された仮想COMポートを介してFRDM-RW612 HS-USBインターフェースに接続します。
- ボーレート:3000000
- データ・ビット:8、パリティ:なし
- ストップ・ビット:1ビット
- フロー制御:なし
- 受信時の改行処理:自動
FRDM-RW612ボードをリセットした後、デモ・アプリケーションは、初期化メッセージ、ステータス更新、および操作ログをターミナル・ウィンドウに表示します。
6. VS Codeを使用したビルドとロード
この手順では、MS Visual Studio (VS) Codeが正しくインストールされていることを確認します。
6.1 VS Code拡張機能のインストール
Zephyr開発に必要なVS Code拡張機能をインストールするには、次の手順に従います。
ステップ1:拡張機能ビューを開く
- VS Codeを起動します
- 拡張機能ビューに移動します(または、ショートカット
Ctrl+Shift+XまたはmacOSではCmd+Shift+Xを使用します)
ステップ2:必要な拡張機能をインストールする
VS Codeをセットアップするには、次の拡張機能をインストールします。
- C/C++ Extension Pack:IntelliSense、デバッグ、およびコード・ブラウジングを提供します
- CMake Tools:CMake言語サポートとビルド統合
- Zephyr IDE(オプション):Zephyr固有の追加機能
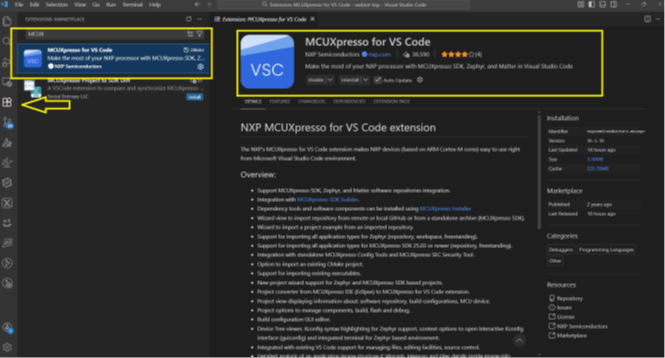
ステップ3:MCUXpresso Zephyrの依存関係をインストールする
セットアップ中、Zephyr統合開発環境 (IDE) 拡張機能は、MCUXpresso Zephyr開発に必要な依存関係をインストールするように求めます。
MCUXpressoインストーラを開く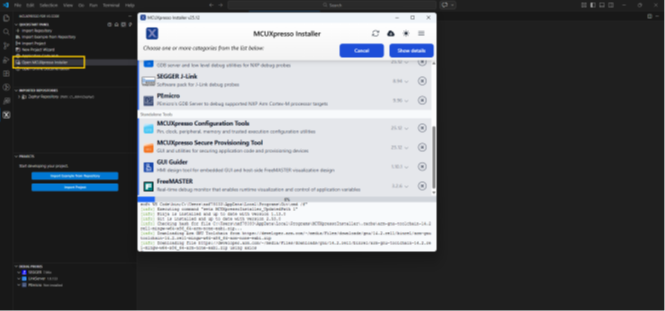
パート1:Zephyrの依存関係のインストール
Zephyrの依存関係をインストールする最初の段階では、次の画像の画面が表示されます。

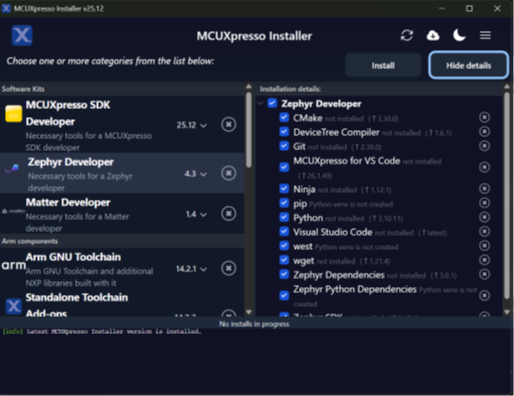
パート2:Zephyrの依存関係のインストール
Zephyrの依存関係をインストールする2番目の段階では、次の画像の画面が表示されます。
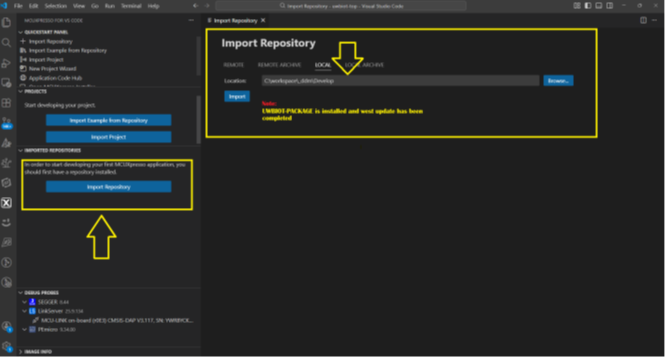
FRDM-RW612 Zephyrリポジトリのインポート
- VS Codeで、コマンド・パレットを開きます(
Ctrl+Shift+P、macOSではCmd+Shift+P) - Westの更新が完了したローカル・リポジトリを見つけます
- リポジトリ・フォルダを選択します
プロジェクト構造の理解
FRDM-RW612 ZephyrプロジェクトはCMakeベースで、以下を提供します。
- 完全な開発環境の統合
- 自動化されたビルド設定
- 統合されたデバッグ・サポート
- IntelliSenseとコード・ナビゲーション
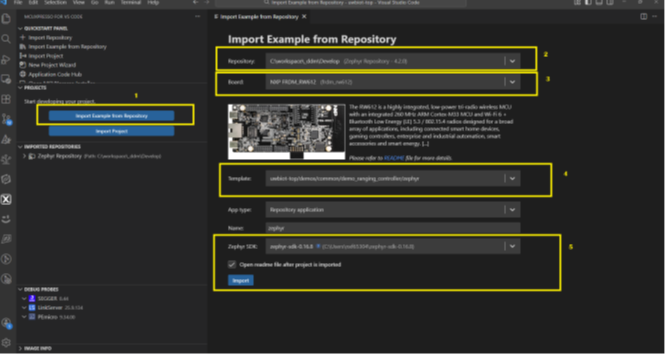
CMakeプロジェクトのインポート
次の手順では、CMakeのインポートを完了します。
- VS Codeアクティビティ・バーのMCUXpresso IDEアイコンをクリックします(左側のサイドバーにあります)
- MCUXpresso IDEパネルで、[Repository(リポジトリ)]タブの[Import Example(サンプルのインポート)]をクリックします
- インポートするデモ・プロジェクト・フォルダを見つけて選択します(例:uwbiot-op/demos/ranging)
- ドロップダウン・リストからボード (frdmrw612) を選択します
- [Import(インポート)]をクリックして、プロジェクトのインポート処理を完了します
6.2 アプリケーションのビルドとフラッシュ
次の手順では、アプリケーションをビルドしてフラッシュします。
ビルド設定の選択
- VS Codeステータス・バーのビルド・バリアント・セレクタをクリックします
- 目的の設定を選択します。
- Debug(デバッグ):デバッグ・シンボルを含めます。デバッグ用に最適化されています
- Release(リリース):パフォーマンスとサイズに最適化されています
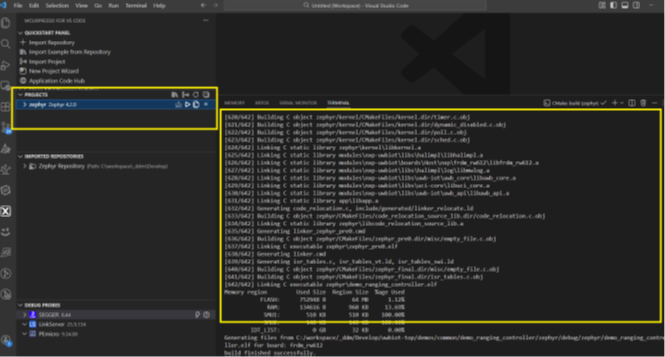
アプリケーションのビルド
- ステータス・バーの[
Build(ビルド)]ボタンをクリックするか、[Command Palette(コマンド・パレット)]を開いて[CMake: Build(CMake:ビルド)]を選択します - ビルド・プロセスが完了するまで待ちます
ビルド出力場所
コンパイルされたバイナリは、選択した設定に対応するビルド・ディレクトリに生成されます。
build/Debug/(デバッグ・ビルドの場合build/Release/(リリース・ビルドの場合)
6.3 デバッグ環境のセットアップ
次の手順では、開発環境をデバッグします。
デバッグ設定の指定
- デバッグ・プローブ(J-Link、CMSIS-DAPなど)がFRDM-RW612ボードに正しく接続されていることを確認します
- デバッグ・プローブをUSB経由でPCに接続します
- VS Codeで、[Run and Debug(実行とデバッグ)]ビューに移動します(またはショートカット
Ctrl+Shift+Dを使用します) - ドロップダウンから適切なデバッグ設定を選択します

ハードウェア接続チェックリスト
デバッグを開始する前に、次のことを確認します。
- デバッグ・プローブがFRDM-RW612 SWD/JTAGヘッダに接続されている
- FRDM-RW612ボードに電源が供給されている(USBまたは外部電源を介して)
- デバッグ・プローブがPCに接続されている
- デバッグ・プローブ用の適切なドライバがインストールされている
デバッグの開始
- [Run and Debug(実行とデバッグ)]ビューで
F5キーを押すか、緑色の再生ボタンをクリックします - アプリケーションがボードにフラッシュされ、デバッグ・セッションが開始されます
- デバッグ中は、必要に応じてブレークポイントを使用し、コードをステップ・スルーして、変数を調べます
7. VS Codeのトラブルシューティング
このセクションでは、VS Codeビルドとコマンド・ライン・ビルドの両方の一般的な問題について説明します。
7.1 Westコマンドが見つからない (Linux)
# Install west via pip
pip install --user west
export PATH=$PATH:~/.local/bin7.2 ビルド失敗(「No Such File or Directory(そのようなファイルまたはディレクトリはありません)」)
# Ensure west update completed successfully
west update
# Try a pristine build
west build -b frdm_rw612 -p always 7.3 Windows:既存のファイルに対するファイルが見つからないエラー
症状:
ワークスペースにファイルが存在する場合でも、エラーが発生する場合があります(次に示します)。
fatal error:(致命的なエラー:: No such file or directory :そのようなファイルまたはディレクトリはありません) CMake Error: Cannot find source file:(CMakeエラー:ソース・ファイルが見つかりません:Error: The system cannot find the path specified(エラー:システムが指定されたパスを見つけることができません)
原因:
WindowsのデフォルトのMAX_PATH制限は260文字です。ファイル・パスがこの文字制限を超えると、Windowsはそれらのパスにアクセスできなくなり、「ファイルが見つからない」エラーが発生します。
解決方法:
ファイルを検索するには、短いワークスペース・パス(C:\uwbなど)を使用するか、次のいずれかの方法を使用して長いパスのサポートを有効にします。
# first method: in registry editor
1. Press Win + R, type "regedit" and press Enter
2. Go to: HKEY_LOCAL_MACHINE\SYSTEM\CurrentControlSet\Control\FileSystem
3. Find or create a DWORD value: LongPathsEnabled
4. Set value to: 1
5. Restart your computer
# Second method: in Group policy editor
1. Press Win + R, type "gpedit.msc" and press Enter
2. Navigate to: Computer Configuration > Administrative Templates > System > Filesystem
3. Enable "Enable Win32 long paths"
4. Restart your computer# Third method: via PowerShell command (to be run as Administrator)
New-ItemProperty -Path "HKLM:\SYSTEM\CurrentControlSet\Control\FileSystem" -Name "LongPathsEnabled" -Value 1 -PropertyType DWORD -Force7.4 Windows:WSL2を使用する(推奨される代替手段)
互換性の問題が発生した場合は、Windows Subsystem for Linuxを試します(以下を参照)。
# Install WSL2 from PowerShell (Administrator)
wsl --install
# Then work within WSL2 Ubuntu environment# Follow Linux instructions from there7.5 CMakeエラー(「fatal error: opening dependency file(致命的なエラー:依存関係ファイルを開く際)」または「No Such File or Directory(そのようなファイルまたはディレクトリはありません)」)
上記のエラーは、生成された依存関係ファイルをCMakeが見つけられない場合に発生します。多くの場合、原因は次のとおりです。
- Westの更新が不完全である
- モジュールが見つからないか、ビルド・キャッシュが破損している
- Windowsでのパスが長すぎる問題
- 依存関係の解決が不完全である
エラーの例
CMakeを使用すると、次のエラーが発生する場合があります。
fatal error: opening dependency file modules\psa_crypto_driver\...
\mcuxClPsaDriver_generate_ecp_key.c.obj.d: No such file or directory
fatal error: opening dependency file build/CMakeFiles/myproject.dir/src/
main.c.obj.d: No such file or directoryこれは、次のいずれかの問題が原因で発生します。
- モジュール/ディレクトリが不完全である
- Westの更新が不完全である
- ビルド・キャッシュが壊れているか不完全である
- CMakeの依存関係追跡ファイルがない
- 十分な空きディスク領域がない
- Windowsの場合と同様に、長いパスを有効にする必要がある(上記参照)
解決策
以下は、CMakeのエラーを解決するための提案事項です。
# 1. Clean build directory completely
rm -rf build/
# 2. Re-run west update to ensure all dependencies are fetched
west update
# 3. Try pristine build
west build -b frdm_rw612 -p always
# 4. If still failing, check if all modules are present
west list
# 5. Verify CMake can find the toolchain
cmake --version 7.6 Pythonバージョンの不一致
Pythonの不一致が発生した場合は、以下を参照してください。
# Ensure Python 3.8 or later
python --version
# Upgrade if needed
sudo apt install python3.10 # Linux7.7 CMakeバージョンが古すぎる
CMakeのバージョンが古いことを除外するには、以下を参照してください。
# Check version
cmake --version
# Upgrade via pip
pip install --upgrade cmake
# Or install from official source
# Linux: https://cmake.org/download/
# macOS: brew install cmake7.8 Ninjaが見つからない
Ninjaが見つからない場合は、以下を参照してください。
# Install Ninja
pip install ninja
# Or via package manager
sudo apt install ninja-build # Linux
brew install ninja # macOS7.9 Zephyr SDKが見つからない (Linux)
SDKが見つからない場合は、以下を参照してください。
# Set environment variable
export ZEPHYR_SDK_INSTALL_DIR=~/zephyr-sdk-0.16.5
# Add to ~/.bashrc for persistence
echo 'export ZEPHYR_SDK_INSTALL_DIR=~/zephyr-sdk-0.16.5' >> ~/.bashrc7.10 ビルド時のメモリ不足
システムがメモリ不足を示している場合は、以下を参照してください。
# Limit parallel jobs
west build -b frdm_rw612 -p auto  -- -j2
# Or set in environment (Linux)
export CMAKE_BUILD_PARALLEL_LEVEL=2 7.11 ディスク容量の問題
ディスク容量のエラーが発生した場合は、以下を参照してください。
# Check available space
df -h .
# Clean old builds
rm -rf build/
# Clean west cache (if needed)
rm -rf ~/.west/7.12 Pythonでのモジュール・インポート・エラー
モジュールのインポート・エラーが発生した場合は、以下を参照してください。
# Reinstall requirements
pip install -r zephyr/scripts/requirements.txt --force-reinstall
# Clear pip cache
pip cache purge7.13 フラッシュ時に権限が拒否された (Linux)
フラッシュ時にアクセス許可が拒否された場合は、以下を参照してください。
sudo usermod -a -G dialout $USER# Log out and log back in7.14 フラッシュ失敗/デバイスが見つからない
デバイスが見つからないことが原因でフラッシュが失敗する場合は、以下を参照してください。
# Check if device is connected
# Check J-Link connection
JLinkExe # Should detect device (Linux)7.15 ボードが見つからないエラー
ボードが見つからないというエラーが発生した場合は、以下を参照してください。
# List available boards
west boards
# Ensure you're using the correct board name
# For FRDM-RW612: frdm_rw6128. VS Code Continuationのトラブルシューティング
このセクションでは、引き続きVS Codeビルドとコマンド・ライン・ビルドの両方の一般的な問題について説明します。
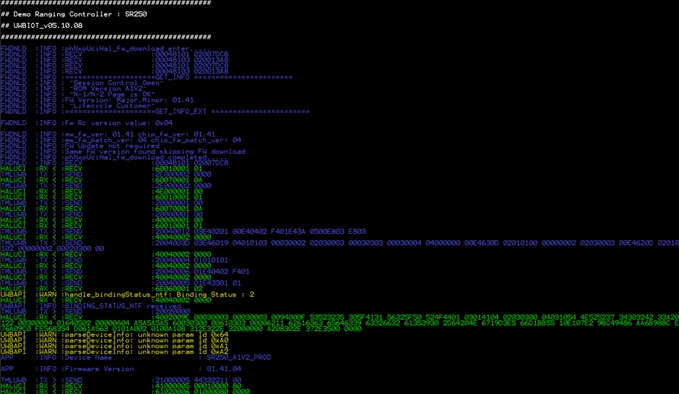
8.1 SR250ファームウェア (FW) バージョン・エラー
デモ・アプリケーションの実行中に、ログに次のエラー(下図)が記録された場合は、SR250のFWバージョンとUWBIOTのMWバージョンの不一致を示しています。
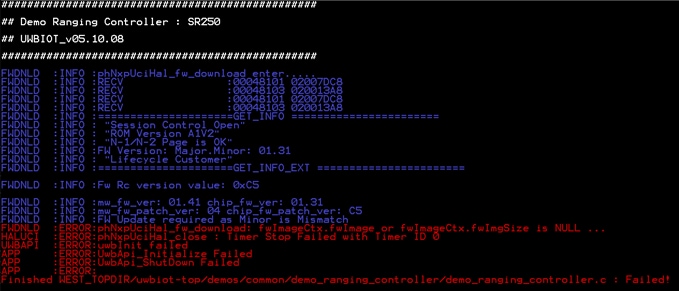
デモ・アプリケーションuwbiot-top/demos/SR2xx/demo_sr2xx_fw_updateを実行すると、SR250のFWを更新できます。
8.2 複数のPythonバージョンの競合
複数のバージョンのPythonに関連する競合が発生した場合は、以下を参照してください。
# Use virtual environment
python -m venv ~/Myvenv
source ~/Myvenv/bin/activate
# Then proceed with setup8.3 便利なデバッグ・コマンド
以下に、デバッグ処理に役立つ追加のコマンドを示します。
# Verbose build
west build -b frdm_rw612 -p auto  -v
# Show west configuration
west config# List all projects and their status
west list# Show build system info
west build -b frdm_rw612 -p auto -- --trace # Check environment variables
env | grep ZEPHYR8.4 サポート情報
問題が解決しない場合は、次の追加リソースを参照してください。
- Zephyrトラブルシューティング・ガイドを確認する
- build/zephyr/ディレクトリにあるビルド・ログを確認する
- 詳細なビルド出力を有効にする (west build -v)
- Zephyrの問題を確認する
- すべての前提条件が正しくインストールされていることを確認する
8.5 その他の便利なデバッグ・コマンド
以下に、デバッグ処理に役立つ追加のコマンドを示します。
# Verbose build
west build -b frdm_rw612 -p auto  -v
# Show west configuration
west config# List all projects and their status
west list# Show build system info
west build -b frdm_rw612 -p auto -- --trace # Check environment variables
env | grep ZEPHYRこのページ
- 4.1
ステップ1:SR250用のUWBIoTミドルウェアを取得する
- 4.2
ステップ2:West Workspaceを初期化する
- 4.3
ステップ3:依存関係を更新する
- 4.4
ステップ4:Pythonの依存関係をインストールする
- 4.5
ステップ5:環境をセットアップする
- 7.1
Westコマンドが見つからない (Linux)
- 7.2
ビルド失敗(「No Such File or Directory(そのようなファイルまたはディレクトリはありません)」)
- 7.3
Windows:既存のファイルに対するファイルが見つからないエラー
- 7.4
Windows:WSL2を使用する(推奨される代替手段)
- 7.5
CMakeエラー(「fatal error: opening dependency file(致命的なエラー:依存関係ファイルを開く際)」または「No Such File or Directory(そのようなファイルまたはディレクトリはありません)」)
- 7.6
Pythonバージョンの不一致
- 7.7
CMakeバージョンが古すぎる
- 7.8
Ninjaが見つからない
- 7.9
Zephyr SDKが見つからない (Linux)
- 7.10
ビルド時のメモリ不足
- 7.11
ディスク容量の問題
- 7.12
Pythonでのモジュール・インポート・エラー
- 7.13
フラッシュ時に権限が拒否された (Linux)
- 7.14
フラッシュ失敗/デバイスが見つからない
- 7.15
ボードが見つからないエラー