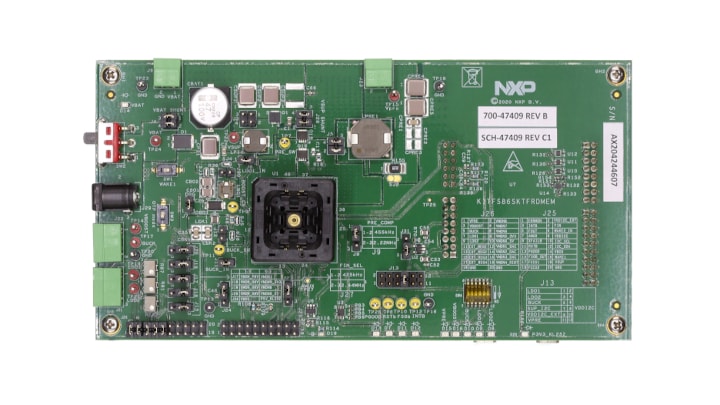
KITFS86SKTFRDMEM評価ボードのスタート・ガイド
このドキュメントの内容
-
パッケージの内容
-
ハードウェアの入手
-
ハードウェアの構成
サインイン 進行状況を保存するには アカウントをお持ちでない方 アカウントを作成する。

お客様の KITFS86SKTFRDMEM: FS86 Safety SBC Programming Socket Board
1. パッケージの内容
NXPのアナログ製品開発ボードは、NXP製品の評価を目的とした使いやすいプラットフォームです。さまざまなアナログ・ソリューション、ミックスド・シグナル・ソリューション、パワー・ソリューションに対応しています。実績のある大容量テクノロジを使用したモノリシック集積回路およびシステム・イン・パッケージ (SiP) デバイスを搭載しています。NXP製品は、最先端システムへの電源供給において、より長いバッテリー寿命、より小さいフォーム・ファクタ、より少ない部品数、より低いコスト、より優れたパフォーマンスを実現します。
このページでは、KITFS86SKTFRDMEMボードをセットアップして使用する手順について説明します。
1.1 キットの内容と同梱物一覧
以下のものが含まれています。
- クイック・スタート・ガイド
- FRDM-KL25Zに接続された、組み立ておよびテスト済みのKITFS86SKTFRDMEM(帯電防止袋入り)
- 3.0フィートのUSB-STD A to USB-B-miniケーブル
- 2個のコネクタ、ターミナル・ブロック・プラグ、2ポジション、ストレート、3.81 mm
- 2個のコネクタ、ターミナル・ブロック・プラグ、3ポジション、ストレート、3.81 mm
- ボードに搭載されたジャンパ
1.2 追加ハードウェア
このボードの作業をする際は、キットの内容物のほかに以下のハードウェアが必要になるか、または使用すると役立ちます。
- 電圧範囲8.0 V~60 V、電流制限1.0 A(初期値)の電源
1.3 最小システム要件
この評価ボードにはWindows PCワークステーションが必要です。この評価ボードで作業する際は、これらの最低限の仕様を満たすことで良好な結果が得られます。
- Windows 7またはWindows 10を搭載したUSB対応のコンピュータ
1.4 ソフトウェア
この評価ボードで作業するには、ソフトウェアのインストールが必要です。記載されているすべてのソフトウェアは、KITFS86SKTFRDMEMの評価ボードの情報ページまたは提供されているリンクから入手できます。
- NXP車載PMICファミリ用NXP GUI - 最新バージョン
2. ハードウェアの入手
2.1 ボードの特長
- VBAT電源コネクタ(JackおよびPhoenix)
- VPRE:最大出力1.0 A(ソケットの制限)
- VBUCK:1.0 V~3.3 V
- VBOOST:5.0 V~6.0 V
- LDO1:1.5 V~5.0 V
- LDO2:1.1 V~5.0 V
- イグニッション・キー・スイッチ
- FS0B外部セーフティ・ピン
- NXPソフトウェアGUIに容易にアクセスするための組込みUSB接続(I²Cバス、IO、RSTB、FS0B、
- INTB、デバッグ、MUX_OUT、レギュレータ、レジスタへのアクセス、OTPエミュレーションおよびプログラミング)
- 信号とレギュレータの状態を示すLED
- OTPのヒューズ機能をサポート
- 電圧モニタリング用のジャンパ設定
2.2 ボードの説明
KITFS86SKTFRDMEMは柔軟に活用でき、デバイスのすべての機能を試用し、アプリケーションの主要部分の測定を行うことができます。ボードに接続されたKL25Z MCU FreedomボードとNXP GUIソフトウェアを併用することで、読み取り/書き込みモードでレジスタにアクセスできます。すべてのレギュレータにコネクタを介してアクセス可能です。DC/DCスイッチャ・ノードなどの非ユーザー信号は、テスト・ポイントにマッピングされています。デジタル信号(I²C、RSTBなど)は、コネクタを介してアクセスできます。WAKE1ピンには、それらの制御(イグニッション)用のスイッチがあります。デバイスの電源オン/オフには、VBATスイッチを使用できます。このキットの主な目的は、OTP構成を書き込むことです。このキットは、エミュレーション・モードまたはOTPモードで操作できます。エミュレーション・モードでは、電源が供給されている限りボード構成は有効なままですが、デバイスがディープ・フェイルセーフに移行した場合、フェイルセーフ構成は失われます。OTPモードでは、ヒューズ設定済みの構成が使用されます。デバイスではヒューズを使用した設定を2回行うことができます。OTPモードでは、ユーザーがエミュレーション・モードを使用してOTP構成を上書きする場合を除き、デバイスは常にヒューズ設定済みの構成で起動されます。このボードでは、追加のツールやボードなしでOTPのヒューズ設定を行えます。
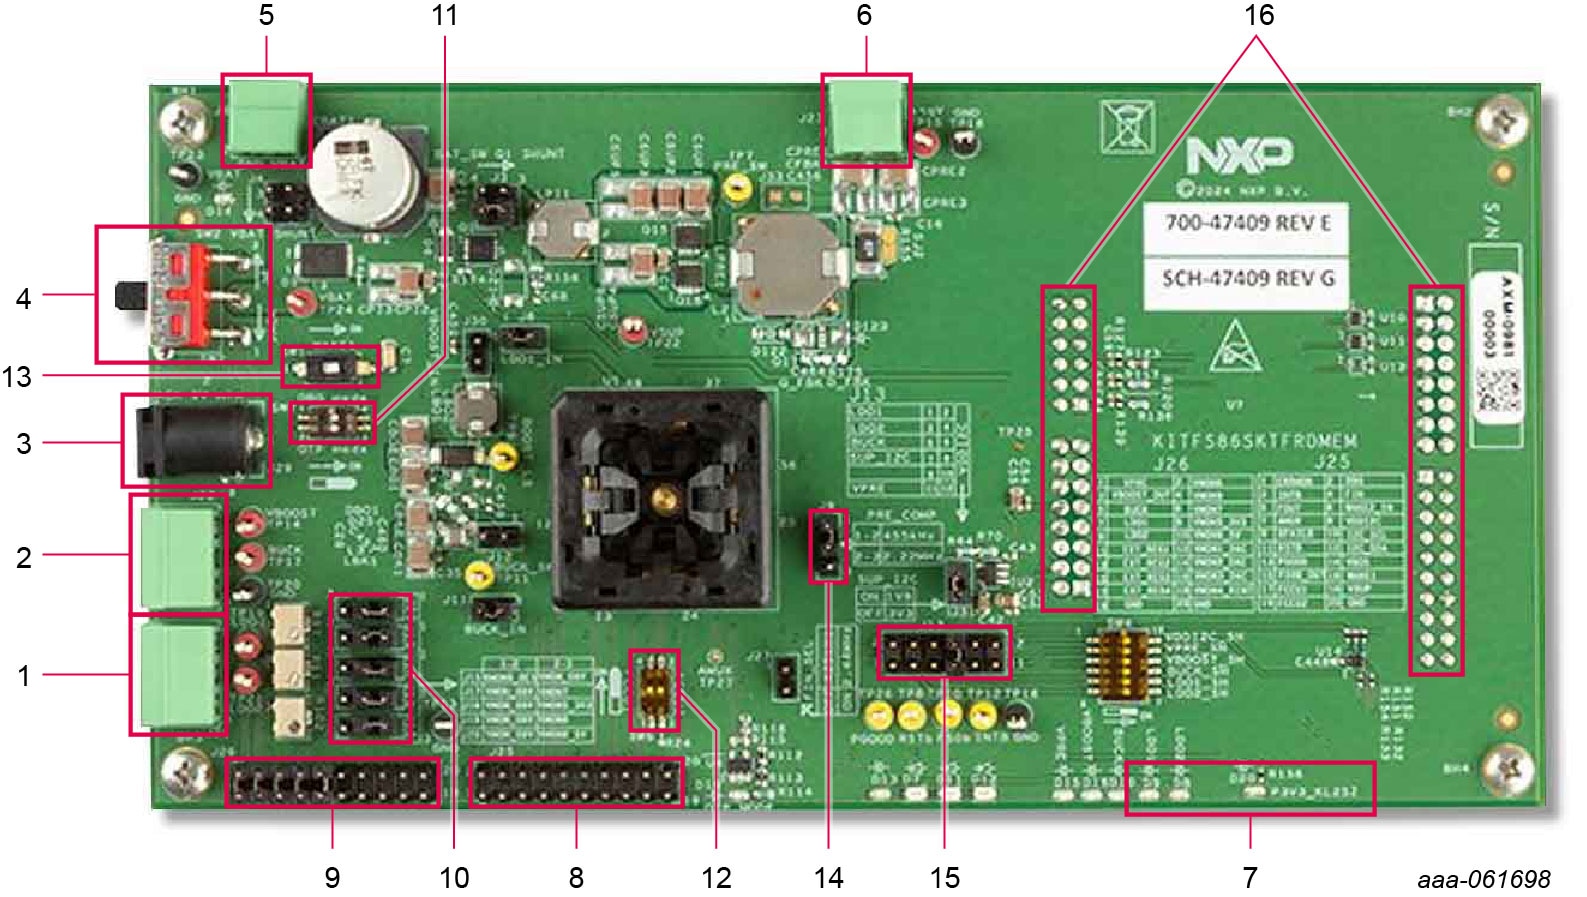
2.3 ボードのコンポーネント
| 番号 | 説明 |
|---|---|
| 1 | LDO1/LDO2電源 |
| 2 | BUCK/BOOST電源 |
| 3 | VBAT Jackコネクタ |
| 4 |
VBAT 3ポジション・スイッチ
|
| 5 | VBAT Phoenixコネクタ |
| 6 | VPRE電源 |
| 7 | USBコネクタ(MCUフラッシュ用OpenSDA、NXP GUI制御用KL25Z) |
| 8 | デバッグ用接続。FS8600信号へのアクセス |
| 9 | 外部レギュレータ用コネクタ(VMONxに対して) |
| 10 | VMONx構成(レギュレータの監視または固定0.8 Vを選択) |
| 11 | OTPおよびDBGスイッチ |
| 12 | FCCUスイッチ |
| 13 | VPRE補償ネットワーク設定(455 kHzまたは2.22 MHz) |
| 14 | VDDI2C選択 |
| 17 | KL25Z Freedomボード・コネクタ |
3. ハードウェアの構成
3.1 ハードウェアの構成
デバイス構成は2回変更できます。プログラミングの手順については、車載PMICファミリ用NXP GUIから入手可能なFS86車載ファミリ用NXP GUIユーザー・マニュアルを参照してください。
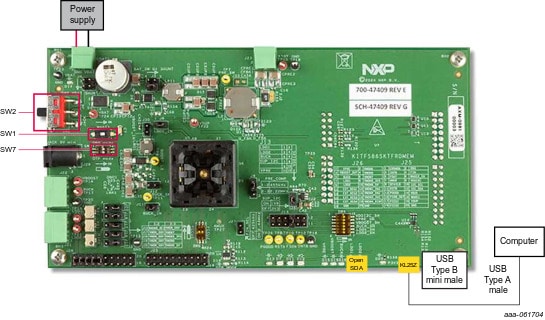
図2は、開発ボード、電源、Windows PCワークステーションを含む一般的なハードウェア構成を示しています。
図2に示すようにハードウェアとワークステーションを構成するには、以下の手順を実施します。
- 表2に示す構成になるようジャンパとスイッチを取り付けます
- 付属のUSB 2.0ケーブルを使用して、Windows PCのUSBポートをKITFS86SKTFRDMEM開発ボードに接続します
- DC電源を12 Vに、電流制限を1.0 Aに設定します。電源を切った状態で、DC電源の正負の出力をVBAT Phoenixコネクタ (
J6) に接続します - 電源を入れます
SW2を一番上の位置に設定します
| スイッチ | 構成 | |||
|---|---|---|---|---|
| ノーマル・モード | デバッグ・モードの開始 | OTPモードの開始 | ||
| 動作 | ウォッチドッグ2 sウィンドウ | ウォッチドッグ・ウィンドウ全開 | OTPエミュレーション/プログラミングおよびデバッグ・モード開始 | |
SW1 (WAKE1) |
閉(WAKE1ハイ) | |||
SW2 (VBAT) |
中央ポジション(VBATオフ) | |||
SW7 (DBG_OTP) |
1-4開(DBGモード・オフ) 2-3開(OTPモード・オフ) |
2-3閉(OTPモード・オン) | ||
| 2-3開(OTPモード・オフ) 1-4閉 (DBG = 4.5 V) |
||||
図3に示すようにハードウェアとワークステーションを構成するには、以下の手順を実施します。
- 表2に示す構成になるようジャンパとスイッチを取り付けます
- 付属のUSB 2.0ケーブルを使用して、Windows PCのUSBポートをKITFS86SKTFRDMEM開発ボードに接続します
- DC電源を12 Vに、電流制限を1.0 Aに設定します。電源を切った状態で、DC電源の正負の出力をVBAT Phoenixコネクタ (
J6) に接続します - 電源を入れます
- SW2を一番上の位置に設定します
このステップで、製品がOTPモード開始の構成になっている場合、すべてのレギュレータがオフになります。ユーザーは、OTP構成で電源を投入するか、または電源を投入する前にミラー・レジスタを構成することができます。以下の3つのうちいずれかのアクションが行われると、すぐに電源投入が開始されます。
SW7(2-3) がオフにされる- I²CでOTPモード終了コマンドが送信される
- NXP GUIの[Exit OTP Mode(OTPモードを終了する)]がクリックされる
設計・リソース
その他の参考情報
NXPの「FS86:ドメイン・コントローラ用セーフティ・システムベーシス・チップ、ASIL BおよびDに適合」ページに加えて、以下のページもご覧ください。
- FS8500:S32マイクロコントローラ用セーフティ・システムベーシス・チップ、ASIL Dに適合
- FS8400:S32マイクロコントローラ用セーフティ・システムベーシス・チップ、ASIL Bに適合
- 車載PMICファミリ用NXP GUI
アプリケーション・ページ:

